
Dance Studio Manager Setup Guide
Memberships in DSM: build membership levels with member categories, then sell them with sales items.
Dance Studio Manager can be used to manage studio memberships such as Bronze Member, Silver Member, Gold Member, VIP Member, Trial Member, or Company Member. The most important thing to understand is that memberships in DSM are built from Member Categories, with optional Sales Items that assign or remove those categories when purchased.
A membership can be assigned manually on the member or account record, or automatically by selling a membership-related sales item. That makes memberships flexible enough for paid monthly plans, VIP programs, free trials, company access, discounts, special class access, or segmented marketing groups.
Important before you begin
In DSM, a sales item does not become a membership by itself. A membership is usually a Member Category assigned to a member. A sales item becomes membership-related when it belongs to a configured Membership Items Category and is set up to assign the correct member category when purchased.
Member Categories
These are the actual membership labels assigned to a member, such as Bronze Member, Silver Member, Gold Member, VIP, Trial Member, or Company Member.
Purchase Items Categories
These organize the sales items you sell. The Membership Items Categories setting tells DSM which purchase item categories should be treated as membership-related items.
Practical setup rule
Create the membership names under Member Categories, then create the sellable membership products under Sales Items.
Step 1: Create the membership names
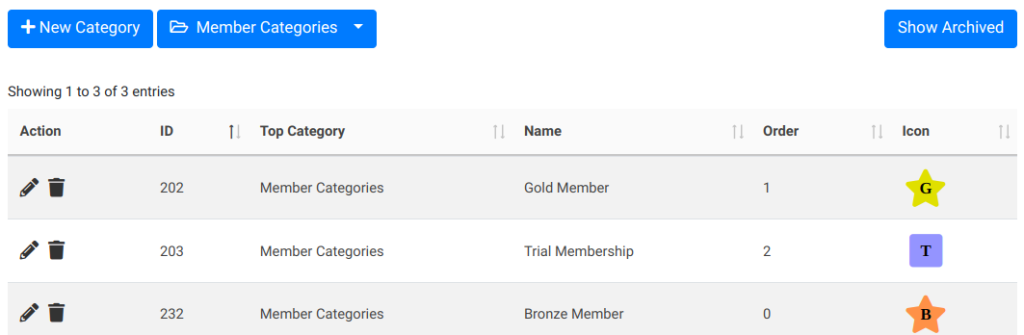
Go to Settings, then Categories, and choose Member Categories. Create one category for each membership level you offer.
- Bronze Member
- Silver Member
- Gold Member
- VIP Member
- Trial Member
- Company Member
These category names become the actual membership labels that are assigned to members.
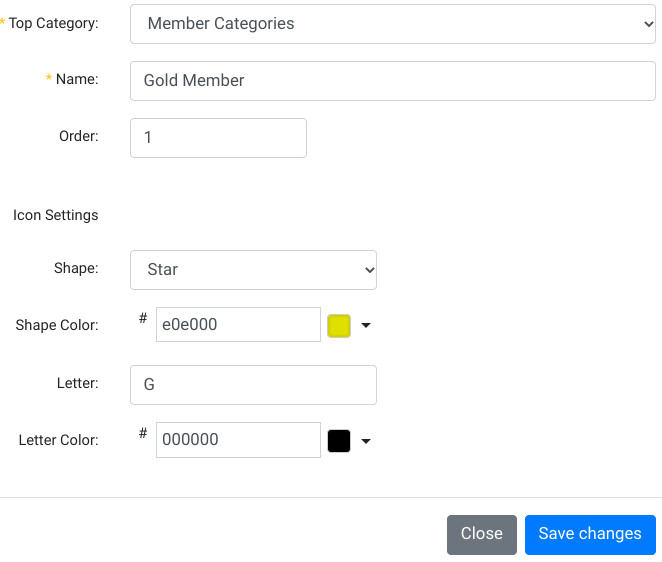
If you want icons to appear next to members, configure the icon fields on the member category itself. This is not a special membership-only feature. It is the general category icon system being used for membership categories.
For example, you might give Bronze Member a bronze star with a B, Silver Member a silver star with an S, and Gold Member a gold star with a G.
Step 2: Enable membership icons
To display those icons, go to Settings and then Global Settings. Search for icons and enable the relevant display settings such as Show Icons and Show Icons for Categories.
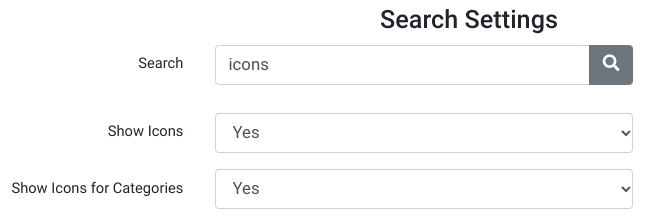
After that, the icons assigned to your member categories can appear in areas such as the member list, search, and attendance views.
Step 3: Create a purchase item category for memberships
This is a separate setup step from creating the membership names.
Go to Settings, then Categories, and create a Purchase Items Category such as:
- Memberships
- Monthly Memberships
- Annual Memberships
Then go to Settings, Global Settings, and locate Membership Items Categories. Select the purchase item category you want DSM to treat as membership-related.
This is the step that keeps the two category systems straight: Member Categories are the actual memberships assigned to people, while Purchase Items Categories organize the products being sold.
Step 4: Create the membership sales item
Go to Settings and then Sales Items. Create one sales item for each membership product you want to sell.
- Bronze Membership Monthly
- Silver Membership Monthly
- Gold Membership Monthly
For these items, the recommended setup is usually:
- Type: Item
- Purchase Category: your memberships purchase item category
- Price: the membership price
- Activation / Expiration: the membership term
- After Expiration: renewal behavior if needed
- Set Member Categories: the member category to assign after purchase
- Unset Member Categories: any old membership category that should be removed on upgrade
- Sell Online: enabled if members should buy it in the Online Client
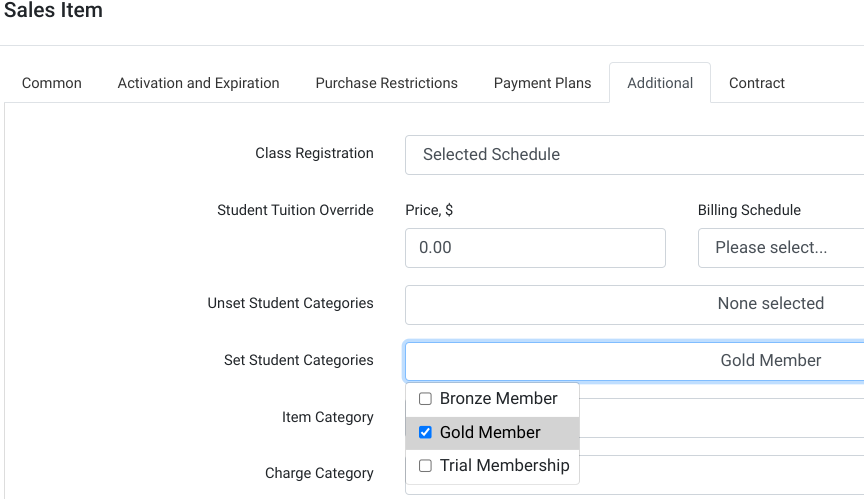

This is how DSM supports automatic membership assignment. The sales item purchase can set the correct member category and remove categories that should no longer apply.
Step 5: Configure recurring memberships
If you want monthly memberships to renew automatically, configure the sales item with recurring payment behavior and appropriate expiration or renewal settings.
DSM can store future scheduled payments with the member, purchase, amount, payment token, payment date, and status. For automatic card billing to work well, the member needs a usable saved payment method.
If a membership is later terminated, future scheduled payments tied to sales items that set that member category can also be terminated. That is one reason it is helpful to keep your membership structure clean from the beginning.
Step 6: Assign memberships manually when needed
You can also assign a membership manually by editing the member or account and selecting the correct member category.
For each membership category assigned to a member, DSM can store an activation date, expiration date, termination date, and status-related details. Manual assignment is useful when you are importing existing members, comping a membership, correcting an account, or assigning a membership outside the normal online purchase flow.
Step 7: Use memberships for access, discounts, and communication
Once memberships are assigned, they become useful in many parts of DSM.
Assigning a member category at Online Client registration
If you want everyone who registers through the Online Client to be placed into a particular member category automatically, DSM can do that too. This is helpful for tracking online leads, free-trial signups, or a general prospect group.
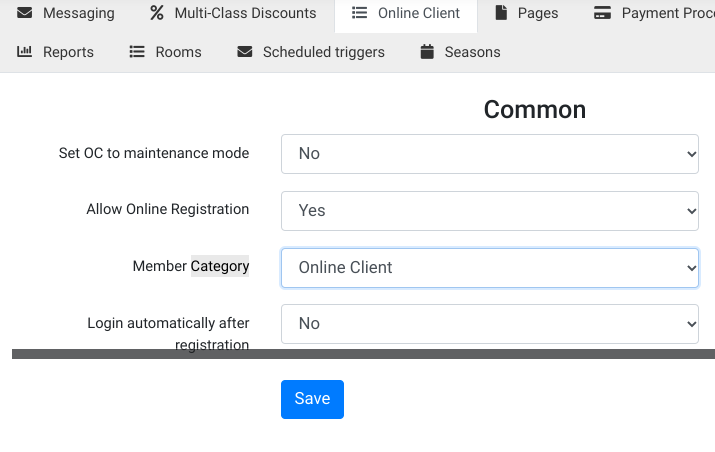
This is separate from paid memberships, but it uses the same underlying member-category structure. That means the same category system can support marketing groups, prospects, and true paid membership levels.
Private URL registrations and special event segmentation
If you host private events, birthday parties, or other registrations that should not be mixed into your normal marketing or membership communication groups, you can place those registrations into a separate member category as well.

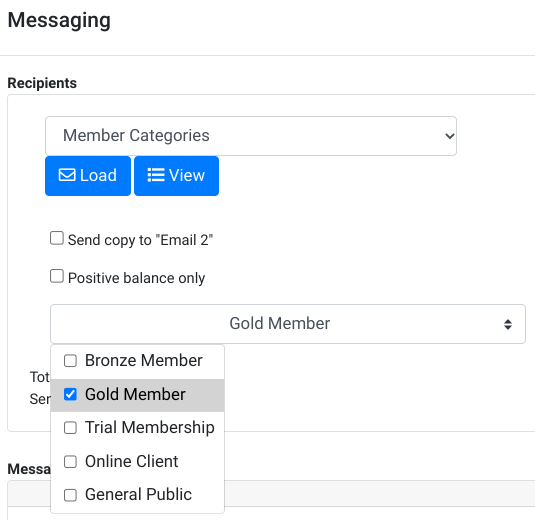
Emailing members by membership level
From Messaging, you can create an email or text message and target recipients by member category. This is helpful when you want to reach Bronze Members, Gold Members, VIP members, or trial members separately.
Notifications to special member groups
Client notifications can also be configured around special member categories. That lets you use targeted templates when clients cancel early, cancel late, or trigger other notification workflows.

Allowing unpaid registration for selected memberships
If members are on recurring plans, you may want to let them reserve classes just before the next renewal processes. DSM includes settings to allow unpaid registration for selected member categories and to control how far in advance they can register.


Members-only classes
When creating or editing a class, you can control who can view and register for it online. This lets you build members-only classes or special programs reserved for specific membership levels.

Restricting sales by member category
Sales items can be restricted so they are only sold to selected member categories, or hidden from selected member categories. This is useful when you want only active members, VIP clients, or a certain membership tier to see a special item.


Membership discounts
DSM supports member-category discounts. You can use item discounts or rates to give special pricing to members based on their assigned category.
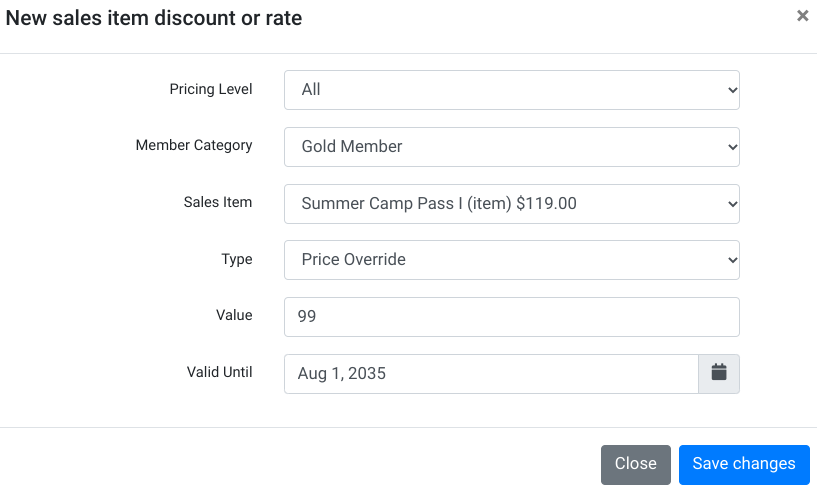
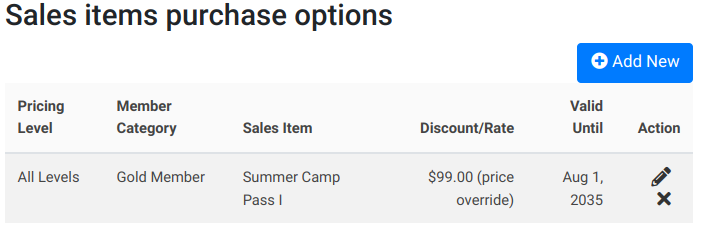
That makes it possible to create Bronze, Silver, and Gold pricing structures without creating a completely separate membership table.
Member-exclusive videos
Videos can also be limited to selected member categories. That is a useful way to provide member-only training content, bonus lessons, or special event material.

For membership-based late-cancel or no-show policies, see Charge for Late Cancels or No Shows.
Step 8: Renewal, termination, and on-hold memberships
Memberships in DSM are not just labels. They can carry activation, expiration, and termination dates, and recurring membership sales items can create future scheduled payments tied to those memberships.
That matters in a few practical ways:
- A membership can be active now, upcoming in the future, expired, terminated, or on hold depending on its dates and related payment state.
- Recurring membership payments can continue automatically when the membership is configured to renew.
- If a membership category is terminated, future scheduled payments tied to that membership can also be terminated.
- On-hold memberships can be reviewed separately so you can distinguish a paused member from a truly cancelled one.
This is one reason the Membership report is valuable: it is not just a list of names. It helps you review lifecycle status and follow up on memberships that are about to renew, have expired, or are currently paused.
Step 9: Review memberships
Go to Reports and open the Membership report to review membership activity. The report can show membership-related information such as member name, contact details, membership, location, activation date, expire or renew date, termination date, and renewal counts.
The report can also help distinguish active, upcoming, and on-hold memberships. That makes it useful for tracking who currently has access, who is about to renew, and which memberships may be paused or need follow-up.
Frequently asked questions about memberships
What is a membership in DSM?
A membership is usually a Member Category assigned to a member or account, such as Bronze Member, Silver Member, Gold Member, VIP Member, or Trial Member.
What is the difference between Member Categories and Membership Items Categories?
Member Categories are the labels assigned to members. Membership Items Categories are purchase item categories that tell DSM which sales items should be treated as membership-related purchases.
Can memberships be sold online?
Yes. Create a sales item for the membership, make it visible online, assign it to the correct Membership Items Category, and configure it to set the correct Member Category after purchase.
Can memberships renew automatically?
Yes. Membership sales items can be configured with recurring payment behavior and automatic renewal, assuming payment processing is set up and the member has a saved payment method.
Can a membership give discounts?
Yes. DSM supports member-category discounts, which can apply pricing advantages based on the member’s assigned category.
Can members have icons for their membership level?
Yes. Assign icons to the relevant member categories and enable icon display in settings.
Can I manually assign a membership?
Yes. Edit the member or account and assign the appropriate member category, along with activation and expiration dates when needed.
Need help setting up memberships?
If you are building your membership program for the first time, the cleanest path is usually to define your membership names first, then build the sales items that assign them, then decide how those memberships affect access, discounts, renewals, and communication.
If you want help designing the structure, contact Dance Studio Manager or ask in the support forum.