
Dance Studio Manager Help Guide
How to Transfer a Student from One Class to Another Without Losing History
The safest transfer is usually to remove the student from future schedules in the old class and then add the student to the new class. That keeps past history intact while helping future schedules, attendance, and tuition stay accurate.
Quick answer: If the student has already attended or paid, do not rush to complete delete. In most transfer situations, Future Schedules is the better choice because it changes the old enrollment from In Class to Archived while preserving the historical record.
If you also need to review what happens after the move, see Processing Tuition and Emailing Statements and Tuition Override.
Sometimes a student needs a different level, a different teacher, or a different day and time after the season has already started. In Dance Studio Manager, you do not need to delete the student’s full history in order to make that change.
This is especially important if the student already has attendance, tuition charges, or payment history tied to the original class. A good transfer should keep the old record useful while making the new class the active enrollment going forward.
Step 1: Open the Student’s Current Class
Go to the family account, open Related Students and Classes, and find the class the student is currently enrolled in. Click Delete next to that class enrollment.
Even though the button says Delete, this is not always a full erase. Dance Studio Manager gives you multiple removal choices depending on whether you want to remove one meeting, future schedules only, or the complete enrollment.
Step 2: Choose the Right Removal Option
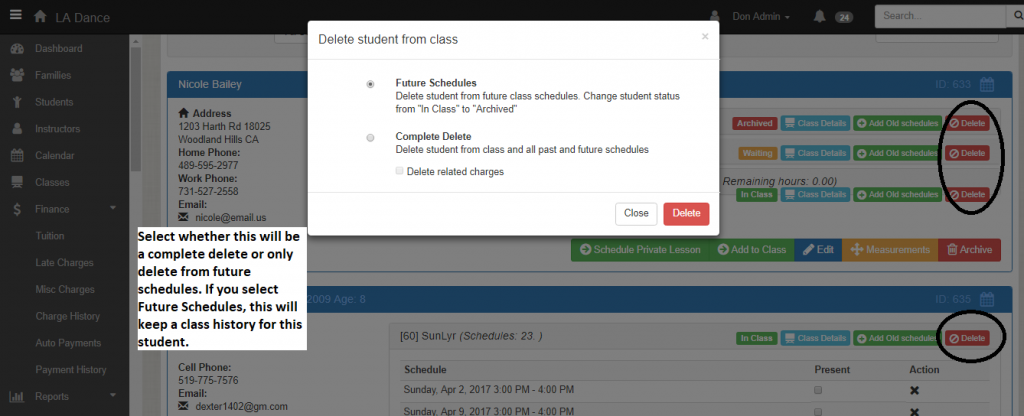
When the delete window opens, you will see three choices. The right one depends on whether you are correcting a mistake or doing a real transfer.
Future Schedules
Use Future Schedules when the student is leaving the class going forward but you want to keep past attendance and history. This is usually the best transfer option. It removes the student from upcoming schedules in the old class and changes the class status from In Class to Archived.
Selected Schedule
Use Selected Schedule when you only need to remove the student from one specific meeting. This is helpful for one-off schedule cleanup, but it is usually not the right tool for a full class transfer.
Complete Delete
Use Complete Delete only when you truly want to remove the student from both past and future schedules in that class. If the student has already attended, been charged, or built history there, this option is usually too aggressive.
Best practice: For most real transfers, choose Future Schedules, not Complete Delete.
Step 3: Add the Student to the New Class
After removing the old future schedules, click Add to Class for that student.
The Add Student to Class form can include much more than a class picker. Depending on how your studio is set up, it may show billing schedule details, sales item or purchased package options, price override, schedule selection, status options such as active or waiting, registration fee settings, warnings, and an ignore warnings and continue option.

Step 4: Review Price, Status, and Schedules Before Saving
Before you confirm the move, review the details carefully:
- Make sure the student is being added to the correct class and schedule dates.
- Check whether the new class uses a billing schedule or a sales item/package workflow.
- Review the student’s status in the new class.
- Look closely at the new class price before saving.
If the family already paid for the original class, you may not want the new class to bill at the full standard rate. In that situation, a price override or manual adjustment may be appropriate. If you need help with the billing side afterward, these related guides are worth reviewing: Processing Tuition and Emailing Statements and Tuition Override.
Step 5: Save the New Enrollment and Double-Check the Result
Click Add Student to Class to finish the transfer. The new class should now be the student’s active class, while the old one remains archived for reference if you used Future Schedules.
After saving, it is smart to check the student’s upcoming schedules and ledger. That confirms the student was added to the right meetings and that future billing will be based on the new active enrollment.
Why This Matters for Tuition and History
Normal tuition processing only includes active class enrollments. If the old class stays active when it should have been archived, that student may still be included in future Global Tuition calculations for the wrong class.
That is why the transfer process matters. You are not only cleaning up the class screen. You are protecting future tuition accuracy while preserving useful attendance and enrollment history.
If you also need to confirm attendance after the move, see Marking Attendance in Dance Studio Manager.
Common Questions
Will this delete the student or family account?
No. You are only changing the student’s enrollment in that class, not deleting the student or family record.
Which option should I use for most class transfers?
Usually Future Schedules. It removes upcoming meetings in the old class while preserving past history.
When is Complete Delete appropriate?
Mostly when the student was added to the wrong class by mistake and no real history needs to be preserved.
Can I adjust the price when moving the student?
Yes. The add-to-class workflow can show pricing fields, and you can review or override the amount before saving when needed.
Need help with transfers, tuition, or setup questions?
Browse more help articles in our FAQ, or contact us if you want help with your specific studio workflow.
You can also review related guides on tuition processing, tuition override, and attendance tracking.