Classes, Sales Items, and registration
Assign Sales Items and pricing options to a class
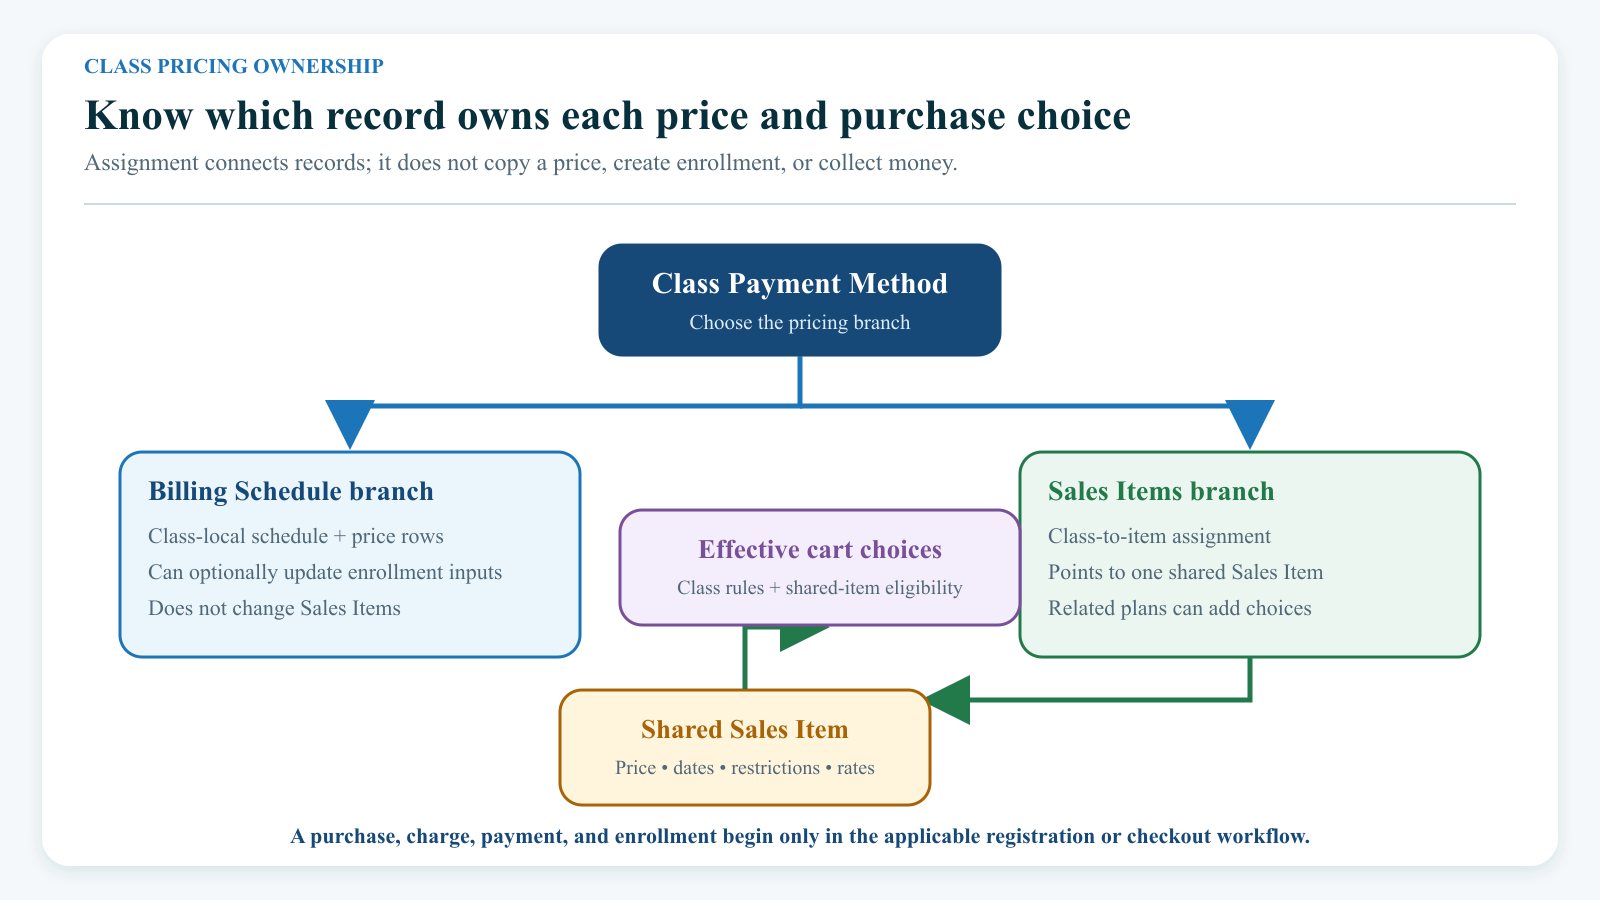
Assigning an item creates a link between the class and the shared Sales Item. It does not copy the item's price, create a purchase, enroll a student, add a charge, or collect a payment.
#Before you begin
- Confirm that you are authorized to change both class registration and pricing availability. Use your own staff account; do not use a shared administrator login or a copied direct URL.
- Decide whether the class uses Billing Schedule or Sales Items under Details > Payment > Payment Method.
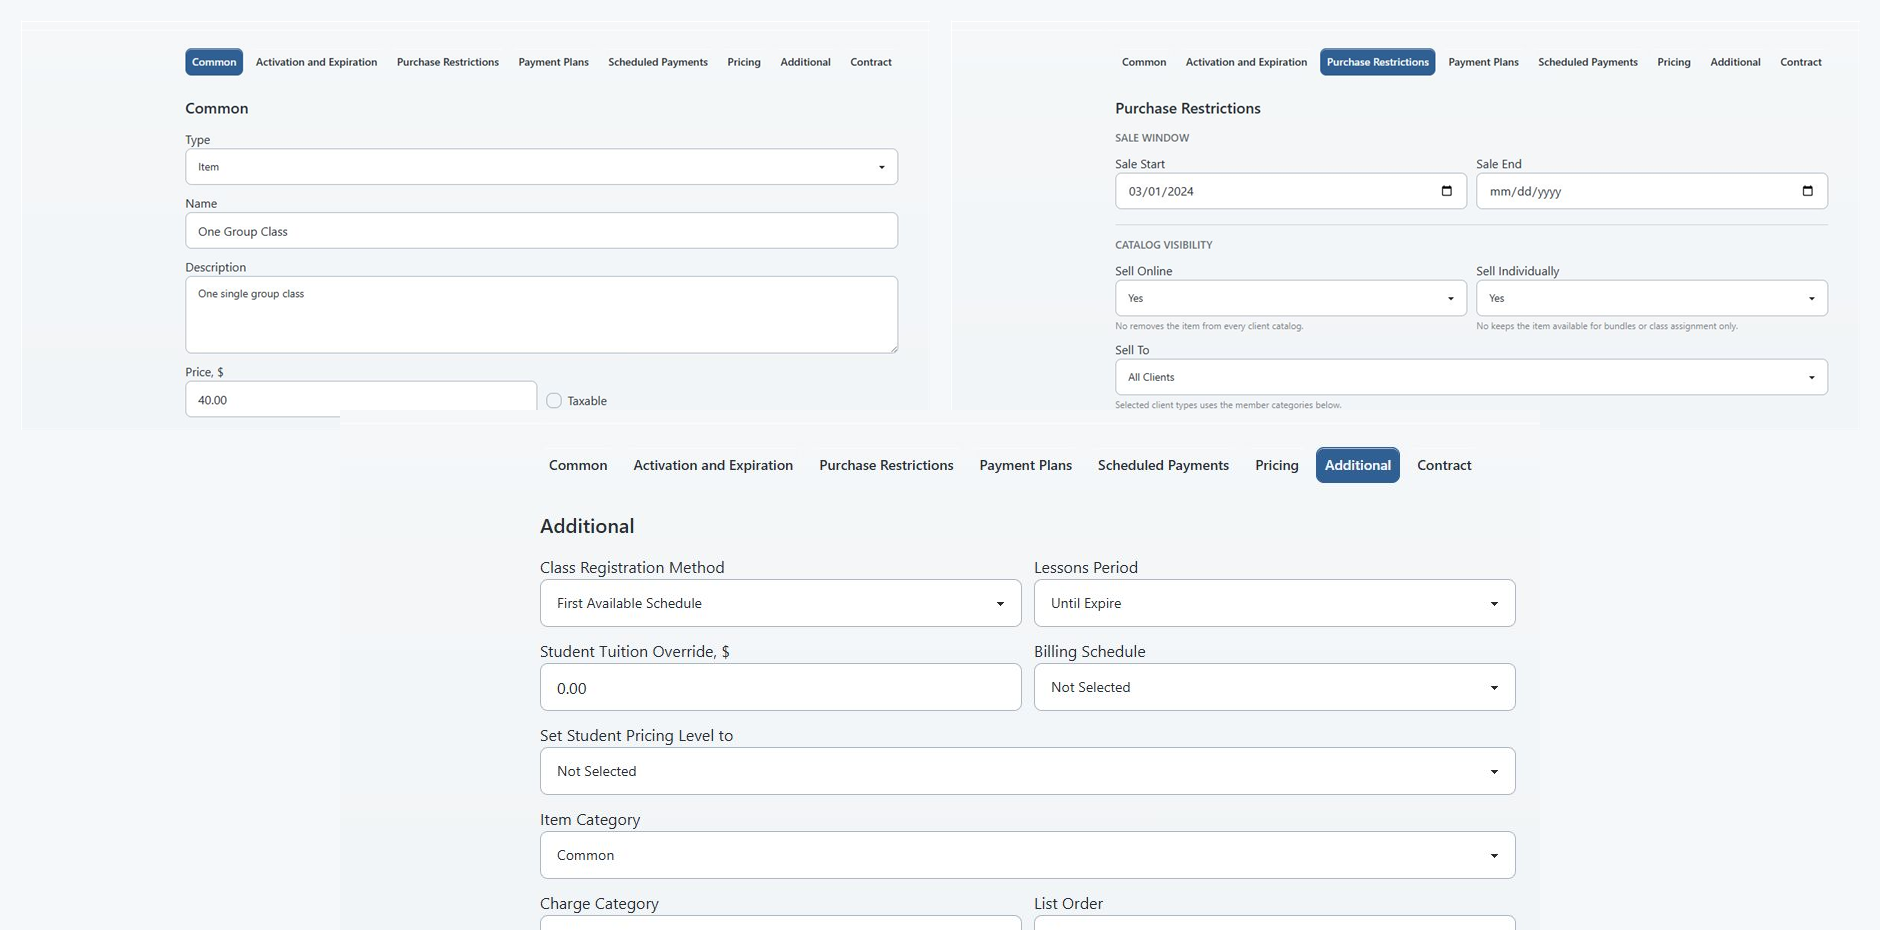
- Review the Sales Item under Settings > Sales Items before assigning it. Check its type, status, visibility, base price, sale dates, season settings, purchase restrictions, class-registration method, limits, rates, related packages, and payment plans.
- Name the exact fictional or controlled student who should see the option and one who should not. Staff and Online Client eligibility are not identical.
- Record the class's existing assigned items, including archived items, before changing anything. The assignment page does not provide an assignment-specific history or undo action.
- Use a processor sandbox, a pay-later test method, or stop before checkout submission. Never use a real client's payment method for documentation or configuration testing.
Important: An item in Available Sales Items is not necessarily suitable for class registration. The page can list products, bundles, archived items, hidden items, restricted items, and items outside their intended sale window. The class page shows only the item name, base price, and active/archived state; it does not show every eligibility rule.
Important: Do not rely on the Sales Item's Sell Online setting alone to keep a class-registration option private. The class-registration path has its own availability rules. Leave an item unassigned until it is ready, close class registration while testing, and verify the result with a controlled Online Client account.
#Understand the records before changing them
| Record or control | What it owns | What assignment changes | What assignment does not change |
|---|---|---|---|
| Class Payment Method | Whether the class primarily uses Billing Schedule prices or Sales Items | Determines whether Sales Items are required or optional for this class | The Sales Item's own price, restrictions, payment plans, or rates |
| Class-to-Sales Item assignment | Which shared items are connected to the class | Makes an item eligible to participate in class purchase and staff enrollment paths | Purchases, charges, payments, enrollments, or schedule attendance |
| Shared Sales Item | Base price, type, sale dates, registration method, units, limits, restrictions, rates, and related records | Nothing is copied into the class | Class-specific settings; edits affect every place that uses the item |
| Sales Item payment plan or related package | Additional ways the Sales Item can be purchased | Can expand one assigned item into several visible purchase choices | A separate class-local price |
| Class Billing Schedule price row | A class-specific Billing Schedule and price | Provides a separate pricing branch for Billing Schedule classes | Sales Item availability or Sales Item settings |
| Purchase, order, enrollment, charge, or scheduled payment | A completed staff or client transaction | Created only by the applicable enrollment or checkout action | Removed or reversed merely because an item is unassigned later |
Two assigned Sales Items are normally alternative choices. Their prices are not added together to create one class price.
#When the Sales Items tab appears
The Sales Items tab normally appears when either of these is true:
- Details > Payment > Payment Method is Sales Items.
- The class uses Billing Schedule and Allow Drop In is selected.
The tab is not shown for a recital class.
If you change the payment method or drop-in setting, select Save changes on Details before opening the Sales Items tab. Reopen the class so you are working from the saved configuration.
Note: A Billing Schedule class can show the Sales Items tab because Allow Drop In is selected even when the Online Client setting that permits Sales Items on regular classes is not enabled. Treat the class setting and the Online Client result as two separate checks.
#Prepare a Sales Item for this class
- Open Settings > Sales Items.
- Select the item you intend to assign.
- Confirm its exact name and record ID in your change record. Similar names are easy to confuse on the class page.
- Confirm the item type. Use extra caution with a bundle, because completing a bundle purchase can enroll the buyer or register schedules across the classes connected to that bundle.
- Confirm the base price and any member-category or pricing-level rates.
- Confirm whether the item can be sold individually. A directly assigned item that is not individually sellable can be omitted from the Online Client choice while still appearing in some staff paths.
- Confirm Active/Archived, visibility, season-sale settings, sale start and end, purchase restrictions, and quantity or per-client limits.
- Review its class-registration method and number of lessons, hours, or credits. These settings can determine which schedules are attached or how the resulting purchase is used.
- Review related packages and payment plans. A related package can appear as another option even when that package is not directly assigned to the class.
- Save the item only if you intended to change the shared record. Then return to the class.
Warning: Editing the Sales Item changes the shared item everywhere it is used. If this class needs a distinct price or registration behavior, create a dedicated Sales Item and assign that item instead of changing a widely shared one.
#Assign a Sales Item
- Open Group Classes.
- Select the class.
- Select Sales Items.
- Select Active.
- Compare Available Sales Items with Assigned Sales Items.
- Record every current assigned item. Select Archived, then All, and record those assignments too.
- Return to Active.
- In Available Sales Items, select the exact item you reviewed.
- Select Add Selected.
- Confirm that the item moved to Assigned Sales Items. This is still an unsaved page draft.
- Review Active, Archived, and All again. Confirm that only the intended items are assigned.
- Select Save changes.
- Wait for Sales items updated.
- Reload the page and repeat the Active, Archived, and All review.
Warning: Avoid Add All and Remove All. Those buttons act on the full in-memory list, including archived items hidden by the current filter. The confirmation does not list the affected items.
If you moved the wrong item but have not selected Save changes, reload the page and start again. If you already saved, use the recovery procedure below.
#Edit one assigned item from the class
If your role can edit Sales Items:
- Open the class's Sales Items tab.
- Select exactly one item under Assigned Sales Items.
- Select Edit Item.
- Review or edit the shared Sales Item.
- Save only the intended shared changes.
- Return to the class and verify the assignment again.
- Repeat the staff and Online Client checks below.
Edit Item is unavailable when no item is selected, more than one is selected, or your role cannot edit Sales Items.
The price displayed on the assignment page is the shared item's base price. It may not be the final price for a particular student. Rates, the selected student's categories or pricing level, a payment plan's first payment, discounts, fees, taxes, and a staff price override can change the amount shown in the cart or at checkout.
#Offer more than one purchase option
Assign additional items only when each option has a clear purpose, such as a single visit and a multi-visit package.
For every option, document:
- the exact Sales Item and ID;
- the intended student or client category;
- the base and expected effective price;
- the sale and season window;
- the registration method and included units;
- any related package or payment plan;
- where staff should use it;
- where the Online Client should see it; and
- the expected result after checkout.
Multiple assigned items appear as alternatives, not as a combined total. One direct item can also produce Pay in Full plus one or more payment-plan choices. A related package can add another choice. Test the complete choice list so clients do not see duplicate or confusing offers.
Warning: Assign a bundle only after reviewing every class connected to it and completing a controlled checkout rehearsal. Bundle checkout can use the class assignments to create enrollments or schedule registrations across more than one class.
#Verify the staff experience
Assignment alone has no financial effect. The next staff action can.
- Use a controlled student with no real balance or payment method.
- Open the class's Students tab or the applicable occurrence in the Calendar day view.
- Start the normal Add Student or Sales Package workflow without submitting it.
- Confirm that the intended new Sales Item is available.
- Confirm that unrelated, archived, or restricted items are not being chosen merely because they appear in the staff list.
- Confirm the selected student, class, schedule, item, units, and price.
- If the staff path allows an editable price, compare it with the approved amount before continuing.
- For a checkout workflow, add the controlled item to the Shopping Cart and stop before payment submission.
- Clear the test cart after recording the result.
Depending on the path and item settings, completing the action can create a purchase, charge, enrollment, and schedule links. Follow the enrollment and Shopping Cart guides for those actions; do not treat the class assignment as proof that those records were created.
#Verify the Online Client experience
- Sign in with the controlled client account.
- Select the exact eligible student.
- Find the class through the normal Online Client registration path.
- Open its purchase options.
- Confirm that the intended direct item, related package, and payment-plan choices appear—or do not appear—exactly as designed.
- Repeat the check with a controlled student who should be ineligible.
- Add the eligible choice to the cart without submitting checkout.
- Confirm the student, class, occurrence, item, effective price, first-payment amount when applicable, and final due amount.
- Clear the controlled cart.
An active assigned item can still be absent because of visibility, individual-sale, season, sale-date, type, registration, member-category, client-type, new-client, quantity, or per-customer rules. A future sale may appear disabled until its start date. An expired sale should not remain available.
Important: Hiding a price on the class list does not make the option free. The cart and checkout remain the financial source of truth for the selected student.
Important: Staff and Online Client paths apply different rules. Passing the staff check does not replace the Online Client check, and the reverse is also true.
#Use Billing Schedule prices instead
Billing Schedule prices are not Sales Item assignments.
- Open the class's Details tab.
- Under Payment, set Payment Method to Billing Schedule.
- Under Pricing (Billing Schedules), add a row for each supported Billing Schedule and price.
- Remove incomplete or duplicate rows.
- Leave Update Price and Billing Schedule for Students cleared unless there is exactly one approved row and you have rehearsed the effect on a disposable class.
- Select Save changes.
- Verify each choice through the applicable registration path.
Warning: In the current build, selecting Update Price and Billing Schedule for Students while more than one pricing row exists can set every existing class enrollment to the final row's price and Billing Schedule. It does not preserve each student's previous choice. Leave the option cleared and update existing enrollments individually through the approved pricing workflow.
When multiple Billing Schedule rows are available, the Online Client can be directed to a purchase-options page to choose between them. Those choices are separate from assigned Sales Items.
#Remove an assignment safely
Unassigning an item removes that direct class link. It normally stops the item from being offered directly after the relevant pages are refreshed, but related-package and other catalog paths must be checked separately. It does not cancel or reverse history.
- Close or contain new registration while you test the change.
- Record the current Active, Archived, and All assignment lists.
- Inventory existing carts, purchases, enrollments, schedule links, charges, payment plans, and unused purchase credits that depend on the item.
- Clear controlled test carts.
- Open Group Classes, select the class, and select Sales Items.
- Select All so the complete relationship is visible.
- Select the exact item under Assigned Sales Items.
- Select Remove Selected.
- Review the full assigned list.
- Select Save changes.
- Reload and confirm the item is under Available Sales Items, not Assigned Sales Items.
- Repeat the staff and Online Client checks.
- Rebuild any controlled cart from a fresh class page; do not assume an already-open cart was cleaned automatically.
Warning: Removing an assignment does not refund a payment, cancel a purchase, delete an order, remove an enrollment, detach historical schedules, reverse a charge, stop an existing payment plan, or notify a client. Use the appropriate finance, purchase, and enrollment workflows for any approved correction.
An unused purchase credit originating from the item can also stop being offered for this class after the assignment is removed. The shared Sales Item remains available anywhere else it is still configured for use.
#Recover from a wrong assignment
#The wrong item was moved but not saved
Reload the page. Confirm the original list, then repeat the procedure with Add Selected or Remove Selected.
#The wrong assignment was saved
- Contain registration and ask staff not to use the affected option.
- Preserve the before-state record and note the time of the incorrect save.
- Reopen Sales Items and select All.
- Restore the exact prior assigned list with Add Selected and Remove Selected.
- Select Save changes.
- Reload and verify both staff and Online Client paths.
- Inspect activity during the affected window for carts, purchases, enrollments, charges, or scheduled payments.
Reassigning the item restores the link only. It does not undo a transaction that happened while the wrong state was active.
#A transaction used the wrong item or price
Stop changing the class assignment. Preserve the order, purchase, charge, payment, enrollment, and processor references. Follow the approved purchase or finance correction workflow, with processor reconciliation when money moved.
#Confirm it worked
- Sales items updated appeared after the save.
- A full reload shows the exact intended Assigned Sales Items under Active, Archived, and All.
- The shared Sales Item still has the intended type, status, restrictions, registration method, units, rates, related packages, and payment plans.
- The controlled staff path shows the correct option and approved price.
- The eligible Online Client student sees the expected choices.
- The ineligible controlled student does not receive an unintended choice.
- The cart shows the correct student, class, occurrence, item, effective price, payment-plan amount, and total.
- No real checkout, charge, payment, message, or enrollment was created during a read-only rehearsal.
- After a removal, historical records remain reconciled and no new registration path offers the removed item.
#Troubleshooting
#The Sales Items tab is missing
Confirm that the saved Payment Method is Sales Items, or that the Billing Schedule class has Allow Drop In selected. Reopen the class after saving. The tab is intentionally hidden for recital classes. If your role is not intended to change class pricing, ask an administrator to review the role; do not use a direct URL.
#The item is missing from Available Sales Items
Select Archived, then All. The item may already be assigned, archived, or saved under a similar name. Search the shared Sales Items list by its exact ID before creating a duplicate.
#An archived item disappeared while I was working
The filter hides it; it does not remove it from the page's underlying assignment state. Select All and review again before saving. Avoid the bulk buttons.
#Edit Item is missing or disabled
Select exactly one assigned item. If the button remains missing, your role does not have Sales Item edit access. Assignment access and shared-item edit access should be reviewed separately.
#The save succeeded, but the wrong items are assigned
Select All, compare the list with the before-state record, and restore the exact prior list. If the same item appears more than once or the list changes unexpectedly after reload, stop using the page and contact support rather than using Remove All.
#Staff can see the item, but the Online Client cannot
Check the item's active/archived state, visibility, individual-sale setting, type, season-sale status, sale window, purchase restrictions, registration method, quantity limits, and the selected student's categories or history. For a Billing Schedule class, also confirm the global setting that allows Sales Items for regular classes.
#The Online Client can see an item that has Sell Online turned off
Treat the class assignment as a separate exposure path. Close registration or remove the assignment, reload with a controlled client account, and verify the result. Do not assume Sell Online alone controls the class-registration offer.
#The item is visible but disabled
Check the sale start date and the selected student's eligibility. A future sale can be listed before it becomes purchasable. Also confirm class and season registration status.
#The price differs from the class assignment page
The assignment page shows the base Sales Item price. Confirm the selected student, pricing level, active member categories, Sales Item rates, payment plan, discounts, fees, taxes, and any staff-entered price override. Use the cart and checkout review as the final expected amount.
#An unexpected package or payment plan appears
Review the assigned item's Related Items and payment plans. One direct assignment can produce multiple purchase choices without every choice being directly assigned.
#An existing purchase credit disappeared from the class choices
Confirm that the Sales Item that originated the credit is still assigned to this class and that the credit remains active, unexpired, season-eligible, and unused. Reassign only when the item should genuinely remain valid for new class usage.
#Removing the assignment did not remove an old purchase or charge
That is expected. Assignment controls future eligibility; it is not a finance reversal or enrollment deletion. Reconcile the existing records through their own workflows.
#The option remains in an already-open cart
Clear the controlled cart, reopen the class, and build it again. New cart additions are checked against current availability, but do not rely on unassignment to clean or reverse an existing cart or completed checkout.
#A bundle affected more classes than expected
Contain new sales immediately. Preserve the bundle, assigned class list, order, purchase, and enrollment results. Do not delete assignments or enrollments blindly. Ask support and finance to reconcile the complete bundle result before changing more records.
#Protect client and financial information
- Use fictional adults, students, classes, items, and balances for screenshots, videos, testing, and support reproduction.
- Do not expose real names, email addresses, phone numbers, birth dates, member-category details, balances, order references, processor IDs, payment tokens, or card and ACH information.
- Keep the browser frame limited to the relevant page. Exclude unrelated tabs, notifications, password managers, developer tools, and autofill suggestions.
- Use addresses in the approved non-deliverable documentation domain and a controlled mail sink if an end-to-end workflow could send a message.
- Stop before live payment submission. Mask the payment method even in a processor sandbox.
- Record who approved the price, eligibility, bundle scope, and recovery plan. Class assignment changes can affect what staff sell and what clients can purchase.
#Related articles
- Group Classes
- Create a group class
- Launch a class for online registration
- Create a Sales Item
- Offer and create payment plans
- Manage student enrollment
- Manage class capacity, waitlists, and drop-in registration
- Manage class charges and pricing overrides
- Staff Shopping Cart and checkout
- Review purchases
- Roles and permissions
- Find and change Global Settings safely
- Find and register for classes
- Online Client checkout