Settings
Brand the Online Client and admin header
#Before you begin
- Keep an approved copy of the original logo outside the software.
- Prepare a logo with enough contrast for the intended theme and with no private client or staff information.
- Record the current theme, colors, logo height, and visibility choices.
- Decide whether the logo should appear on Client Home, in the admin header, or both.
- Confirm the studio website address before turning on the logo link.
- Plan to check signed-out, signed-in, desktop, and mobile Online Client views after saving.
Warning: Remove existing logo removes the stored logo when you save. Keep the source file so you can upload it again if the change must be reversed.
Important: The preview on this page is a representative sample, not a complete preview of every Online Client screen. Text, tables, schedules, forms, and images can expose contrast or spacing problems that do not appear in the sample card.
#Understand the page
The page has two main sections.
| Section | What it controls |
|---|---|
| Logo | The uploaded logo, its height, whether it appears on Client Home or in the admin header, and whether it links to the studio website. |
| Online Client Theme | A theme preset, primary and secondary colors, and rounded-corner styling for supported Online Client elements. |
The Online Client Theme is separate from an individual staff member's admin theme preference. Changing the client theme does not select a new admin color scheme for every staff account.
Some studios can show a mode-disabled badge beside a section. When a section is disabled, its controls are unavailable even if your login normally has Settings access.
#Prepare the logo file
The current upload accepts JPG, PNG, GIF, SVG, and WebP files. The file must be no larger than 2 MB and no wider than 2,000 pixels or taller than 1,000 pixels.
For a clean result:
- use a transparent-background PNG or SVG when the approved logo supports it;
- leave comfortable space around the artwork;
- avoid very small lettering that becomes unreadable in a header;
- test the logo against both the navigation color and a light page background; and
- use a fictional or approved studio image while building a demo or training site.
An accepted file type or size does not guarantee that the artwork will be legible. Review the rendered result at the actual header size.
#Upload or replace the logo
- Select Settings > Branding & Logos.
- In Logo, select the logo file.
- Confirm that the local preview shows the intended artwork.
- Turn Show logo on Client Home on or off as approved.
- Turn Show logo in Admin header on or off as approved.
- Set Logo height (px) between 24 and 300.
- Turn Link logo to school website on only when the configured studio website is correct.
- Leave Remove existing logo cleared when uploading a replacement.
- Continue to the theme review before saving.
Selecting a file changes only the local preview until you select Save branding. If the file is rejected, correct the reported type, size, or dimensions and select it again.
#Remove the logo
- Select Settings > Branding & Logos.
- In Logo, select Remove existing logo.
- Review Show logo on Client Home and Show logo in Admin header so the stored visibility choices match the intended no-logo state.
- Select Save branding.
- Reload the page and confirm that No logo selected appears.
Warning: Saving the removal deletes the stored logo asset. This is not the same as temporarily hiding it with a display switch.
If you may want the logo again, leave the asset in place and turn off the appropriate display switch instead.
#Choose the Online Client theme
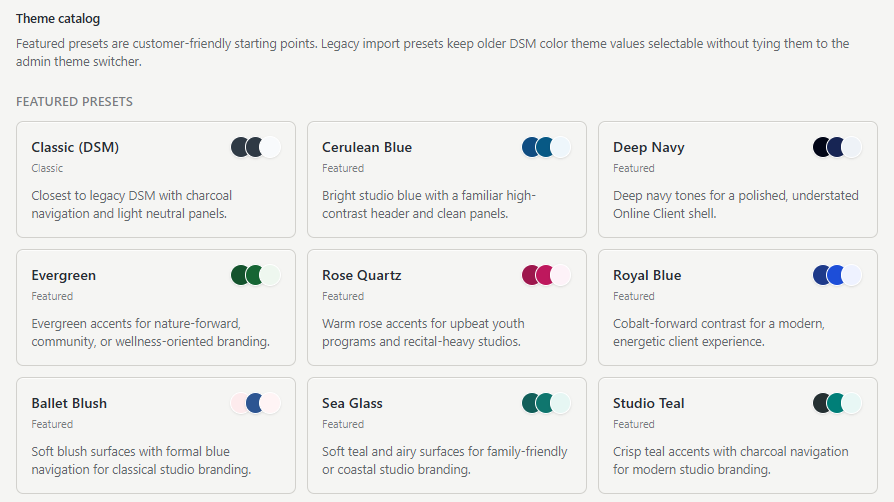
- In Online Client Theme, review the choices under Theme catalog.
- Select a starting preset under Featured presets or, when appropriate, Legacy import presets.
- Review the sample header, card, link, primary action, and color values.
- Adjust Primary color and Secondary color only when the studio has approved custom colors.
- Turn Use rounded corners on buttons and cards on or off.
- Check the preview again for readable text, visible focus states, and clear primary and secondary actions.
- Select Save branding.
The color controls use six-digit hexadecimal colors. A color can be valid and still fail accessibility or brand requirements. Do not rely on color alone to communicate a status, error, or required action.
#What happens next
Selecting Save branding stores the writable logo and theme choices for the current studio. A new logo replaces the previously stored logo. The software refreshes its branding data and regenerates the supported Online Client branding stylesheet when theme or color settings change.
The saved theme can affect navigation, links, buttons, cards, tables, schedules, forms, badges, and other supported Online Client elements. Pages that use their own images or embedded content can still need separate review.
Saving branding does not:
- create or correct the studio website address;
- guarantee that a missing logo file was restored;
- update logos inside previously created PDFs, messages, or uploaded documents;
- prove that every page meets contrast requirements; or
- change the underlying content shown to clients.
#Confirm it worked
- Reload Settings > Branding & Logos and confirm the saved logo, preset, colors, and switches.
- Open the signed-out Online Client home page in a private window.
- Sign in with a fictional client and review the home page, schedule, registration, Shopping Cart, and one form with validation messages.
- Review the same pages at a mobile width.
- When Link logo to school website is on, select the logo and confirm it opens the approved destination.
- When Show logo in Admin header is on, reload an admin page and confirm the logo does not crowd navigation or account controls.
- Check keyboard focus, link visibility, button contrast, and error messages rather than judging only the overall palette.
Record the approved theme name, color values, logo filename, and review date. Do not record private storage paths or unrelated server diagnostics in customer-facing notes.
#Troubleshooting
#The logo upload is rejected
Confirm that the file is a JPG, PNG, GIF, SVG, or WebP, no larger than 2 MB, and within 2,000 x 1,000 pixels. Re-export the image rather than renaming an unsupported file extension.
#The page reports that the stored logo file is missing
The setting can refer to a file that is no longer available in storage. Upload the approved source file again and save. Do not copy internal logo diagnostics into a public ticket or screenshot without a privacy review.
#The logo is saved but does not appear on Client Home
Confirm Show logo on Client Home is on, the Logo mode is enabled, and the current page is using the same studio. Then reload without an old cached page.
#The logo link does not work
Confirm Link logo to school website is on and that the studio website is configured correctly in Settings > Global Settings. The logo must also be visible for the link to be available.
#The admin header did not change
Confirm Show logo in Admin header is on and reload the admin page. The Online Client theme itself does not replace each staff member's admin theme preference.
#The colors saved but a page is hard to read
Restore the recorded theme and colors, then test a different preset or higher-contrast custom colors. Review the actual problem page; the sample preview cannot represent every content combination.
#Branding controls are disabled
A studio mode can disable logo, theme, or color management. Record the disabled badge and ask an owner, administrator, or support contact to confirm whether the mode should be enabled. Do not try to bypass the disabled control through Legacy settings.