Communications
Choose message recipients and send safely
Current channel status: Use this procedure for Email only. The individual composer currently blocks SMS, and it does not offer a working push option. SMS, TTS, and client-message templates can appear elsewhere in Messaging, but the current bulk process submits through the email/SMTP transport. Do not select Start Sending for an SMS, TTS, push, or client-message template until that channel has a separately verified end-to-end procedure.
#Before you begin
- Confirm who requested the message, its purpose, and the exact people who should receive it.
- Confirm that your login group permits both template work and sending. Access to a family, student, class, schedule, or staff screen does not by itself prove permission to send.
- Confirm that the SMTP notice on Prepare to Send reports a usable email configuration and approved sender.
- Correct invalid, shared, duplicate, or outdated addresses before building the queue.
- Confirm the studio's consent and opt-out records. The current broad recipient builder does not provide a general consent or unsubscribe filter.
- Use a controlled staff mailbox for the test. A test address is a real outbound destination.
- Use synthetic data for screenshots, recordings, rehearsals, and training sends.
Warning: Prepare to Send loads a queue automatically when the page first opens. That first total can represent the default audience, not the audience you intend. Choose the correct source and filters, then select Load yourself before reviewing or sending.
Warning: Start Sending begins real outbound email. Pause and Cancel cannot recall email already submitted.

#Choose the narrowest accurate source
Recipient selection is safest when it starts from the operational screen that defines the audience.
| Need | Preferred starting point | What the selection means |
|---|---|---|
| One family, student, or account | The exact person's account and Compose Message | One address selected from that record, or an explicitly entered custom address |
| People enrolled in a class | Group Classes > class > Students | Exact checked rows from the class enrollment roster and its selected enrollment-status view |
| People associated with one dated occurrence | Day View > occurrence roster | Exact checked rows from one schedule occurrence; attendance/status remains visible for manual selection |
| A reviewed list of account records | Launch an email with exact selected records so Selected Students appears | The selected member IDs and each selected record's stored email address |
| Instructors or staff | Prepare to Send > Instructors, only after a staff-address audit | Every staff row with an email address; current expansion does not filter inactive staff |
| A category-based audience | Prepare to Send > Member Categories, only after a membership audit | Members linked to the selected categories; current expansion does not filter account status |
Prefer exact checkboxes over a broad label. A class enrollment roster, a date-specific schedule roster, and a broad Member Classes builder are three different audiences.
#Understand family and guardian routing
DSM does not automatically turn every selected student into the correct guardian recipient in the current send paths.
- The individual composer offers the primary and alternate email stored on the record you opened.
- Selected Students, Member Categories, and Member Classes load the selected member record's primary email and, when enabled, its Email 2.
- A class roster can display a guardian email as a contact fallback, while the bulk queue still uses the selected student's own stored email.
- The label All Students (Guardians) should not be treated as proof that the current queue contains guardian records.
Important: If the message belongs with a parent or household account, select or open that parent/account record. Do not assume a child selection will be rerouted. On Prepare to Send, the queued address sample is more authoritative than the address displayed on the source roster.
For a family with a shared address, decide whether the household should receive one copy or one copy per person. The current queue does not globally deduplicate the same address across different member records.
#Send one email from an account
Use the individual composer when the message belongs to one known person or account.
- Open the intended Family or Student record.
- Confirm that the record - not merely a related family member - is the intended recipient.
- Open Compose Message from the available email/message action.
- Select Email.
- Choose the record's primary email, alternate email, or an approved custom destination.
- Select a category or reusable template when appropriate.
- Review and edit the subject and body.
- Insert only merge tags whose source data is present on this record.
- Select an approved signature when needed.
- Add only the intended attachment or statement. Reopen each file before sending.
- Recheck the destination, subject, body, signature, links, and attachments.
- Select Send once.
- Wait for the success or error result, then confirm the entry in message history and provider reporting when available.
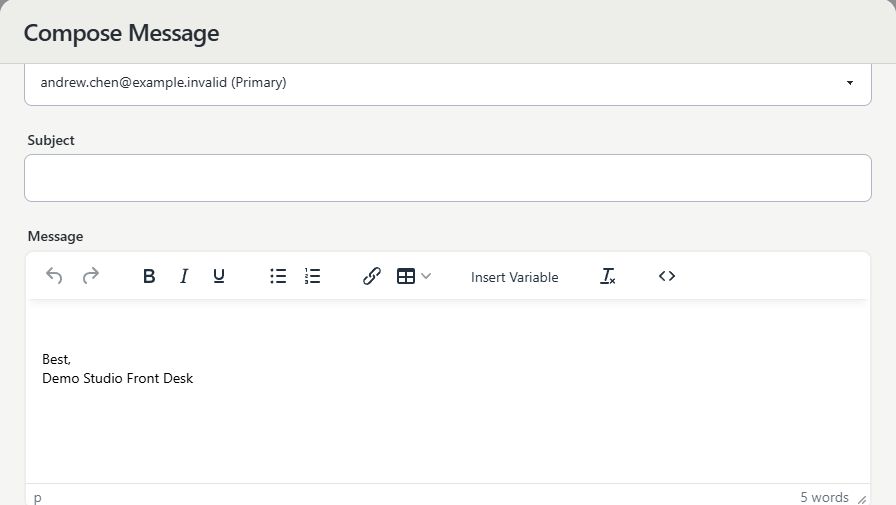
The individual composer does not currently provide a separate test-send button. For reusable or high-impact content, create and test an Email template through Messaging first, or send the completed content to a controlled internal account before addressing the client.
Important: Selecting a signature in the individual composer is supported. The bulk template flow is different; verify the sign-off in the actual test email before relying on its Signature setting.
#Send to selected class members
Use the class's Students page for an enrollment audience across the class.
- Open Group Classes and select the class.
- Open Students.
- Choose the enrollment-status filter that matches the communication plan.
- Review the visible roster. The common Active view can include students marked in class, waiting, eligible, or drop-in.
- Select the checkbox beside each intended person.
- If the roster has more than one page, repeat the review deliberately. A page-level selection is not proof that every class member was selected.
- Select the bulk Email action.
- Create or select the approved Email template and save it.
- On Prepare to Send, keep Selected Students (count) selected.
- Continue with Review the queued recipients.
Warning: Do not use the roster's SMS action as proof that SMS delivery is available. It can open an SMS template path, but current end-to-end SMS delivery is not verified by this guide.
#Send from one schedule occurrence
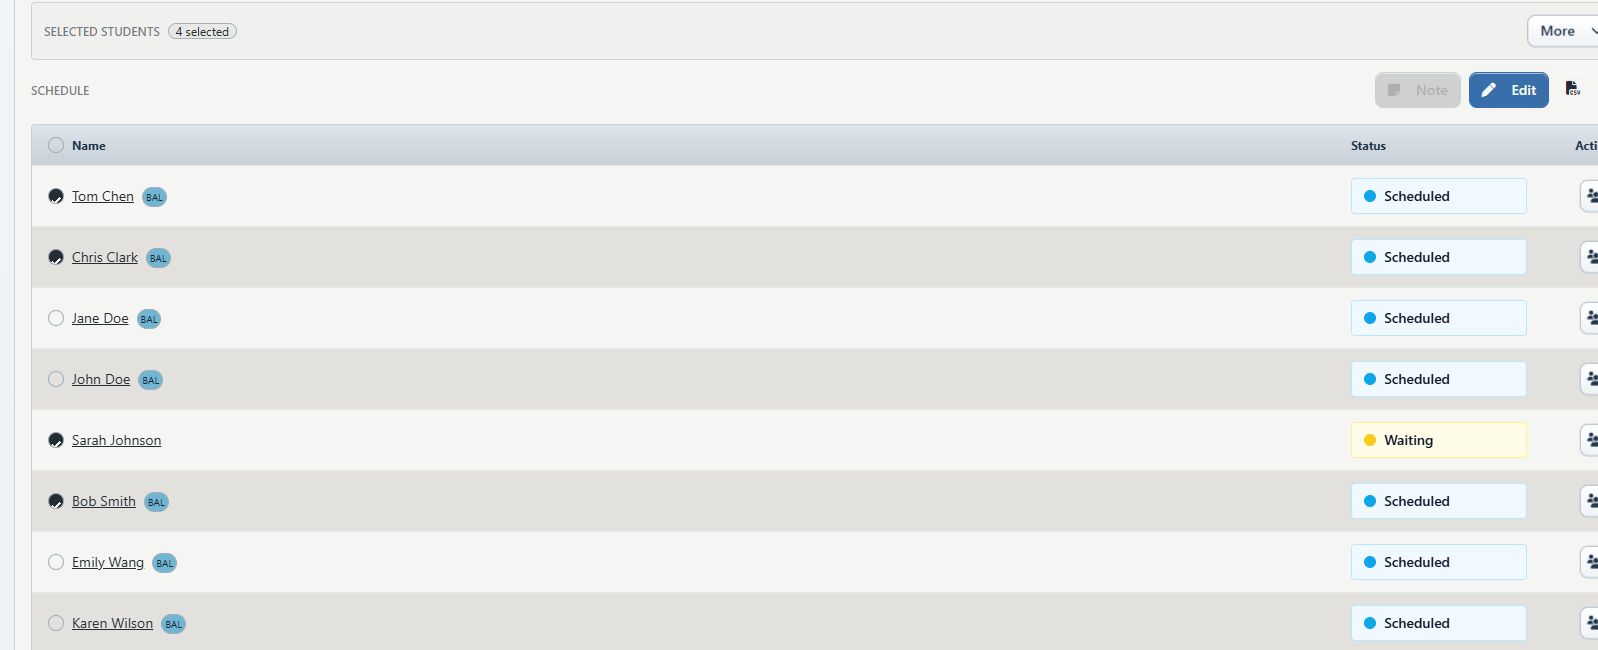
Use Day View when the audience depends on a particular class date, such as everyone scheduled today or only the people whose current status you reviewed.
- Open Calendar, then open the correct Day View date.
- Find the correct class occurrence by date, time, class, location, room, and instructor.
- Expand its roster.
- Review each person's status: Scheduled, Attended, Early Cancel, Late Cancel, No Show, or Waiting.
- Check only the intended people. The roster does not automatically select or exclude a status for the email action.
- Open More, then select the email action for the selected people.
- Create or select the approved Email template and save it.
- On Prepare to Send, keep Selected Students (count) selected.
- Continue with Review the queued recipients.
The Day View roster represents one schedule occurrence. It is not the class's enrollment list. A person can be enrolled in the class but not belong in this dated audience, or can appear on the dated roster with a cancellation, no-show, or waiting status.
#Use staff, category, and other broad builders carefully
The current Prepare to Send list includes broad audience labels. Their names are not sufficient verification of the expanded queue.
| Builder | Current expansion | Required precaution |
|---|---|---|
| Instructors | All staff rows that contain an email address | Audit employment/status and addresses first; inactive staff are not automatically excluded |
| Member Categories | Member records linked to the selected categories | Select at least one category and audit account status, family role, consent, and duplicates |
| Member Classes | Distinct member records linked through class schedule rows | Do not interpret this as active class enrollment or attendance; status and date are not filtered |
| All Students (Guardians) | Broad member rows in the current general fallback | Do not use for guardian routing in the current release |
| Currently Enrolled | Broad member rows in the current general fallback | Do not use as proof of current enrollment in the current release |
| Per Location | Displays location choices, but current expansion does not apply the selected location | Do not use in the current release |
For the last three builders, the current fallback can load up to 1,000 member rows. Use an exact class/account selection instead. If a broad audience is unavoidable, stop and have an administrator or data reviewer produce and reconcile an approved source list before any send.
Leaving the category or class multi-select empty is not a harmless default. It can expand across every linked category or schedule row. Always select the intended values and then select Load.
#Review the queued recipients
- Confirm that the recipient selector still shows Selected Students (count) or the exact reviewed builder.
- Keep Send copy to Email 2 off unless every selected record should receive both stored addresses.
- Use Positive balance only only for a finance-defined audience. It does not filter consent, account status, enrollment, attendance, or invalid addresses.
- Select Load. Loading replaces that template's previous working queue.
- Compare Total with the number you expected from the source screen or approved source list.
- Select View.
- Review every displayed address for domain mistakes, placeholders, unintended shared addresses, and duplicates.
- Correct source records or reduce the audience if the result is unclear. Select Load again after every correction.
The Queued Recipients (sample) window shows addresses only and is limited to the first 100 queue rows. It is not a complete audit when Total exceeds 100. Split a large audience into smaller approved groups or reconcile it against a separate authorized list before sending.
Warning: Current broad queue loading does not validate email syntax before adding an address and does not globally deduplicate addresses. The same household address can receive more than one copy, and an invalid address can fail only after sending begins.
#Review the template, merge tags, signature, and attachments
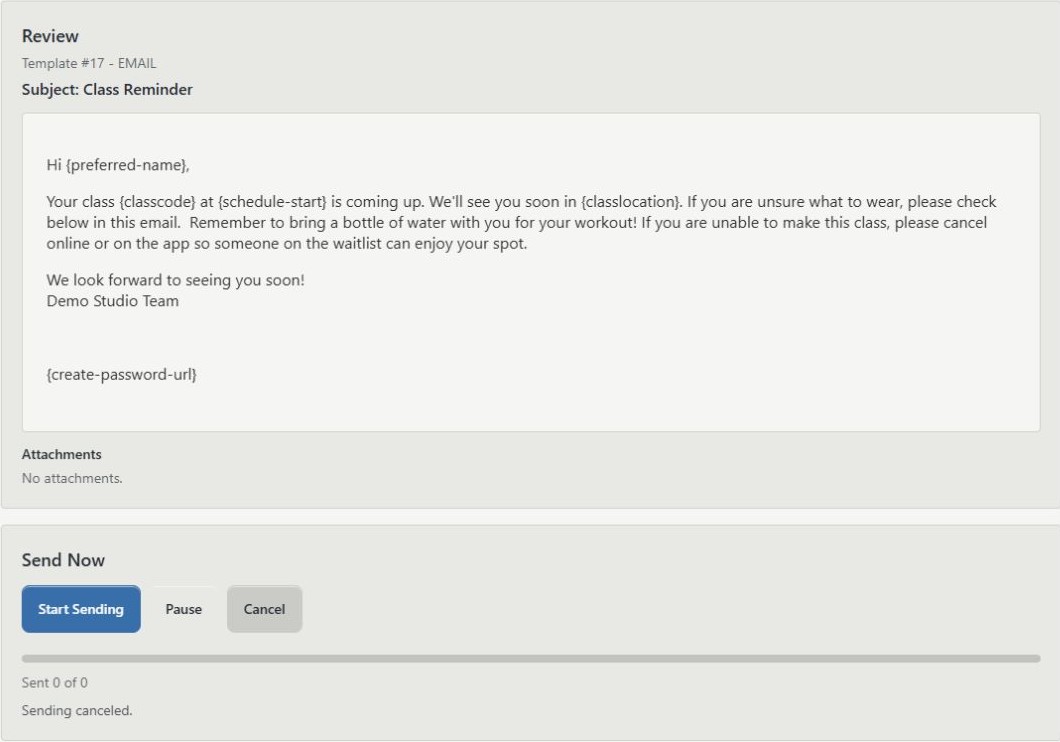
On Prepare to Send, inspect the Review panel before testing.
#Template and merge tags
- Review Using literals in messages when choosing personalized values or deciding whether the current workflow supplies their required context.
- Confirm that the template type reads EMAIL.
- Confirm the subject and visible body.
- Prefer member and studio merge tags whose source is present for every selected record.
- Do not rely on class- or schedule-specific tags in the current bulk procedure. The queue retains member context but does not retain the source class or schedule context for each outbound email.
- Do not use password-revealing, credential, payment, or other sensitive values in a template or screenshot.
The on-page Review panel displays the saved template body. It does not render the body separately for every queued recipient.
#Signature
The Email template editor stores a Signature selection, but current bulk test and send source does not append that selected signature by itself. For a bulk email, include the approved sign-off directly in the saved body and confirm it in the received test. Avoid adding the sign-off twice.
#Attachments
- Confirm every filename and file size shown in Review.
- Open the source file and verify that it belongs to this audience and message version.
- Remove drafts, prior-client files, exports, and files with hidden personal information.
- Do not attach a roster or contact export merely to explain who was selected.
#Send and inspect a controlled test
- Enter a controlled staff address in Send Test Email.
- Select Send Test once.
- Confirm that DSM reports the intended test destination.
- Open the received email outside DSM.
- Check the sender name and address, reply behavior, subject, body, sign-off, links, layout on desktop and mobile, and every attachment.
- Confirm that no raw merge tag remains.
- Return to Edit Template if anything is wrong, then reload recipients and send a new controlled test.
Important: The current test control accepts only the test address. It automatically uses an available member as sample data and does not pass the source class or schedule from the active screen. A correct test proves transport and the rendered sample; it does not prove that every recipient has complete data or that class/schedule tags will resolve correctly.
Do not use an on-screen success alert as the only confirmation. Confirm receipt in the controlled mailbox.
#Start, pause, resume, or cancel the send
- Recheck the segment, Total, queued sample, template type, subject, body, sign-off, and attachments.
- Record the expected audience count and approval according to studio policy.
- Select Start Sending once.
- Keep the browser tab open, the session signed in, and the computer awake while the counters advance.
- Watch Sent n of total and the result line.
- Select Pause if you must stop submitting additional queued messages.
- To continue a known paused queue, recheck the count and select Start Sending once. Do not reload recipients unless you intend to replace the remaining queue.
- Select Cancel only when the unsent queue should be discarded.
The current browser advances the queue one recipient at a time. It is not a durable unattended background job. A closed tab, expired session, browser restart, or network interruption can stop the process.
Warning: Cancel clears the template's queued recipients and resets the displayed counts. It does not recall messages already sent. Load also replaces the existing queue for that template.
The completion message can appear after all pending rows have been attempted even when some rows failed. If the final Sent number is lower than Total, treat the difference as unresolved failures, not as success.
#Confirm what happened
Use more than one source of evidence:
- Record the final Sent and Total values.
- Open Messaging > History and filter by template, recipient, subject, type, or member ID.
- Open representative history details and confirm the destination, body, status, and available service ID.
- When Email Delivery is available, review provider events and recipient health for failed, bounced, complained, or suppressed destinations.
- Confirm receipt in the controlled mailbox and, when required, with an authorized sample recipient.
- Reconcile any difference between the approved audience, queue total, local history, provider submissions, and failures before retrying.
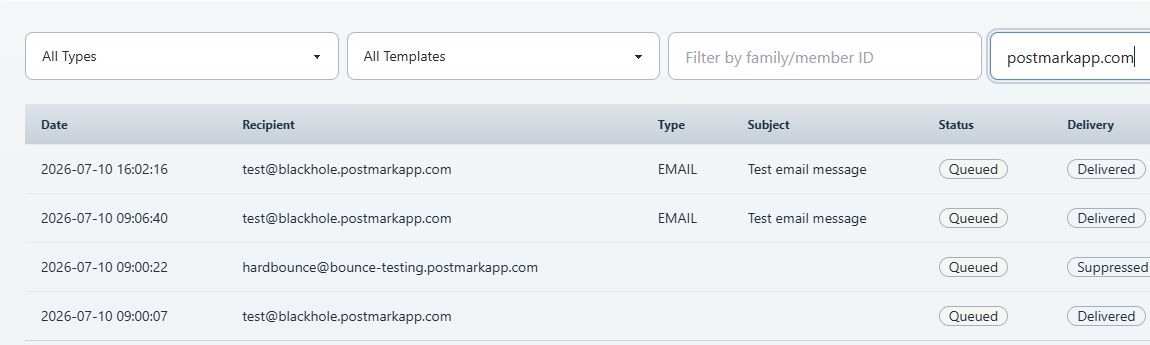
Local sent means DSM submitted the message without receiving an immediate transport error. It is not proof of inbox placement or reading. Provider delivered means the destination server accepted the message; it still does not prove inbox placement or reading.
Member-linked bulk emails can be written to local History. The Instructors builder queues staff addresses without a member link, so its individual recipients may not appear in the same member-linked local history. Use provider reporting and the approved source list for that reconciliation.
#Respect opt-outs, invalid destinations, and recipient health
- Do not send to a person who opted out, withdrew consent, or should not receive the message under studio policy, even if the address appears in the queue.
- Do not replace or slightly alter a suppressed address just to bypass a provider block.
- Correct a hard-bounced address only after the studio has verified the replacement. Clearing a hard-bounce health record, when permitted, requires a reason.
- Complaint and provider-suppression states require review by the studio's communications or deliverability owner.
- If Email Delivery is absent, DSM may have only local send history. Ask the provider owner to check the provider account rather than assuming delivery.
#Privacy and recording rules
- Use names such as Alex Rivera, Jordan Lee, and Taylor Morgan only as synthetic examples.
- Use addresses in the studio's approved, non-deliverable documentation domain; never put a real client's address into documentation.
- Crop browser tabs, tenant identifiers, internal URLs, service IDs, message bodies, phone numbers, balances, medical notes, and credentials unless the field is fictional and needed for the lesson.
- Do not show a real recipient queue, contact export, roster download, suppression list, provider token, or SMTP setting.
- Store screenshot and video source files only in the approved documentation location.
- Record the capture date, DSM interface generation, source environment, and replacement status for every visual.
#Troubleshooting
#The total is already populated when the page opens
The page performs one automatic load. Select the intended source and filters, then select Load. Do not send from the opening total.
#The total is larger or smaller than expected
Check the source roster, selected checkboxes, segment, category/class values, Email 2, and Positive balance only. Remember that View shows only the first 100 addresses. Avoid All Students (Guardians), Currently Enrolled, and Per Location in the current release.
#The guardian address is missing or the student address is wrong
Open the intended parent/account record and correct its contact data. A child selection is not automatically rerouted. Compare the actual queued address with the class roster's displayed fallback contact.
#One household received duplicates
The same address can be queued from several member records, and Email 2 can add another destination. Correct duplicate record data, turn off Email 2 when it is not required, reduce the audience, reload, and recheck the sample. Do not resend the completed queue.
#A queued address is malformed
Cancel before starting, correct the source record, reload, and review again. Broad loading does not reject every malformed address in advance.
#A merge tag is blank, wrong, or still visible
Stop the send. Use a tag supported by every recipient's member data, or replace it with plain language. Do not rely on class/schedule tags in the current bulk procedure. Send a new controlled test.
#The sign-off is missing
Add the approved sign-off directly to the bulk template body and send another test. Do not assume the stored Signature selection was appended.
#SMTP is unavailable
Do not retry. Ask an administrator to verify the tenant emailer settings, sender identity, authentication, provider status, and outbound safety setting.
#SMS, TTS, push, or client message does not send
Stop. This guide verifies only email. The individual composer currently rejects SMS and push, and the bulk path is email/SMTP-oriented. Use a separately tested channel procedure when one becomes available.
#The page stopped while sending
Do not immediately select Start Sending or Load. Record the displayed counts, then reconcile History and provider submissions. Resume only when you can identify the remaining queue without duplicating submitted messages.
#The page says completed but Sent is lower than Total
Treat the difference as failed attempts. Review History, Email Delivery, provider records, address health, and application support logs. Correct destinations and create a new, explicit retry audience; do not restart the entire original audience.
#An instructor email is absent from History
The staff recipient queue does not attach a member ID, so member-linked local history may not contain the individual record. Check provider reporting and the approved staff list.
#Email Delivery is missing
The tab appears only when the required permission, feature flag, provider, configuration, and verification checks are satisfied. Local History is not a replacement for provider event reporting.
#Related articles
- Manage message templates, history, and email delivery
- Using literals in messages
- Create and manage email signatures
- Use Day Overview and instructor Teaching views
- Configure and verify Group Permissions
- Messaging overview
- Families and students
- Record attendance and use class rosters
- Manage student enrollment
- Manage poll questions and review answers
- Staff and time clock
- Categories
- Create, assign, and verify Member Categories
- Roles and permissions
- DSM feature availability