Waivers and Agreements
Review and sign waivers
#Before you begin
- Open the account menu and select Waivers. This menu item opens the completed-waiver list first; select Back to Pending to review documents that still need action.
- Checkout can also send you directly to Waivers & Agreements when required documents are unsigned.
- Read the entire document and confirm who it is for before signing.
- A guardian account can sign for an active related student when the account relationship permits it.
- The signing form requires JavaScript. Use a current browser and avoid private browsing settings that clear the session while you work.
Warning: Selecting Agree To This Document records acceptance and can store an electronic signature and a PDF. Treat it as a legally significant action. Contact the studio before signing if the document, participant, or terms are wrong.
#Review pending waivers
- Open the account menu and select Waivers.
- Select Back to Pending.
- Review the Action Required message and the number of unsigned waivers.
- For each Pending Signature card, confirm:
- the waiver title;
- For, which names the participant;
- Type;
- Related to, when the waiver is connected to a class, purchase, or other record.
- Select Review & Sign for the intended waiver and participant.
If no documents are pending, the page shows All Caught Up! and offers Return to Home or Continue Registration, depending on how you reached the page.
#Sign a waiver
- Select Review & Sign on the correct pending-waiver card.
- Read Agreement Terms completely.
- Review the participant information.
- Under Who is this waiver for?, confirm the selected person. The waiver can already be limited to the participant named on the pending card.
- If Electronic Signature appears, sign in the pad with a mouse, trackpad, or touchscreen.
- Review Saved Signature Preview. Select Clear signature and sign again if it is incomplete or belongs to the wrong signer.
- Select the Electronic Signature Consent checkbox.
- If the document does not require a drawn signature, review the acceptance notice instead.
- Recheck the document title and participant.
- Select Agree To This Document once.
When more waivers remain, the page reports how many are left and returns you to the pending list. Complete each required document separately.
#Email a signing link
Use this option when the intended signer should complete the waiver from another device or inbox.
- On the pending-waiver card, review the displayed email destination.
- If more than one approved address is available, choose the intended address under Send to.
- Select Email Signing Link once.
- Look for A signing link was emailed successfully.
- Tell the recipient which studio and participant the document concerns, without forwarding the link to anyone else.
Important: Emailing a link does not complete the waiver. It remains pending until the authorized signer submits it. The button is unavailable when no eligible email address is on file.
Warning: A signing link is sensitive. Verify the recipient before sending it, and do not post or reuse the link.
#Continue checkout after required waivers
When checkout finds unsigned required waivers, it stores a return marker and opens Waivers & Agreements. The message states whether one or several documents are pending.
- Do not add the same cart items again.
- Select Review & Sign for the first required waiver.
- Complete and submit every pending waiver.
- After the final waiver, wait for the message Waiver signed successfully. Continuing your registration.
- Confirm that checkout opens again with the original cart or registration information.
- Recheck the order before completing checkout.
If you return to the pending page after all documents are complete, select Continue Registration. If the return path is no longer available, open Cart and continue from the existing items instead of creating a duplicate cart.
#Review completed waivers
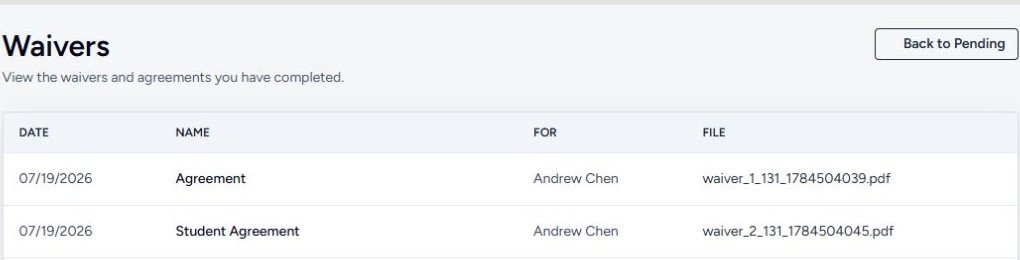
- Open the account menu and select Waivers, or select Completed Waivers from the pending page.
- Find the row by Date, Name, and For.
- If the document has a stored file, select its filename to download the PDF.
- If the File column says agreed, select the waiver name to view the completed agreement online.
- On the detail page, confirm the document title, completion date, and Completed status.
- Select Download when a downloadable file is available.
Completed records are limited to the signed-in account and authorized active family members.
#What happens next
- The software records the completed waiver for the selected participant and the logged-in account holder who supplied the acceptance.
- A signature-required document can be stored with a generated PDF.
- The waiver moves from the pending list to the completed list.
- After the final waiver, the Online Client returns home unless a checkout or registration return marker is active.
- When checkout was interrupted, the final waiver returns the session to checkout so the original workflow can continue.
#Confirm it worked
Look for the success message after submitting. Then open Waivers > Completed Waivers and verify the document's date, name, participant, and file or agreed status.
For checkout, also confirm that the original checkout reopens after the final required waiver. The waiver is complete even though the order still requires its own final review and submission.
#Troubleshooting
#Agree To This Document is disabled
For a signature-required document, draw a signature and select the electronic-signature consent checkbox. If the signature pad does not appear, enable JavaScript, refresh the page, and start the signature again.
#The wrong participant is shown
Select Cancel or Back to Waivers without submitting. Return to the pending card for the correct person. A guardian can sign only for family members authorized on that account.
#No email address is available
The pending card cannot send a signing link without an eligible address. Update the account through the studio's approved process or ask the studio to send the document another way.
#The waiver says it was already signed
Open Completed Waivers and look for the participant's record. Do not submit the same document again.
#Checkout does not resume
First confirm that no waiver remains under Back to Pending. Then open Cart and continue from the existing order. Do not add the same class or item again solely to restart checkout.
#A completed file is unavailable
The original page or stored file may no longer be accessible. Contact the studio with the waiver title, participant, and completion date. Do not send a signature image or emailed signing token in an ordinary message.