Settings, students, and reports
Configure Size Systems and verify size suggestions
Current limitation: The current DSM Next interface lets an administrator create, rename, order, archive, and restore a Size System name under Settings > Categories. It does not currently provide a customer-facing page for adding or editing the underlying size names and measurement ranges. A newly added name is therefore only a label until its range rows have been installed through an approved support or data-migration process.
Safety warning: Treat every displayed size as a suggestion. The current report can return a size when only one populated measurement fits that row, even when other measurements disagree. If several rows qualify, it chooses the first size name alphabetically. Verify the complete approved chart and the person's requirements before ordering, assigning, or altering anything.
Privacy warning: Body measurements and fitting notes can be sensitive personal information, especially for a minor. Limit access, collect only what the studio is authorized to use, and keep screenshots, exports, PDFs, support requests, and change records free of real personal data whenever possible.
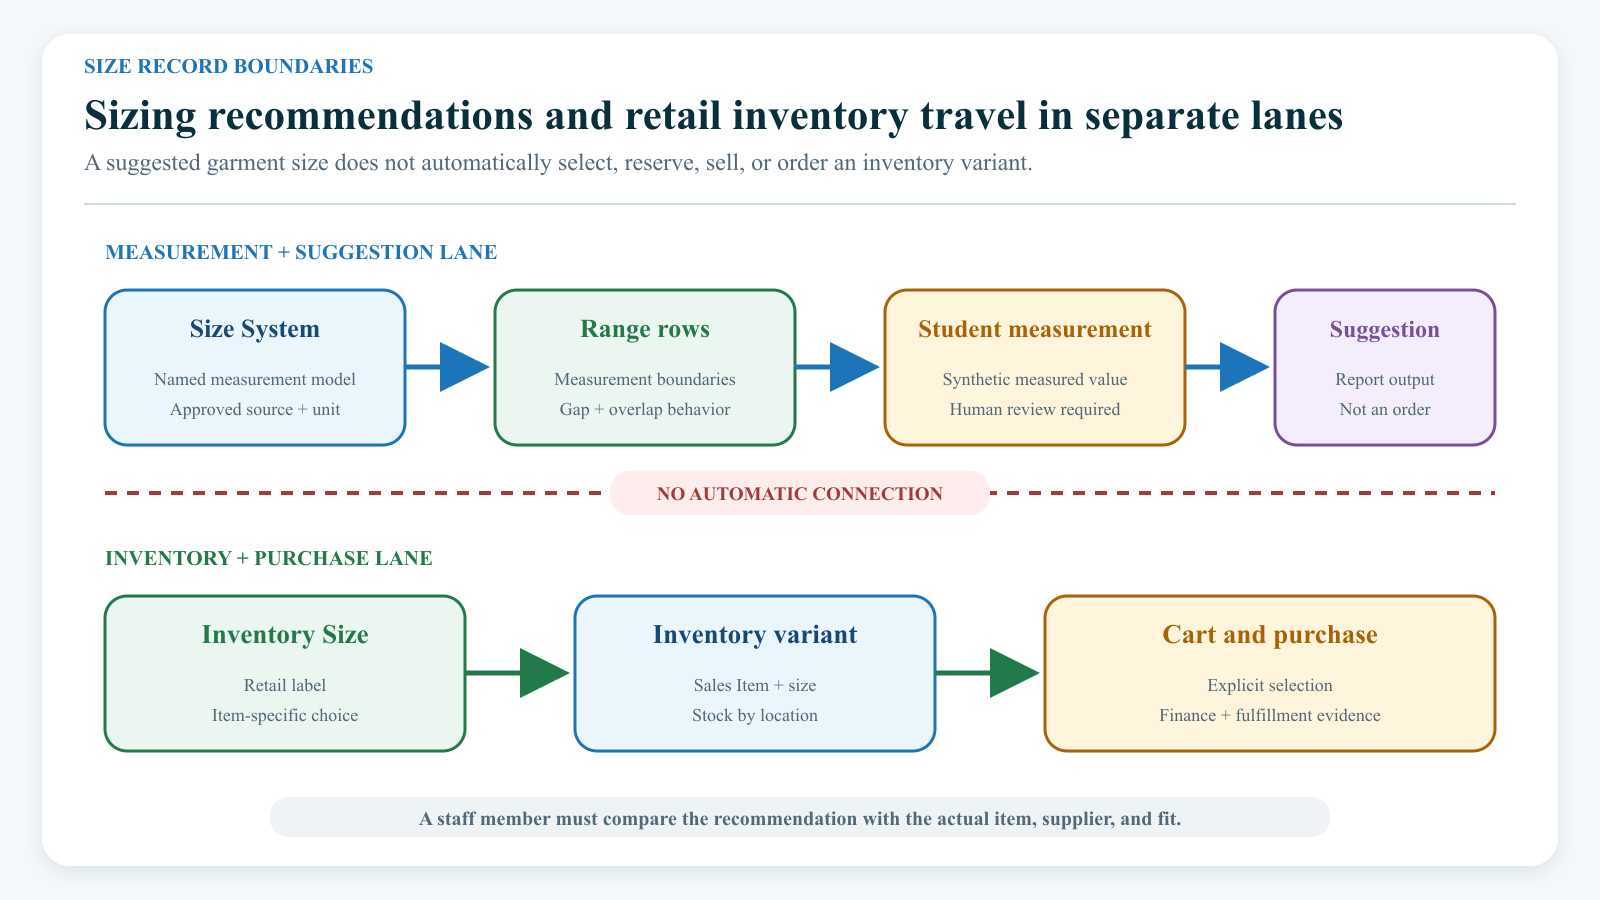
#Keep four different kinds of size separate
The word “size” appears in several parts of the software, but those records are not connected automatically.
| Record | Where it is maintained or used | What it does |
|---|---|---|
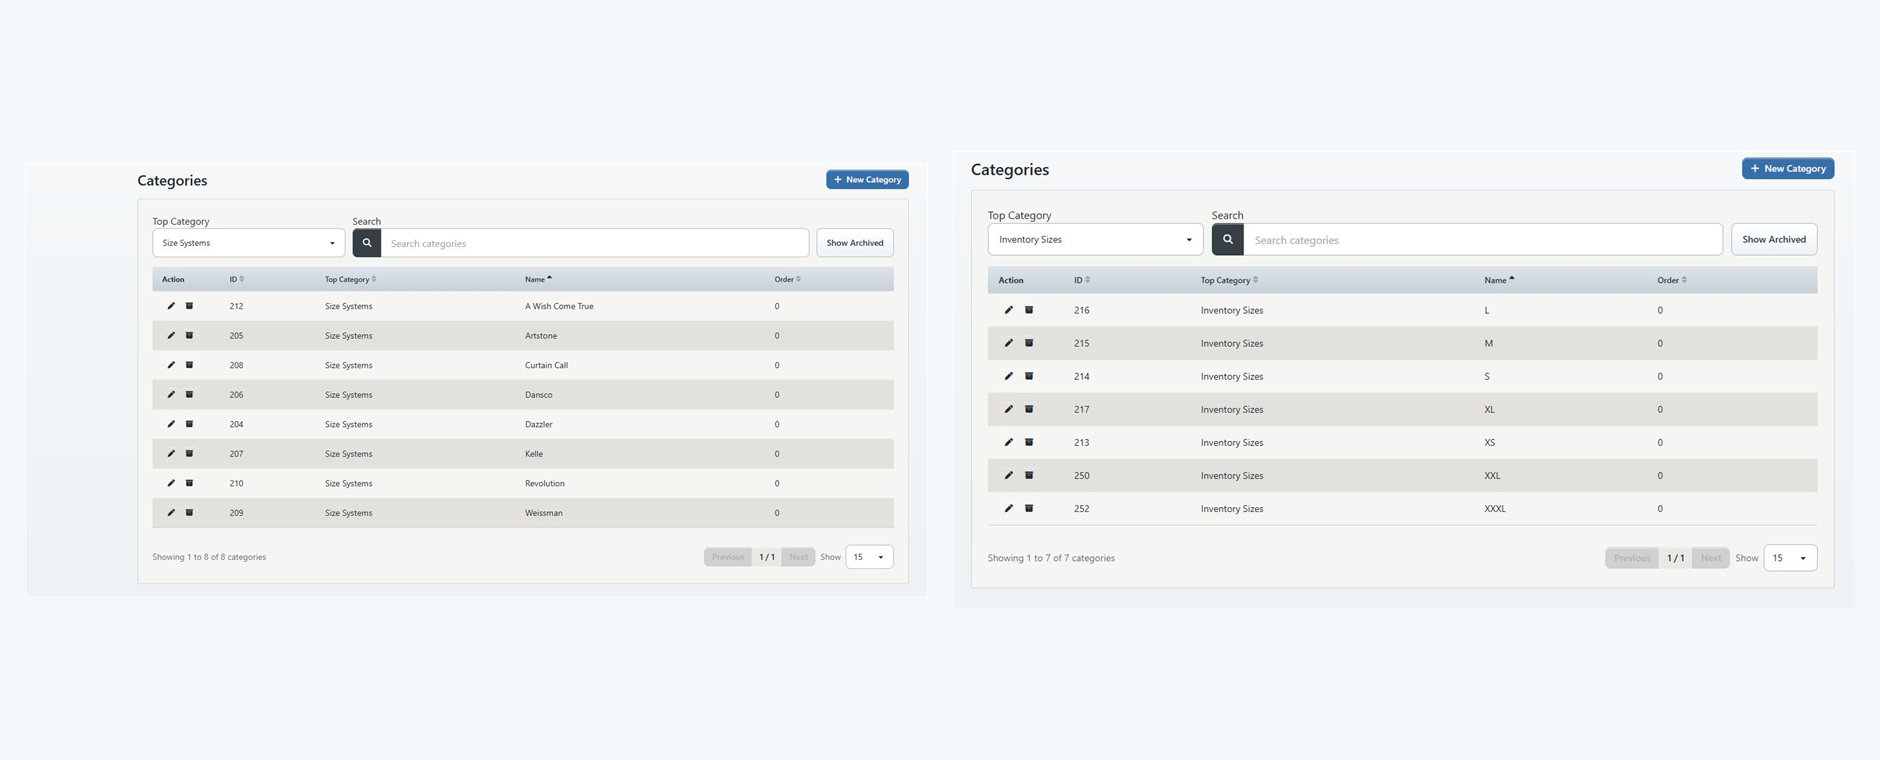
| Size System name | Settings > Categories, with Top Category set to Size Systems | Identifies a sizing source in the Measurements List filter. |
| Size range row | Installed in the tenant's sizing data through an approved support or migration process; no current DSM Next editor was found | Connects one Size System and one fixed Chart to a Size Name and optional minimum/maximum ranges for Chest, Bust, Waist, Hips, Girth, and Inseam. |
| Student Chart, measurements, and Size | Individual student Measurements or a class's Action > Class Measurements | Stores one current measurement snapshot for the student. A manually stored Size overrides a report suggestion. |
| Inventory Size | Settings > Categories, with Top Category set to Inventory Sizes; then used by Inventory variants | Labels a physical product variant offered in staff or client carts and retained through the inventory/purchase relationship. |
The same text can appear in more than one place without creating a relationship. For example, a measurement Size System can suggest Medium, and an Inventory Size can also be named Medium, but the report does not select that inventory variant or add it to a cart.
#Navigation map
Use the path that matches the record you intend to change:
| Task | Current navigation |
|---|---|
| Add, rename, order, archive, or restore a Size System name | Settings > Categories, then select Size Systems under Top Category |
| Update one student's Chart, measurements, manual Size, or Notes | Families or Students > open the account > Family Members and Classes > student > Measurements |
| Update measurements for a class roster | Group Classes > open the class > Action > Class Measurements |
| Review optional suggestions | Reports > Measurements List |
| Add a retail size label | Settings > Categories, then select Inventory Sizes under Top Category |
| Create the retail variant that uses that label | Inventory > Add New, or Inventory > variant > Edit |
There is no current menu destination for editing the underlying Size Name and range rows. Do not look for them under Inventory; that area manages retail variants and stock.
#Plan a Size System before adding it
Create a controlled source sheet before changing DSM. Record:
- the chart owner or source;
- the chart's publication or revision date;
- the measurement unit, such as inches or centimeters;
- the exact measuring method for every field used;
- which fixed DSM Chart each group of rows will use;
- every intended Size Name;
- the minimum and maximum for each applicable field;
- any field the source does not use;
- the effective date and replacement policy;
- who reviewed the source and data entry; and
- how a staff member must confirm a final selection.
Use a versioned, neutral Size System name such as Supplier A 2026 — inches. The current record does not have separate fields for supplier, unit, source date, revision, approval, or effective date, so the name and the protected source sheet must carry that distinction.
Do not copy a chart from memory, an old screenshot, or a different region. Do not combine rows from different suppliers or measurement units into one system simply because their size names look similar.
#Understand the fixed Chart choices
The student measurement forms currently offer these Chart labels:
- Children;
- Adult;
- Boys/Men;
- Girls;
- Women;
- Boys;
- Men;
- Guys;
- Preschool Boys; and
- Preschool Girls.
These are fixed interface choices, not categories created under Settings > Categories. They are used as lookup keys, and they do not convert units or describe the person. Choose one only when it matches the approved source chart and the studio has a legitimate reason to use it. Leave Chart blank when none applies.
The current interface does not let a studio rename these choices, add a new one, or replace them with a different classification model. If the approved source cannot be represented responsibly, do not force it into an unrelated Chart; keep Size manual and escalate the product need.
#Add a Size System name
Adding the name is the only Size System setup step currently available in the customer interface.
- Open Settings > Categories.
- In Top Category, select Size Systems.
- Search for the source and revision to make sure the system does not already exist under another spelling.
- Select New Category.
- Confirm that Top Category is Size Systems.
- Enter a unique, versioned Name that includes the unit when practical.
- Enter Order when the studio uses a controlled category order.
- Select Add.
- Record the new category ID in the protected source sheet.
- Do not use the system in a report until the underlying range rows have been installed and tested.
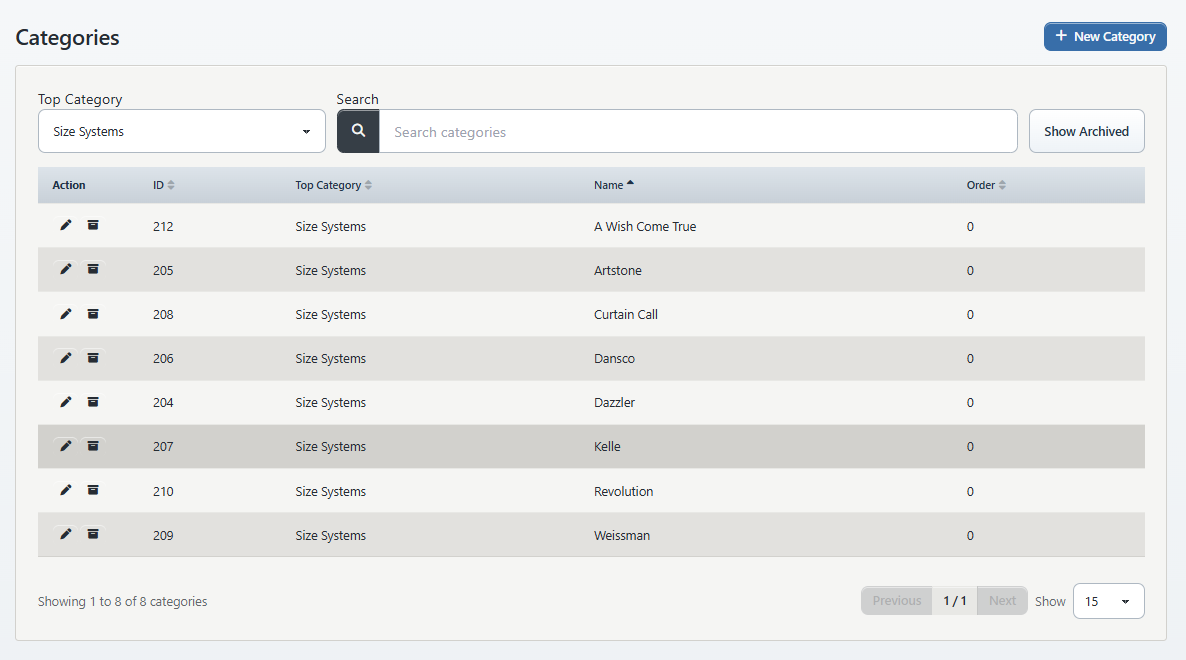
The current category form validates that a name and Top Category are present, but it does not prevent duplicate names or require source/version metadata. Search first, and have a second authorized person review the saved ID and name.
#Prepare the underlying size rows
Each range row needs:
- the Size System category ID;
- one supported Chart key;
- one Size Name; and
- a minimum and maximum for each measurement that the source uses.
The six supported range pairs are:
| Range | Use |
|---|---|
| Chest Min / Max | Approved chest range for the row |
| Bust Min / Max | Approved bust range for the row |
| Waist Min / Max | Approved waist range for the row |
| Hips Min / Max | Approved hip range for the row |
| Girth Min / Max | Approved girth range for the row |
| Inseam Min / Max | Approved inseam range for the row |
Leave both values empty when the source does not use a field. A one-sided range is not a safe substitute: the current matcher requires both a minimum and maximum for a populated measurement to qualify that row.
Before requesting installation or migration, validate the source sheet:
- Confirm one unit for every row in the system.
- Confirm each minimum is less than or equal to its maximum.
- Confirm the intended boundary behavior. Current matching includes both endpoints.
- Find duplicate Size Names within the same system and Chart.
- Find overlapping ranges for the same measurement. An overlap can make several rows qualify.
- Find gaps and decide whether a blank suggestion is safer than extending a published range.
- Find min-only or max-only values; the current matcher will not use them as a complete interval.
- Confirm every Chart key maps to the intended fixed choice.
- Confirm rows from different editions, suppliers, or units have not been mixed.
- Review a set of synthetic boundary cases, including each minimum, maximum, gap, and overlap.
Do not edit sizing tables directly. The current application provides no range editor, validation report, audit journal, archive state, revision history, or undo for these rows. Send the approved source sheet through the studio's supported data-change process. Require a before-state, row counts, inserted or changed IDs, validation results, rollback owner, and post-change report evidence.
#How the Measurements List chooses a size
The report uses this sequence:
- If the student's measurement record already contains Size, the report returns that stored text. The selected Size System does not replace it.
- If Size is blank, the report requires a selected Size System and a nonblank student Chart.
- It loads rows with the selected Size System ID and the same Chart key.
- For each populated body measurement, it checks whether that one value falls between the row's corresponding minimum and maximum, inclusive.
- A row qualifies when any one populated measurement matches. The current lookup does not require all populated fields to fit the same row.
- When more than one row qualifies, the report sorts by Size Name and returns the first row alphabetically.
- When no row qualifies, it leaves the suggested Size blank.
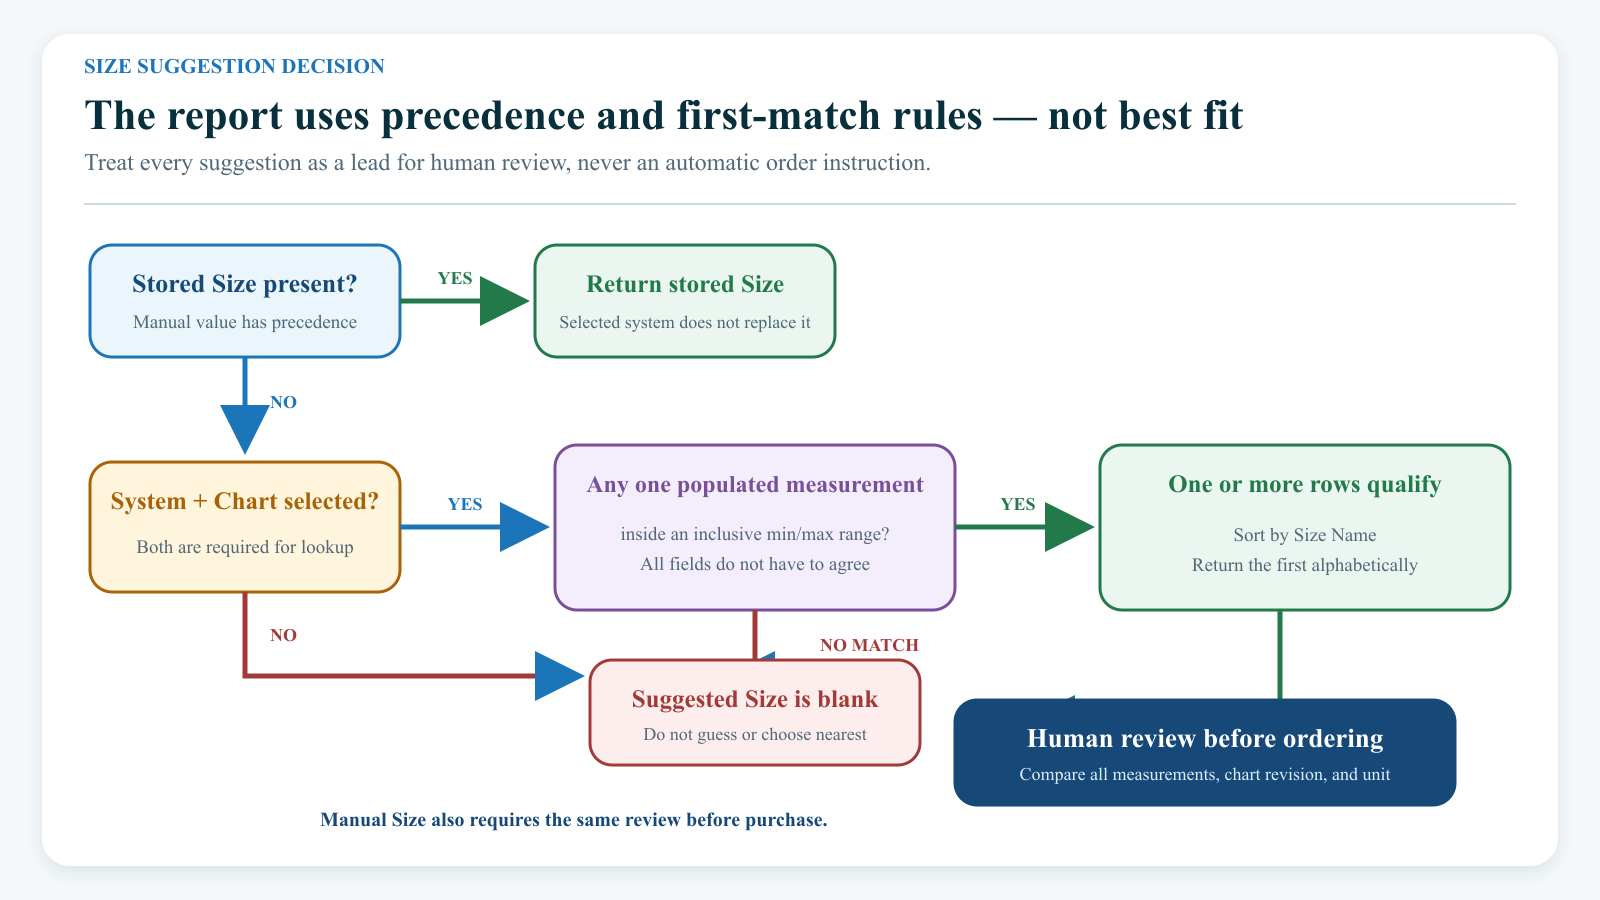
This means the output is not a best-fit calculation, a nearest-size calculation, a majority vote, or a conflict detector. It also does not show which field matched, which fields disagreed, how many rows qualified, the chart revision, or the unit.
If a student has an explicitly approved final size, store it in the student's Size field and preserve the fitting decision in the studio's authorized process. If the field is left blank for suggestion testing, independently compare all relevant measurements with the source chart before acting.
#Test a new or changed system
Use fictional records and a narrow report. Do not begin with a live class or an actual order.
- Confirm the Size System name, ID, unit, revision, and installed row count with the change owner.
- Prepare synthetic students for at least these cases:
- a value exactly at a minimum;
- a value exactly at a maximum;
- a gap that should return blank;
- an overlap that exposes multiple matches;
- two populated fields that point to different sizes;
- a complete consistent set;
- a manual Size override; and
- no measurements.
- Assign the intended fixed Chart and enter plain numeric measurement values. The software does not store the unit, so record it in the protected fixture plan.
- Open Reports > Measurements List.
- Choose one fictional class or the smallest useful season scope.
- First select No size suggestion, then select the new Size System.
- Select Show Report.
- Compare every displayed result with the approved source sheet.
- Repeat the check in the PDF only when PDF handling is approved. The PDF adds a Size column when a Size System is selected but does not add a unit label.
- Record discrepancies and stop. Do not work around a bad range by entering a misleading manual Size.
Only approve the system for routine use after an authorized fitting or wardrobe reviewer and a data reviewer agree on the test results and the current algorithm's limitations.
#Use a Size System in daily work
- Open the student's Measurements page or the class's Action > Class Measurements window.
- Confirm the person and the external measurement unit.
- Select the appropriate Chart only when it matches the approved source.
- Enter plain numeric measurements using the approved method.
- Leave Size blank only when a report suggestion is intended. A stored value always takes priority.
- Save, reopen, and confirm the values.
- Open Reports > Measurements List.
- Select the approved Size System and the narrowest useful class or season scope.
- Run the report and compare the suggestion with the complete chart.
- Record the final human decision through the studio's approved process. Do not treat the report output as an order authorization.
The student has one shared current measurement record across classes. There is no measurement date or history in the current row, so a later edit can change future report results without preserving the earlier basis.
#Understand the sales, inventory, order, and client boundary
A measurement Size System does not participate in retail checkout.
| Workflow | Uses Size System ranges? | What actually controls the size |
|---|---|---|
| Create a Sales Item | No | The Sales Item defines the product or offer. |
| Create an inventory variant | No | The variant's Size uses an active value from the separate Inventory Sizes top category. |
| Staff Shopping Cart | No | Staff select the offered inventory variant. |
| Online Client catalog and cart | No | No student measurement suggestion is carried into the client experience. The reviewed regular catalog Add to Cart form does not expose an Inventory Size selector; some offer paths can expose inventory options, so verify the exact product path. |
| Purchase and inventory-sales reporting | No | When checkout carries an inventory variant ID, the purchase retains that inventory relationship and current reports resolve its size/category label from inventory data. |
| Measurements List | Yes, optionally | The report uses student measurements, Chart, Size System range rows, and any stored manual Size. |
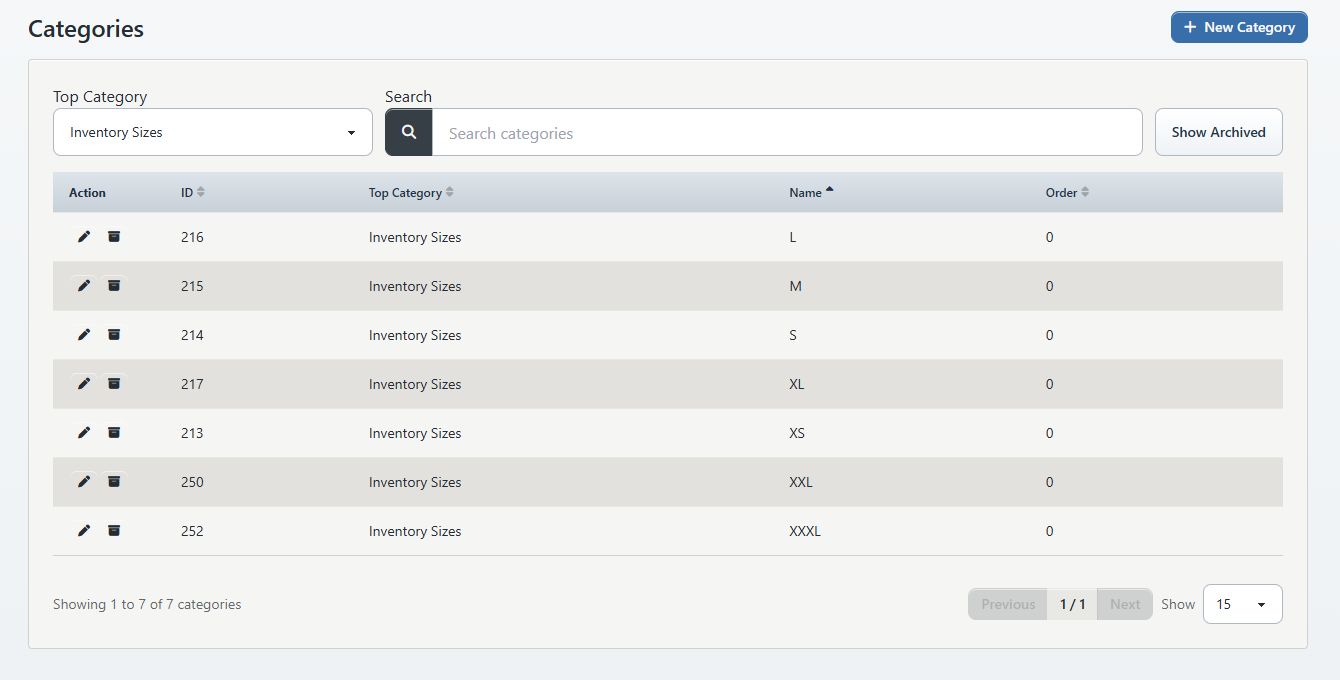
To add a retail size:
- Open Settings > Categories.
- Select Inventory Sizes, not Size Systems.
- Add the client-ready variant label.
- Open Inventory and create or edit the variant for the applicable Sales Item.
- Verify stock, price, location, and variant choice in the staff cart. Inspect the regular client catalog and every supported client offer path separately; do not publish the product until the intended variant can be purchased unambiguously.
- When an approved fictional checkout carries an inventory variant, reconcile its purchase and inventory-sales reporting.
Do not archive an Inventory Size merely because a measurement chart changed. Existing inventory variants can continue to store that category ID, and active variants may still be offered while the label becomes unavailable to normal option lookups. In current cart and inventory paths, an archived or missing Inventory Size label can fall back to a numeric ID. Retire or migrate the affected variants deliberately before archiving the category value.
Changing a Size System name or range row does not change an Inventory Size, inventory variant, cart, order, or purchase. Changing an Inventory Size can change how a current variant is labeled in inventory and sales surfaces, but it does not change student measurements or report suggestions.
#Rename or reorder a Size System
Use a new versioned system when the source chart changes materially. Rename an existing system only for a spelling or clarity correction that does not change meaning.
- Open Settings > Categories and choose Size Systems.
- Record the category ID and current name.
- Select Edit for the exact row.
- Correct Name or Order.
- Do not change Top Category.
- Select Save.
- Reopen the row, then run a fictional narrow Measurements List check.
A rename keeps the same category ID, so underlying size rows remain connected and the report uses the new label. It does not preserve the old label as history. If the new name represents a new chart revision, create a new Size System and new range rows instead.
Order can affect category option endpoints and category-driven selectors, but the current Measurements List builds its Size System filter alphabetically by name. Do not depend on Order to make one system the report's default or to communicate approval.
Moving the row to another Top Category is not a rename or archive. It removes the ID from the Size Systems family while existing range rows can still point to it. Never use Top Category to repurpose an established system.
#Archive or restore a Size System
Before archiving:
- Confirm the system is no longer approved for new use.
- Record its category ID and all known range-row IDs.
- Preserve the approved source and the replacement system.
- Test the replacement with fictional boundary cases.
- Tell authorized staff which system replaces it and from what date.
- Confirm no training material or routine procedure still directs users to the old system.
Then open Settings > Categories > Size Systems and select the row's Archive action. Use Show Archived and Restore to reactivate the same ID when rollback is approved.
Current archive boundary: Some active-only Size System lists hide archived rows, but the current Measurements List filter does not apply the category's active status when it builds its options. An archived system can therefore remain visible there, and its range rows can still return suggestions. Archive is not enforcement. Verify the report after the change and instruct staff not to select a retired system.
The current Categories page has no hard-delete action. The underlying size-range rows also have no current customer-facing archive, restore, or delete controls. Do not request deletion as a routine cleanup step; use a versioned replacement and retain the old IDs for reconciliation unless an approved retention or data-correction requirement says otherwise.
#Change range rows safely
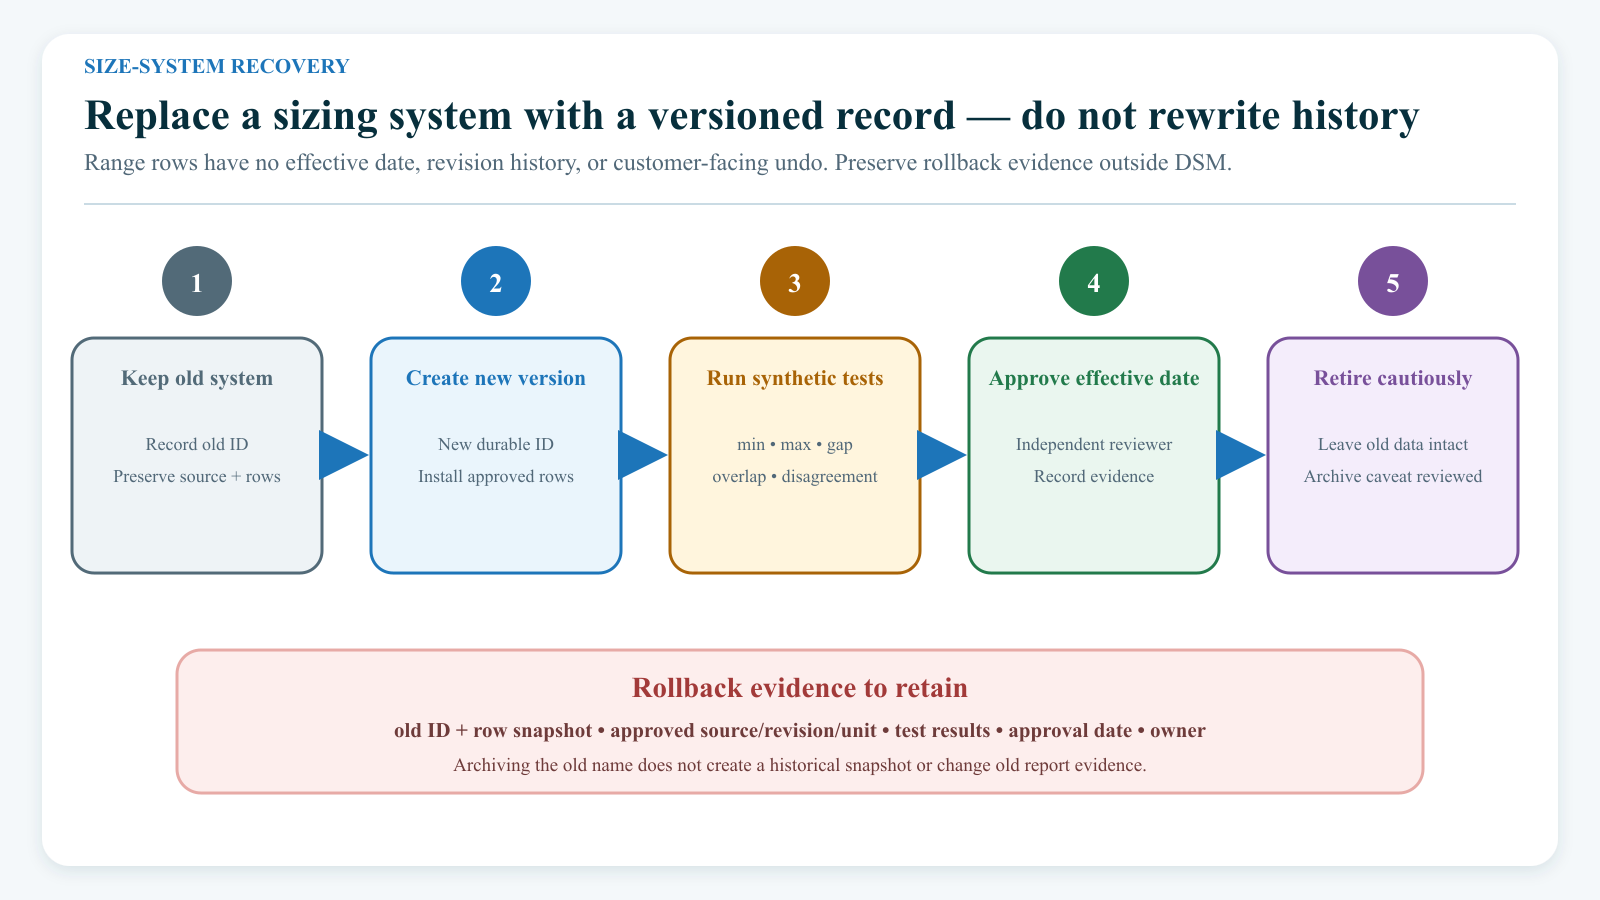
Range edits can change future report output for every student whose blank Size, Chart, and measurements are evaluated against that system. Because the range records have no effective date, status, revision, or history, changing an existing row also changes how an old measurement snapshot is interpreted the next time the report runs.
Use this safer pattern:
- Create a new versioned Size System name.
- Install new rows under the new ID from an approved source sheet.
- Run the complete synthetic boundary test.
- Approve the new version for a stated date.
- Leave the old system intact for reconciliation.
- Archive the old name only after reviewing the report-status limitation.
For a narrow data-entry correction to an existing range, require:
- the original row and corrected row;
- the reason and source page;
- affected system, Chart, Size Name, and field;
- a database snapshot or equivalent supported rollback;
- before-and-after synthetic report evidence;
- a reviewer who did not enter the correction; and
- confirmation that no public screenshot, PDF, order, or support note now relies on the incorrect result.
#Confirm the full setup
Use this checklist before calling a system ready:
- The Size System has a unique versioned name and recorded ID.
- The source, revision, unit, method, approval, and effective date are documented outside DSM.
- Every installed range row points to the intended system ID and fixed Chart.
- Each used field has both a minimum and maximum, with minimum no greater than maximum.
- Gaps, overlaps, duplicate names, and boundary values were reviewed.
- Synthetic tests demonstrate manual Size precedence, blank results, conflicting measurements, and alphabetical first-match behavior.
- Staff understand that a suggestion is not a final fit or purchase decision.
- The Online Client and staff carts were checked only for separate Inventory Size behavior.
- Access, privacy, PDF handling, correction, rollback, and retirement owners are documented.
- A second authorized reviewer signed off on the current release.
#Troubleshooting
#A new Size System appears, but it never suggests a size
Adding the category name does not create range rows. Confirm through the approved support or migration record that rows exist for that exact category ID and student Chart. Then confirm the student's Size is blank, Chart is populated, at least one plain numeric body measurement is present, and both ends of the applicable range exist.
#The report shows a size that does not fit all measurements
That is possible in the current implementation. One matching populated measurement is enough for a row to qualify. Compare all values with the source chart and make a human decision. Record the discrepancy for product review; do not imply the software reconciled it.
#The report shows the same size after a different Size System is selected
Open the student's Measurements page and inspect Size. A manually stored Size takes priority over every selected system. Clear or change it only through the approved correction process and only when a reliable source supports the change.
#The wrong size wins at an overlap
When several rows qualify, the current lookup returns the first Size Name alphabetically. Remove accidental overlap in a new reviewed chart version, or keep the result manual. Renaming sizes to manipulate sort order is not a safe matching rule.
#A boundary value returns blank
Check that the student Chart and system ID match the row, the value uses the same unit, and both minimum and maximum are populated. Boundaries are inclusive, but a min-only or max-only row cannot match that field in the current lookup.
#An archived Size System still appears in Measurements List
This is a known current difference between category consumers. Active-only Size System lists can exclude archived rows, but the report's filter currently loads all child rows. Do not use the retired entry. Preserve its ID, verify the replacement, and escalate if the old option creates operational risk.
#A Size System disappeared after an edit
Open Settings > Categories, select the Top Category where the row now appears, and inspect Top Category in Edit. If it was moved, stop and review dependent range rows before moving it back. Do not create a duplicate replacement until the original ID is understood.
#A client sees a number instead of an inventory size name
This concerns Inventory Sizes, not a measurement Size System. Check the inventory variant's Size category ID and whether that Inventory Size was archived or removed. Restore the label or migrate and retire the variant through an approved inventory process, then verify staff cart, Online Client cart, purchases, and inventory-sales reports.
#A previous range or suggestion must be recovered
The current interface has no range revision history or undo, and student measurements are overwrite-only snapshots. Use the approved source sheet, data-change before-state, database backup, or prior protected test evidence. If none exists, rebuild a new version from an authoritative source rather than guessing the old value.
#A Size System or size row must be deleted
There is no supported customer-facing delete action for either current category names or range rows. Preserve the request, authorization, IDs, dependencies, and rollback evidence, then use the approved support or data-administration process. Verify the Categories page, Size Systems API, Measurements List web/PDF output, student records, inventory boundaries, retained downloads, and backups within the documented deletion scope.
#Related articles
- Create and maintain categories
- Manage student measurements from a class
- Manage inventory variants and stock
- Create a Sales Item
- Sell an item with the staff Shopping Cart
- Review purchases
- Sales, purchases, and inventory overview
- Income, sales, and daily totals reports
- Buy items and use your cart
- Understand and verify your order result
- Roles and permissions