Communications
Manage message templates, history, and email delivery
This guide stops before recipient selection or a bulk send. When the content is approved, continue with Choose message recipients and send safely.
Current channel boundary: The library can store Email, SMS, TTS, and Message records. The generic test and prepare-to-send workflow is currently email-oriented. Saving an SMS, TTS, or Message template does not prove that its delivery channel is configured or that the template can be sent from this page.
#Before you begin
- Confirm that your login group is allowed to view History and to create, edit, archive, restore, or delete templates as required. These are separate responsibilities in many studios.
- Identify the content owner, intended channel, intended audience, approval date, and person responsible for future review.
- Use synthetic people and a controlled internal mailbox for training and tests.
- Confirm consent, required sender identification, opt-out language, and retention requirements for the intended message.
- Create any needed Message Categories under Categories and any approved email signature under the studio's signature settings before editing the template.
- Scan and reopen every attachment. A harmless filename does not prove that the file is safe or belongs to the intended audience.
- If you will send an email test, confirm that SMTP, the sender address, and the studio's outbound safety setting are ready.
Warning: Saving a template does not send it, but Send Test sends a real outbound email and Send Message can lead to a real recipient queue. Stop at the saved template until its content and test plan are approved.
Warning: Permanent template deletion can also remove related local message history. Archive whenever retention or recovery matters.
Important: Current History detail can use the reusable template's current subject, body, and attachment list. Editing or removing content from a template can therefore change what an older History detail window displays. Preserve an approved copy outside the template when the exact sent version is a required business record.
#Understand the five messaging records
| Record or screen | What it answers | What it does not prove |
|---|---|---|
| Message Template | What reusable subject, body, type, category, signature choice, and attachments are stored now | Who should receive it or what an older recipient actually saw |
| Template checkbox | Whether the record belongs in Templates Only rather than Messages Only | Active, draft, archived, approved, or delivered status |
| History | What local message-history rows DSM can find for a recipient, type, template, subject, or service ID | Destination-server acceptance, inbox placement, reading, or an immutable copy of the sent template |
| Email Delivery | What a verified reporting provider recorded for submission, delivery, delay, bounce, complaint, or suppression | Inbox placement, reading, consent, or a response from the recipient |
| Scheduled messages | A reserved screen for a future remote scheduling feed | A working schedule or the status of Settings > Scheduled Triggers |
Treat these records as complementary evidence. A row in one screen is not a substitute for the others.
#Find and interpret a template
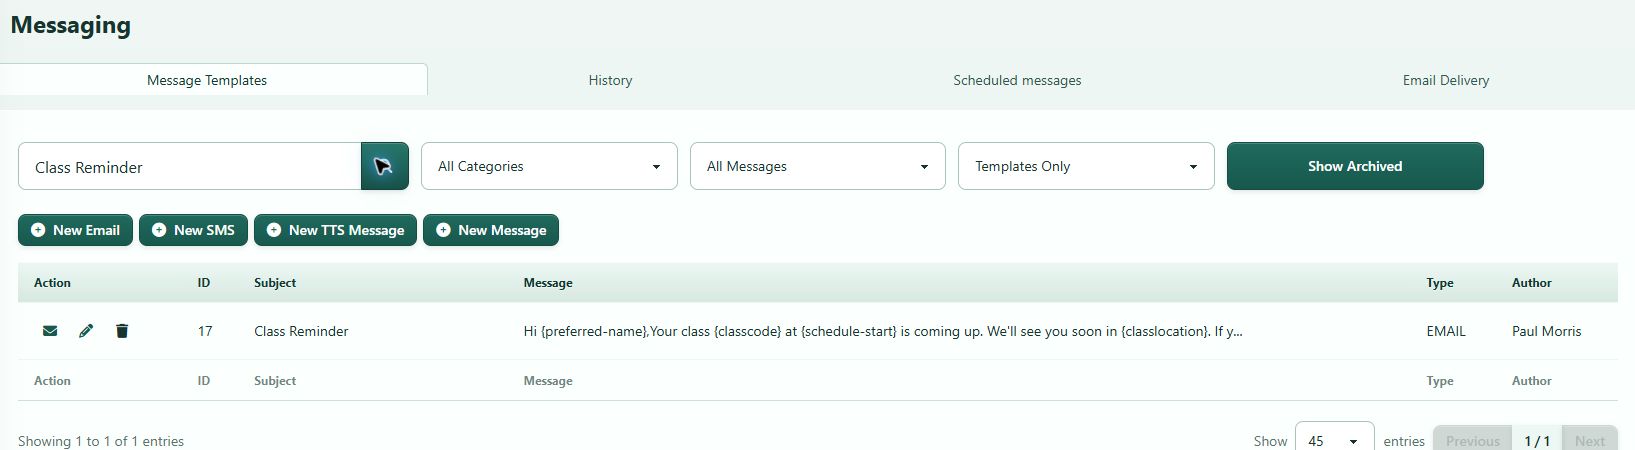
Open Messaging. The section opens Message Templates by default.
Use the library filters together:
| Control | Current behavior |
|---|---|
| Search templates | Searches stored subject and message content after you select Search or press Enter |
| All Categories | Limits results to one active Message Category |
| All Messages | Filters by Message, Email, SMS, or TTS type |
| Templates Only | Shows reusable records whose Template checkbox is selected; this is the default |
| Messages Only | Shows records whose Template checkbox is not selected |
| All Records | Shows both reusable templates and non-template message records |
| Show Archived | Switches to archived records only; it does not add archived records to the active list |
| Page size | Shows 10, 25, 45, 50, or 100 rows per page |
The normal list includes both Active and Draft records. A draft is labeled in the Type column. The current editor does not provide a visible Save as Draft control, so do not build a workflow that depends on creating or activating drafts from that form.
The table shows the record ID, subject, a plain-text preview of the message, type, and available author name. Use the ID when two records have similar subjects.
#If a template seems to be missing
- Clear Search.
- Select All Categories and All Messages.
- Select Templates Only, Messages Only, and then All Records as needed.
- Switch between Show Archived and Show Active.
- Check additional pages.
- Confirm that the record was saved in this studio and not merely drafted in another document or environment.
#Choose the correct template type
| Type | Current editor | Safe interpretation |
|---|---|---|
| Required subject, rich-text body, merge tags, category, signature choice, and attachments | The only type supported by the generic template test control; sending still requires usable SMTP and a reviewed recipient workflow | |
| SMS | Plain text, merge tags, a 2,000-character field, and an on-screen 160-character segment estimate | The estimate is a writing aid, not a provider bill or delivery guarantee; encoding and provider rules can differ |
| TTS | Plain text, merge tags, and a 1,000-character limit | A stored text-to-speech script; provider and end-to-end delivery are not verified by saving it |
| Message | Subject, rich-text body, merge tags, and category | Reusable in-app or client-message content where a separate feature supports it; it is not email and has no attachment panel here |
Choose the type before writing. The current edit screen preserves the saved type and does not offer a type converter.
#Create a reusable template
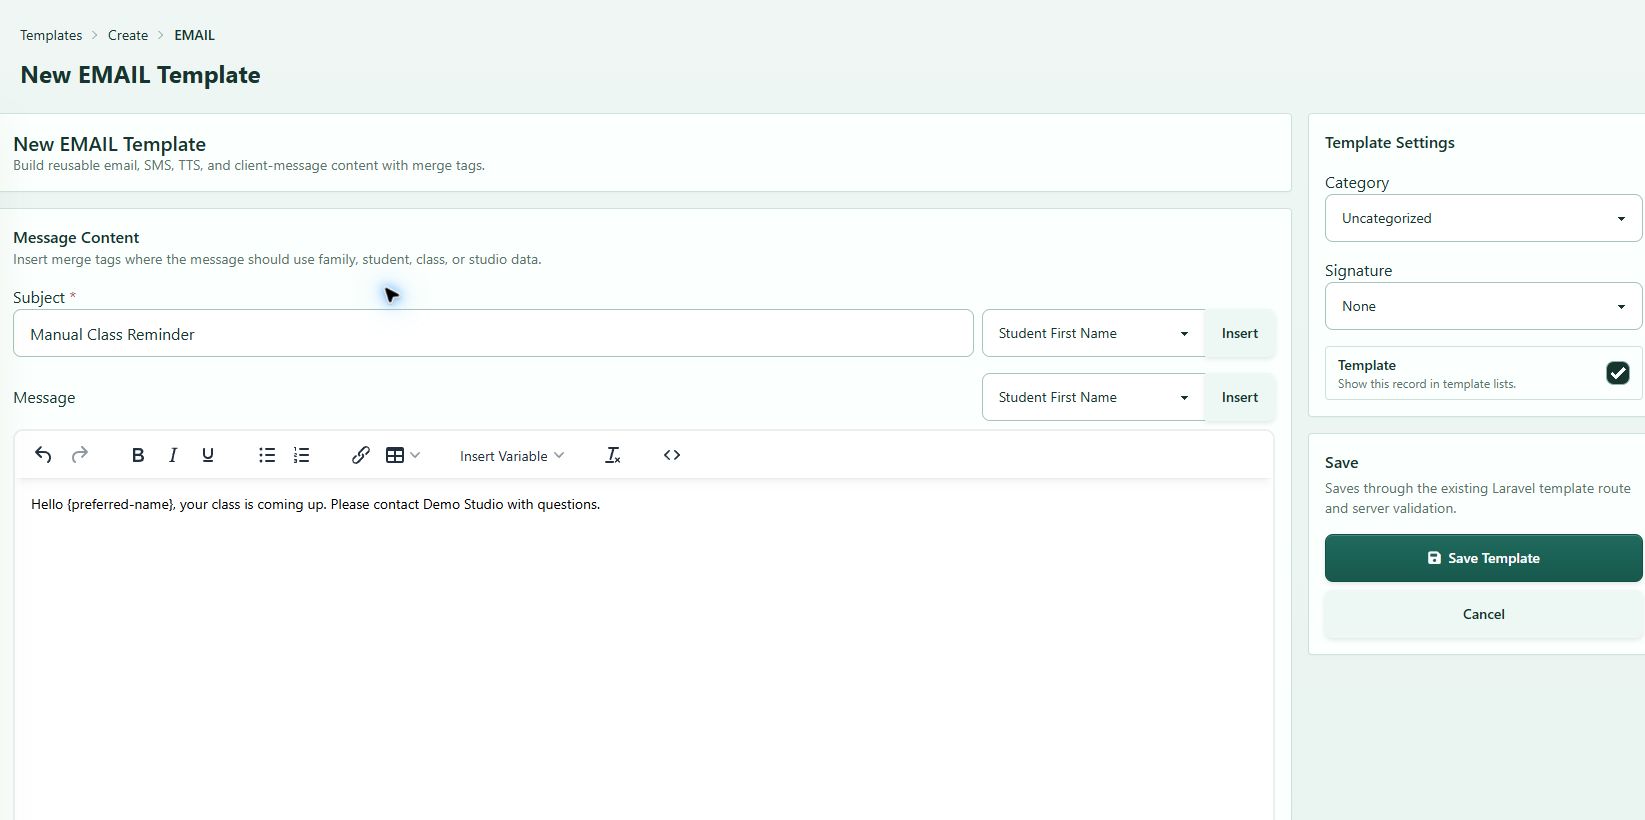
- Open Messaging > Message Templates.
- Select New Email, New SMS, New TTS Message, or New Message.
- Enter a specific subject when the type provides one. Email requires a subject.
- Write the shortest complete message in the appropriate editor.
- Insert approved merge tags only where every intended use supplies the required context.
- Select a Category, or leave Uncategorized when no approved category applies.
- For Email, select a Signature only after reading Understand signature behavior.
- For Email, add and inspect the required attachments.
- Leave Template selected when the content should appear under Templates Only and be reused by other features.
- Clear Template only when the record is intentionally a saved one-off message rather than reusable content.
- Select Save Template once.
- Return to the library and confirm the ID, subject, preview, type, category filter result, and expected Templates Only or Messages Only placement.
- Reopen Edit and confirm the complete body, settings, and current attachment list.
New records saved through the current form are active by default. The Template checkbox changes list classification; it is not an approval, delivery, or active-status control.
Important: When template creation was launched from selected class or schedule records, saving can continue directly to Prepare to Send. Do not treat that redirect as approval to load or send. Follow the separate recipient-selection and send procedure.
#Use categories as organization, not authorization
Message Categories organize the library and can help other settings narrow template choices. They do not select recipients, grant permission, prove consent, or determine delivery status.
- Plan a small, durable category set such as Operations, Enrollment, Billing, or Events.
- Manage the category under Settings > Categories in the Message Categories family when your role permits it.
- Keep only current categories active.
- Return to the template editor and select the category.
- Confirm that the template appears when that category is selected in the library.
Only active Message Categories appear in the current template filter and editor. If a category is missing, check whether it is archived or was created under a different category family.
Avoid creating near-duplicates such as Billing, Billing Messages, and Billing Email unless each has a defined owner and use. Category cleanup is easier before many templates depend on the choices.
#Use merge tags safely
The subject and body controls can insert a merge tag at the cursor. A merge tag becomes recipient-, class-, schedule-, purchase-, gift-card-, or studio-specific only when the sending workflow supplies that context.
For a complete literal reference, workflow-by-workflow guidance, testing procedure, and troubleshooting, see Using literals in messages. The current interface uses merge tag and Insert Variable for what older DSM instructions call a literal.
| Tag family | Examples in the current picker | Context required |
|---|---|---|
| Student/account | First name, last name, preferred name, username, full name | A valid member or family record |
| Studio | Studio name, phone, email, Online Client sign-in URL, registration fee | Complete studio settings |
| Class | Class code/name, location, instructor | A specific class context |
| Schedule | Weekday, day, time, month, start, and room | A specific schedule occurrence |
| Purchase | Purchased item and purchase date | A purchase-aware workflow |
| Gift card | Gift card code and amount | A gift-card-aware workflow |
| Family summary | All students and classes | A family record plus complete current enrollment data |
| Account access | Create Password URL | A specifically approved account-access workflow |
#Insert and review a tag
- Place the cursor in the subject, rich-text body, SMS text, or TTS text.
- Select the tag in the nearby merge-tag picker, or use Insert Variable in the rich-text editor.
- Select Insert.
- Keep the inserted token exactly as supplied. Do not add spaces inside it or retype its brackets.
- Read the entire sentence for singular/plural, punctuation, and a sensible fallback.
- Save, reopen, and test the template with synthetic data that contains the required source value.
- Inspect the received message for both blank values and unreplaced tokens.
A tag without usable context can remain visible as a raw token or can resolve to an empty value. The editor does not prove that every future recipient has complete data.
Important: The generic Send Test Email control supplies an email address but does not let the operator choose the sample member, class, or schedule. The server can use the first available member as sample data, and class or schedule tags can remain unresolved. A correct generic test is therefore not proof that a class-specific tag will work for every send path.
Warning: Use only the tags offered by the current picker and approved for the workflow. Do not paste legacy password-revealing tokens from old documentation. The Create Password URL tag is intentionally not generated by the generic test and can affect account-access state in a real member context. Reserve it for a separately approved account-creation or recovery procedure.
The family class-summary and gift-card tags can expose private schedules, relationships, codes, or values. Do not use them in a broad message unless every destination is authorized to receive that information.
#Understand signature behavior
The Email editor stores a selected Signature. In the current generic template test and bulk email path, that stored selection is not appended automatically to the message body.
For a reliable bulk-email sign-off:
- Put the approved sign-off directly in the Email body.
- Keep the Signature selection for organizational compatibility only if the studio requires it.
- Send a controlled test.
- Confirm the received email contains the sign-off exactly once.
Do not assume the selected signature will appear because it is visible in Template Settings. Do not add the same sign-off twice when a different, separately verified individual-message workflow already appends a signature.
If a retired or duplicate signature appears in the selector, stop and reconcile the signature records under Settings before using it.
#Add and protect email attachments
Attachments are available only for Email templates in this editor.
#Add files
- In Attachments, read the provider-specific limit shown on the page.
- Drag files into the upload area or select the area and browse.
- Wait until each file appears under Ready to attach on save.
- Confirm the filename and displayed size.
- Select Save Template.
- Reopen the template.
- Confirm every file appears under Current files.
- Open each current file and verify its content again.
The current server blocks an individual file above 10 MB and a staged total above 25 MB. The editor displays a guideline of up to 10 files, and Postmark users see a stricter recommendation of no more than 10 attachments and 10 MB total per email. Follow the strictest on-screen provider limit. Upload success does not prove provider acceptance.
Supported extensions include common documents, spreadsheets, images, archives, audio, and video. Prefer the smallest accessible format that clients can open safely. Avoid compressed archives unless the business need, malware review, and recipient instructions are explicit.
#Remove files
- Removing a file under Ready to attach on save removes that staged upload before it becomes part of the template.
- Removing a file under Current files deletes the stored attachment immediately.
Warning: Removing a Current files attachment is not deferred until Save Template, and selecting Cancel afterward does not restore it. Download or retain an approved source copy before removal.
After any attachment change, send a new controlled test. Do not rely on an older test because the stored attachment set has changed.

#Edit without losing the approved version
The current template record does not provide a customer-facing revision history or one-step undo.
- Find the exact record by ID, type, and subject.
- Record its current category, Template state, subject, body, signature choice, and attachment filenames in the studio's approved change record.
- Preserve the previously approved content outside DSM when policy requires an exact sent version.
- Select Edit.
- Make the smallest approved change.
- Review every merge tag, link, sign-off, and attachment; do not review only the changed sentence.
- Select Save Template once.
- Reopen the template and confirm the saved result.
- Run the full controlled test again.
- Record the new review date and owner.
Editing the template changes future uses immediately. It can also change the subject, body, or attachment links shown when older local History rows are opened. Use provider events, the received test, and an external approval record when exact historical content matters.
#Know which lifecycle actions are actually available
| Action | Current customer interface | Result and recovery |
|---|---|---|
| Edit | Pencil action on a visible record when write controls are available | Overwrites the current template; no built-in revision rollback |
| Duplicate | No Duplicate control in the current library | Create a new record manually; do not call an internal endpoint or assume attachments were copied |
| Archive | First confirmation from Archive or Delete | Sets the record aside and hides it from the active list; reversible with Restore |
| Restore | Restore action in Show Archived | Returns the record to active status after confirmation |
| Delete | Second confirmation after declining Archive | Permanently deletes the template and its related local history through the single-record interface; no customer undo |
| Bulk actions | No row checkboxes or bulk toolbar in the current library | Work one record at a time; do not script undocumented endpoints |
| Draft | Draft records can be displayed, but the current editor has no visible Save as Draft action | Do not depend on a draft lifecycle until the interface is expanded and verified |
#Make a safe manual copy
- Open the source template and record its type, category, subject, body, merge tags, signature choice, and attachment filenames.
- Return to the library and select the matching New type.
- Give the new subject a clear version or purpose suffix.
- Copy only reviewed content.
- Select the category and signature choice again.
- Add each approved attachment again; attachments are not part of the supported copy workflow.
- Keep Template selected when the new record should be reusable.
- Save, reopen, and test the new record.
- Archive the old record only after every dependency has been reviewed.
Before archiving a template, check whether a Sales Item, notification setting, Scheduled Trigger, or other configuration refers to its ID. Archive is reversible, but a dependent workflow can still stop finding or using the record.
#Archive a template
- Find the active record by ID.
- Select the trash-can action labeled Archive or Delete.
- At Move template #... to archive?, select OK.
- Select Show Archived.
- Confirm that the record appears there.
#Restore a template
- Select Show Archived.
- Find the record by ID.
- Select Restore.
- Confirm the restore prompt.
- Select Show Active and confirm the record returned.
- Reopen and retest it before reuse.
#Leave the action without changing anything
The current confirmation sequence is unusual. Selecting Cancel on the archive question opens a second delete question.
- Select Cancel on Move template #... to archive?.
- At Delete template #... and related message history? This cannot be undone., select Cancel again.
- Confirm that the record remains in the active list.
#Permanently delete a template
Warning: Permanent deletion has no customer-facing undo and removes related local message-history rows in the single-record workflow. It is not a verified privacy purge of every stored attachment, export, backup, or provider event.
- Confirm the record ID with a second authorized person.
- Export or preserve any business record required by policy.
- Confirm that no notification, Sales Item, Scheduled Trigger, or other setting depends on the template.
- Select Archive or Delete.
- Select Cancel on the archive question.
- Read the permanent-delete question and verify the ID again.
- Select OK only when permanent deletion and local-history loss are both approved.
- Search the active and archived lists for the ID.
- Check dependent settings and required retention evidence.
For ordinary cleanup, archive instead of deleting.
#Test an email template before choosing recipients
Build a repeatable test matrix for every reusable Email template.
- Save and reopen the exact template version under review.
- Confirm that the sender identity and SMTP notice are usable.
- Use a controlled mailbox owned by the studio; do not use a client's address.
- Start with static content and studio-level tags.
- Test member-level tags with a synthetic record whose values are known.
- Test class-, schedule-, purchase-, or gift-card-specific tags only from a workflow that supplies that context.
- Open the received email and check sender, reply behavior, subject, body, unresolved tags, links, sign-off, and every attachment.
- Check a narrow mobile view and at least one representative desktop mail client.
- Confirm that headings, link text, contrast, and reading order remain understandable without images.
- Check that no tracking image, remote content, or pasted HTML was added unintentionally.
- Record the template ID, version, test destination owner, date, result, and reviewer.
- Repeat the test after any subject, body, link, tag, signature, category, or attachment change.
An on-screen test success means the application did not report an immediate send error. Confirm receipt outside DSM and review History and Email Delivery when available.
The generic test is available only for Email. SMS, TTS, and Message content needs a separate channel-specific test and history procedure before operational use.
#Review local message History
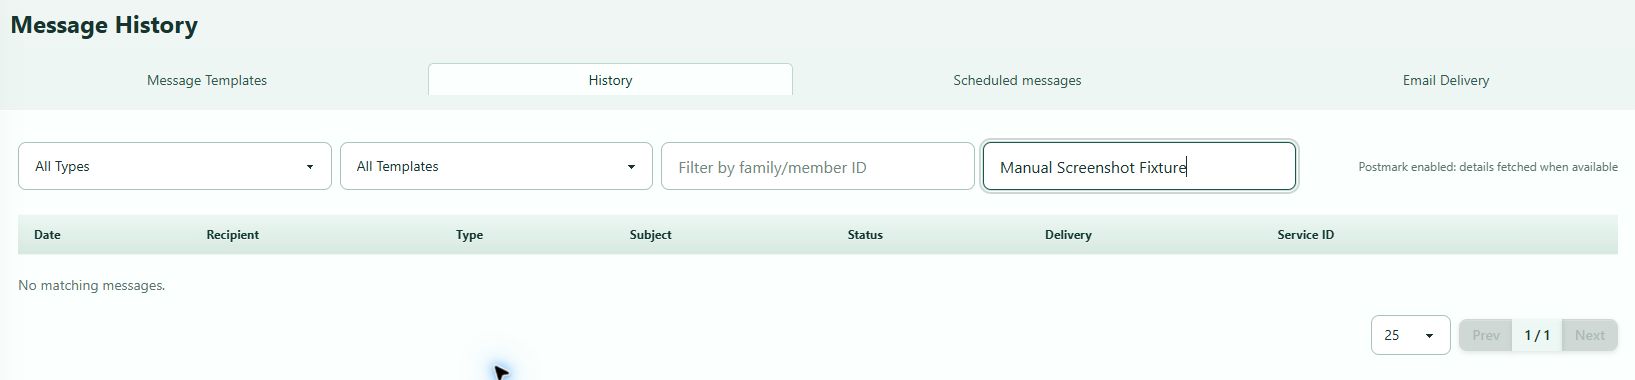
Open Messaging > History.
#Filter the list
- All Types filters Email, SMS, TTS, or Message.
- All Templates filters by the saved template ID and subject label.
- Filter by family/member ID accepts a numeric ID. When a family-level record is selected, current filtering can include its directly related student records.
- Search recipient, subject, or ID searches the stored destination, subject, and available service message ID. It does not search by client name.
- The page can show 10, 25, or 50 rows at a time.
Use the smallest filter that answers the question. A family/member ID is safer than searching a common subject across the entire studio.
#Read a local row
| Field | Meaning |
|---|---|
| Date | The stored sent date when available |
| Recipient | The recorded destination address or channel address |
| Type | The template or history message type |
| Subject | The current joined template subject when available, otherwise the stored history subject |
| Status | A local label such as Queued, Sent, or Failed |
| Delivery | Conditional provider summary when verified reporting is enabled |
| Service ID | An available provider message identifier used for correlation |
Local Sent means the application treated the transport submission as successful. It does not prove delivery, inbox placement, opening, reading, or client action.
Local Failed means the application recorded a send error for that history row. Investigate the address, transport, and provider result before creating a narrow retry audience.
Select View to inspect the available message detail. The detail window can show the current reusable template body and current template attachments rather than a frozen historical copy. Compare it with the received message or approved version record when content changed after the send.
Some sends are not represented uniformly. For example, a broad staff recipient queue can lack a member link, while the current bulk history writer stores rows only for member-linked recipients. Absence from local History is not proof that no provider submission occurred.
#Review provider Email Delivery
The Email Delivery tab appears only when the login is permitted and the studio has a fully configured, enabled, and verified Postmark reporting connection. Ordinary SMTP can send email without making this tab available.
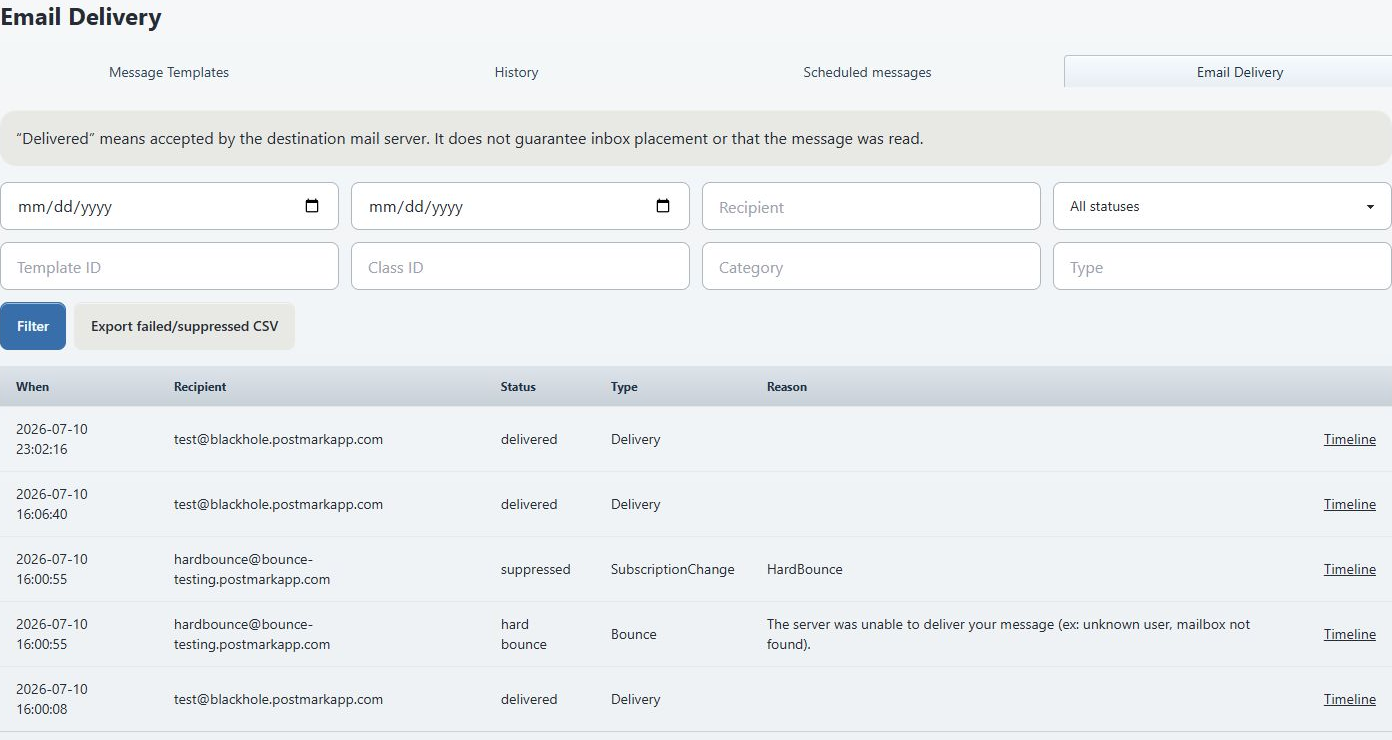
Use Email Delivery to filter provider events by:
- From and To date;
- recipient;
- delivery status;
- template ID;
- class ID;
- category; and
- message type.
The results show event time, recipient, normalized delivery status, provider event type, reason, and a Timeline link. The timeline groups events for the same provider message and recipient.
#Interpret provider statuses
| Status | Operational meaning | Next action |
|---|---|---|
| Submitted | The reporting provider accepted the API submission | Wait for a later event; do not call it delivered |
| Delivered | The destination mail server accepted the message | Do not claim inbox placement, reading, or response |
| Delayed | A transient or DNS-related condition delayed delivery | Recheck the timeline; avoid an immediate duplicate send |
| Soft bounce | A temporary bounce was reported | Verify the address and watch for a later event or repeated failure |
| Failed | The provider submission or SMTP API step failed | Correct the cause, reconcile History, and retry only the affected approved destination |
| Hard bounce | A permanent or inactive-destination failure was reported | Stop sending, verify a corrected address, and follow the controlled clear procedure if appropriate |
| Complaint | The recipient reported the message as unwanted or spam | Keep the address blocked and escalate to the studio's consent/deliverability owner |
| Suppressed | Provider or recipient-health policy prevented or stopped sending | Investigate consent, provider suppression, and address health; do not bypass the block |
Hard bounce, complaint, and suppression states block sending in the verified reporting path. Complaint and suppression states are intentionally not cleared from this screen.
#Clear a corrected hard bounce
Warning: Clearing a local hard-bounce block can allow a later send attempt. It does not correct the account record, restore consent, or remove a provider-side suppression.
- Verify the exact affected address directly with the client through an approved channel.
- If the corrected address is different, update the source account and leave the old, invalid address blocked. The new address does not require clearing the old address's health record.
- Clear the block only when the same exact address is now confirmed deliverable, such as after its mailbox was restored.
- Open the affected Timeline.
- Confirm that the active health state is specifically hard bounce, not complaint or suppression.
- Check and correct the provider suppression record when required.
- Enter a concise Correction reason that explains the verified change without adding unnecessary personal information.
- Select Clear local hard-bounce block.
- Confirm that the local block cleared.
- Use a narrow controlled test or retry audience; never restart the entire original send by default.
The clear action works only for an active local Postmark hard-bounce block and requires a reason. If it is rejected, do not work around the restriction.
#Export failures for controlled follow-up
Select Export failed/suppressed CSV to export the current date, recipient, template, class, category, and type scope restricted to failure-related statuses. Clear a successful-only status filter before exporting, or the combined filters can return no rows.
The export can contain personal contact and delivery-health data. Store it in an approved restricted location, do not email it casually, and delete the working copy according to studio policy.
#Keep Scheduled Messages separate from Scheduled Triggers
Messaging > Scheduled messages is currently a remote-API placeholder.
- New Schedule is disabled.
- The page loads no scheduling records from DSM Next.
- Search, Status, and Template controls filter only a future remote feed.
- Edit and Delete are disabled.
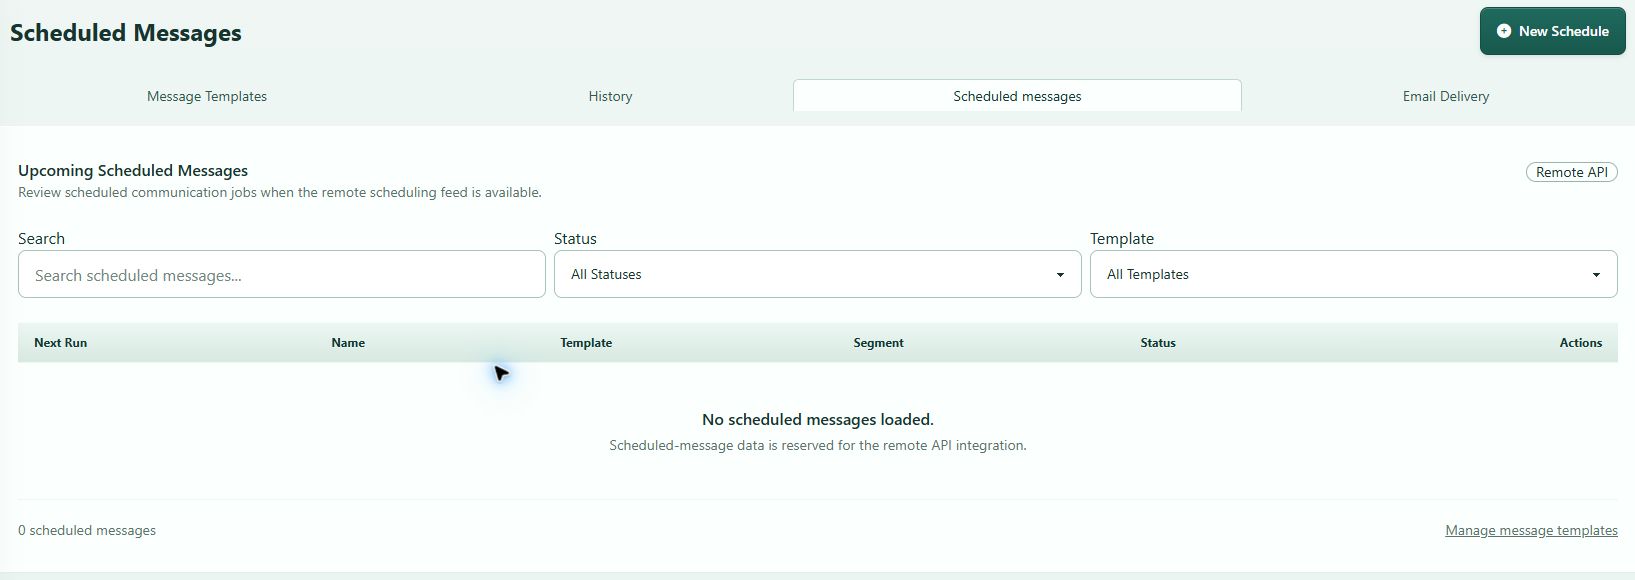
This screen does not prove that no automated messages exist elsewhere.
Settings > Scheduled Triggers is a different, implemented configuration area for event- or date-driven Email and SMS automation. It has separate templates, audiences, timing, scheduler, queue, provider, and safety requirements. See Create and control Scheduled Triggers.
#Protect permissions and communication privacy
- Give template editing, recipient selection, history review, delivery reporting, exports, and hard-bounce clearing only to roles that need each action.
- Instructor-style logins are normally limited to a messaging/history shell and denied template writing, sending, attachment, and Email Delivery actions.
- If a control or direct page is visible unexpectedly, stop and ask an administrator to verify Group Permissions. Visibility is not business authorization.
- Never share an administrator login to work around a missing action.
- Treat template bodies, History details, recipient addresses, service IDs, attachments, delivery reasons, timelines, and CSV exports as confidential studio records.
- Do not place payment credentials, medical details, passwords, private notes, full rosters, or broad exports in a reusable template.
- Use fictional names and reserved, non-deliverable test domains in screenshots and training materials.
- Crop browser tabs, internal URLs, tenant identifiers, provider identifiers, and unrelated records from documentation.
When a client requests deletion or correction of communication data, do not assume that deleting a template removes attachments, provider events, exports, backups, or received email. Follow the studio's approved privacy process and involve support where system-level retention must be evaluated.
#Confirm the template and records are ready
For a reusable template, confirm all of the following:
- The correct ID appears under the intended Templates/Messages, active/archive, type, and category filters.
- The subject and body are the approved version.
- Every merge tag has an identified context and fallback.
- The sign-off appears exactly once in the received test.
- Every current attachment opens and belongs to the intended audience.
- The received Email test works on representative desktop and mobile views.
- The approval and review date are stored outside DSM when required.
- Any prior version was archived rather than permanently deleted unless deletion was explicitly approved.
For an investigation, record separately:
- the approved audience or exact member ID;
- the local History status and service ID;
- the provider timeline and status, when available;
- the corrected source data or provider action;
- whether a retry is required; and
- the exact narrow retry audience.
#Troubleshooting
#New, Edit, Archive, or Restore controls are missing
Your login may have History access without template-write access. Ask an administrator to review the login group. Do not use a copied direct URL or another person's credentials.
#The template is not in Templates Only
Open All Records and Messages Only. The Template checkbox may have been cleared. Edit the exact ID and select Template only if it is approved for reuse.
#Show Archived hid all active templates
That button switches to an archived-only list. Select Show Active to return; it is not an include-archived option.
#There is no Duplicate button or bulk toolbar
Those controls are not part of the current library. Create a reviewed manual copy and work one record at a time. Do not call undocumented endpoints.
#A category is missing
Confirm that it is an active child of Message Categories, not a Member, Class, Charge, or other category family. Reload the editor after correcting it.
#A merge tag is blank or visible in the received message
The test or send path did not supply the required value. Remove the tag, correct the source record, or use a workflow that supplies the member/class/schedule/purchase context. Send a new controlled test.
#The test used the wrong person's data
The generic test can choose the first available member as its sample and does not expose a sample selector. Use synthetic tenant data or a separately controlled source workflow. Do not interpret that preview as proof for the final audience.
#The Create Password URL did not resolve in the test
Generic template testing intentionally disables password-link generation. Do not force it by typing a different token. Use the separately approved account-access workflow.
#The selected signature is missing
Put the approved sign-off directly in the Email body and test again. The stored template Signature selection is not appended by the current generic test or bulk path.
#An attachment disappeared after selecting Cancel
Removing a file under Current files takes effect immediately. Restore it from the approved source copy, save, reopen, and retest.
#The template saved but an attachment is absent
Reopen the template and inspect Current files. Upload staging or finalization can fail independently of the content save. Add the file again only after confirming that a duplicate is not already present.
#A delete question appeared after Canceling archive
Select Cancel again to make no change. The first Cancel declines archive and opens the second, permanent-delete confirmation.
#An older History detail now shows the new template text
The current detail can prefer the reusable template's current subject/body and attachment set. Compare the received email, approval copy, and provider event. Do not rewrite the business record based only on that detail window.
#History says Sent but Email Delivery says Submitted, Delayed, or Failed
The local status describes the application transport attempt; the provider status describes a later delivery stage. Follow the provider timeline and do not resend until the two records are reconciled.
#A staff or instructor destination is absent from local History
Some staff queue rows are not member-linked, while the current bulk history writer records only member-linked rows. Check the approved source list and provider reporting.
#Email Delivery is missing
The tab requires permission and a fully enabled, verified Postmark reporting configuration. Ordinary SMTP History does not provide the same provider event feed. Ask the email-delivery owner to check the provider account.
#Clear local hard-bounce block was rejected
Only an active local hard-bounce block can be cleared, and a reason is required. Complaint and suppression states cannot be cleared there. Verify the address and provider state instead of bypassing the block.
#Scheduled messages has no rows and disabled actions
That is the current placeholder state. Review Scheduled Triggers separately when investigating actual automation.