Settings
Set up rooms and Online Client room booking
#Before you begin
- Confirm that your login can manage room settings and room records. These can be separate permissions.
- Create the studio locations you intend to use, when the room form displays a location list.
- Decide which rooms can be used for private lessons, group classes, and Online Client bookings.
- Decide the booking capacity, duration choices, start-time interval, price, checkout policy, and whether unpaid requests are allowed.
- Create active, client-visible Sales Items with the Room Booking type for paid bookings.
- Prepare a fictional client account and a date range with deliberate test availability.
Warning: Enabling room booking can expose rooms, availability, prices, and checkout actions to clients. An unpaid request can create a pending booking record without collecting money. A paid booking can add an item to the cart and continue into checkout. Test with fictional records before opening live availability.
Important: The current Settings > Rooms form and the current Online Client booking controller do not yet read and write the same setting keys in the inspected source. The admin form stores newer rooms.* keys, while the Online Client path still reads legacy keys such as OC_ROOM_BOOKING, OC_ROOM_BOOKING_TITLE, ROOM_BOOKING_DURATION, ROOM_BOOKING_CHECKOUT, and ROOM_BOOKING_UNPAID_REQUESTS. A Room booking settings updated message is therefore not proof that client behavior changed. Verify every value in the Online Client before launch and ask product support to reconcile the studio's setting rows if the two surfaces disagree.
#Understand the two parts of the page
The page has two related sections:
- Room Booking controls the booking feature's defaults and client choices.
- Rooms manages the individual room records.
The fields shown for a room depend on the columns available in the studio database. A studio can therefore show fewer fields than the list below.
#Review the Room Booking controls
| Control | Current accepted value | Intended use |
|---|---|---|
| Enable Room Booking | Yes or No | Enables the newer Rooms feature state on the admin page. Confirm the Online Client result separately because its current visibility flag is stored under a different key. |
| Default Duration (minutes) | 5 through 600 | Provides a starting booking length. |
| Minutes between Start Times | 5 through 120 | Sets the interval used to generate possible starts inside an availability window. |
| Booking Length Options (CSV) | At least one comma-separated whole number from 5 through 600 | Defines the lengths a client can choose, such as 30, 60, 90. Valid values are deduplicated and sorted when saved. |
| Online Client Section Title | Up to 100 characters | Provides the intended client-facing booking title. Confirm the live title separately because the current client controller reads OC_ROOM_BOOKING_TITLE. |
| Add to Cart and Checkout | Yes or No | Indicates whether a booking should use a Room Booking Sales Item and checkout. Confirm the live choice separately. |
| Unpaid Requests | Yes or No | Indicates whether a signed-in client can request a booking without immediate payment when checkout is not required. Confirm the live choice separately. |
Important: Unpaid Requests: Yes does not override Add to Cart and Checkout: Yes in the current client path. A request-only submission is accepted only when unpaid requests are enabled and checkout is not required.
#Save the booking defaults
- Open Settings > Rooms.
- Set Enable Room Booking to No while building and testing, unless the studio already has a controlled client test environment.
- Enter Default Duration (minutes).
- Enter Minutes between Start Times.
- Enter the approved Booking Length Options (CSV).
- Enter Online Client Section Title.
- Choose Add to Cart and Checkout and Unpaid Requests according to the approved booking policy.
- Select Save.
- Confirm Room booking settings updated.
After saving, inspect the Online Client with a fictional account. If its title, duration choices, request policy, checkout policy, or menu visibility does not match, stop the launch and compare the newer and legacy setting IDs with product support.
#Create a room
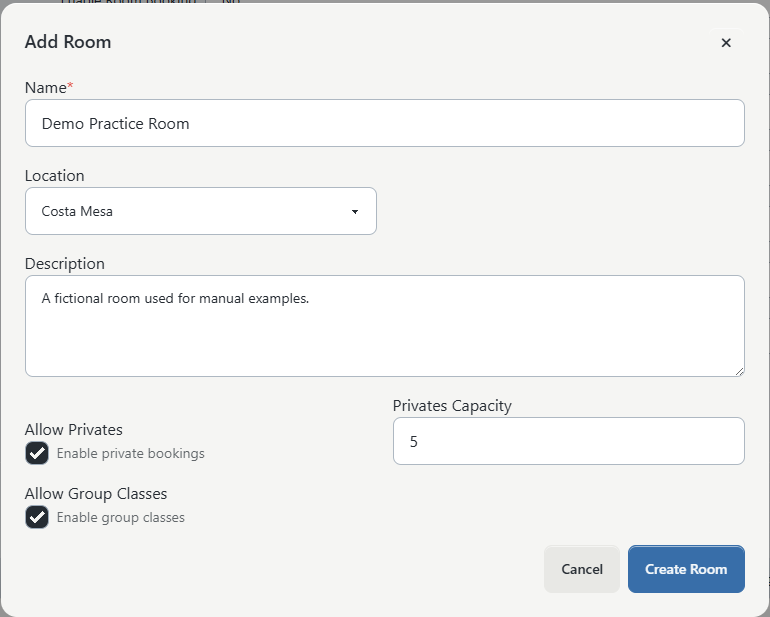
- In the Rooms section, select Add New.
- Enter Name.
- Select or enter Location, when shown.
- Enter a concise Description, when shown.
- Select Allow Privates when the room may be used for private bookings.
- Enter Privates Capacity from 0 through 99, when shown.
- Select Allow Group Classes when the room may be assigned to group classes.
- Enter Room Booking Capacity from 0 through 99, when shown and when the newer room-booking feature is enabled.
- Leave Auto copy room availability off unless a controlled test has proved the intended copy behavior for this studio.
- Under Sales items to book room, select the approved active Room Booking Sales Items.
- Select Create Room.
The room list reports the fields supported by the studio, including location, description, private-use choices, capacities, and group-class availability.
Important: When Allow Privates is on and Privates Capacity is blank, the current save path defaults private capacity to 1. When it is off and the field is blank, it defaults to 0.
Important: A blank Room Booking Capacity is stored as 0 when that field is available and the newer room feature is enabled. The client start-time calculation requires capacity to be greater than the count of overlapping bookings, so use a deliberate positive test capacity before expecting available start times.
#Prepare a Room Booking Sales Item
Use Settings > Sales Items to create or review the item used for checkout.
At minimum, confirm:
- the type is Room Booking;
- the item is active and visible;
- the name and client-facing description are approved;
- the price, tax, restrictions, and active dates are correct;
- any payment plan, scheduled payment, or contract is intentional; and
- the item is selected on the correct room.
The room editor loads active, visible Sales Items of the Room Booking type. If none exist, it reports No room-booking items yet.
Warning: A Sales Item can add charges, scheduled payments, taxes, agreements, and purchase records during checkout. Review the complete fictional cart and confirmation before making a room-booking item available to clients.
#Prepare room availability
The Online Client wizard reads dated availability windows for the selected room. It then generates possible start times inside each window using the configured start-time interval, duration, room capacity, and overlapping bookings.
The currently inspected Settings > Rooms page does not provide an editor for those dated availability records. The separate Rooms Default Availability weekly editor stores a template, but the inspected current source does not show that template being copied into client-visible dated availability. Auto copy room availability is also stored on the room record, but its downstream copy action was not found in the current source.
Before launch:
- Confirm the supported workflow your studio uses to create dated room availability.
- Create a small fictional date range.
- Verify the underlying availability appears in the Online Client.
- Confirm a duration fits fully inside the window.
- Confirm the room has a positive booking capacity.
- Create one overlapping fictional booking and verify the remaining capacity behaves as expected.
Do not publish room-booking instructions that rely on automatic availability until that path has been verified end to end.
#Test the Online Client booking flow
The current client flow presents five steps:
- Select Room;
- Pick Availability;
- Choose Start Time;
- choose a booking length and item; and
- Confirm.
Test both policy branches that your studio intends to use.
#Checkout booking
- Select a room, availability window, start time, length, and Room Booking Sales Item.
- Review the confirmation summary.
- Select Add to Cart and Checkout.
- Confirm the correct item, price, room, start, and length in the cart.
- Continue only with an approved processor test or a no-payment-due test.
- Confirm the purchase and booking history records after checkout.
Adding the item to the cart is not a confirmed payment or proof that the final room booking was linked. Verify the completed checkout and resulting records.
#Unpaid request
- Sign in as the fictional client.
- Select the room, availability, start, and length.
- Select Request Booking.
- Confirm Booking request submitted.
- Open the client's room-booking history and verify the request state.
- Confirm the admin calendar or Room Booking report shows the expected request.
Warning: An unpaid request creates a request record without a purchase or collected payment. Define who approves, rejects, prices, and follows up on these requests before enabling the option for clients.
#Edit, archive, or restore a room
Select the room name or edit action to update a room. The edit form shows its Status and uses Save Changes.
To remove a room from the active list, select its archive action and confirm Archive this room? Select Show Archived to find it later, then use the restore action.
Warning: Archiving a room does not explain or automatically move its existing class assignments, availability, bookings, purchases, calendar events, or reports. Review every future dependency before archiving a room in use.
#What happens next
A created room becomes an active room record and can participate in the scheduling fields supported by the studio. Selected Room Booking Sales Items are stored as room-to-item assignments when the studio has the required relation table.
In the current Online Client path:
- the room menu is controlled by the legacy
OC_ROOM_BOOKINGflag; - the wizard reads active rooms and dated availability;
- possible start times exclude times at capacity;
- checkout bookings add a Sales Item to the cart with room-booking metadata; and
- allowed request-only bookings create a pending request record without a purchase.
Saving the Rooms form does not itself create availability, a class schedule, a purchase, or a payment.
#Confirm it worked
- Find the room in the active Rooms list.
- Reopen it and confirm its location, capacities, scheduling choices, and assigned Sales Items.
- Open the Online Client as a signed-in fictional client.
- Confirm the intended menu label and room list.
- Confirm the exact fictional availability window, start-time interval, duration choices, capacity, and price.
- Complete the approved checkout or request-only test.
- Check booking history, the admin calendar with Show Room Bookings, and the Room Booking report.
- Confirm that an overlapping or full-capacity case is unavailable.
#Troubleshooting
#Room Booking is missing from the Online Client
Confirm the live OC_ROOM_BOOKING setting, not only Enable Room Booking on the newer Rooms form. Then confirm at least one active room, the signed-in account, and the studio-specific Online Client URL.
#The Online Client title or duration choices do not match Settings > Rooms
The current surfaces read different setting keys. Record the values shown in Settings > Rooms, then search the shared settings screen for OC_ROOM_BOOKING_TITLE, ROOM_BOOKING_DURATION, ROOM_BOOKING_DURATION_OPTIONS, and ROOM_BOOKING_START_TIMES_STEP_MINUTES. Do not change both sets blindly; ask product support to identify the authoritative path for the studio and retest.
#A room has no availability
Confirm dated availability records exist for that room, the selected date range is correct, the duration fits inside the window, capacity is greater than zero, and overlapping bookings have not filled it. The weekly default template alone is not verified as a creator of dated availability.
#No Room Booking Sales Items appear
Create or review an active, visible Sales Item of the Room Booking type. Confirm the studio has the room-to-Sales-Item relation table and reopen the room editor.
#Request Booking is unavailable
The client request-only path requires unpaid requests to be enabled, checkout not to be required, and the client to be signed in. Confirm the live legacy values as well as the newer Rooms form.
#A paid booking remains only in the cart
Adding a booking item to the cart is an intermediate step. Complete an approved checkout test and then review the purchase and booking linkage. Record the cart line, member, room, start, length, and resulting status if linkage fails.
#A staff member can view settings but cannot edit rooms
Room settings and room-record management use separate abilities. Ask an owner or administrator to review both the settings and room-management permissions for that login group.