Classes
Record attendance and use class rosters
#Before you begin
- Confirm the date, location, class, and meeting time. Attendance belongs to a specific schedule, not only to the class.
- Confirm that every expected student appears on the roster and has the correct assigned purchase when one is required.
- Know the studio's definitions for early cancellation, late cancellation, and no-show. DSM stores the selected state; it does not decide the studio's policy.
- Review the studio's cancellation-fee, package-usage, scheduled-payment, and status-notification settings.
Warning: Selecting an individual attendance status saves it immediately; there is no separate Save button. A status change can recalculate package usage, queue a cancellation/no-show charge, and send a configured message. When the queued charge becomes due, the system can create the ledger charge and then create a scheduled-payment instruction if that separate option, a payment system, and an eligible stored source are available.
Warning: Changing a status away from Late Cancel or No Show is not proof that an existing fee, charge, or scheduled payment was reversed. Review the account ledger after correcting an attendance mistake.
#Open the correct Day View
- Open Calendar.
- In Month view, select the date number to open Day View.
- Use Prev or Next to move to the correct day if needed.
- Find the class by its name, time, instructor, room, and other schedule details.
- Expand the class if its roster is collapsed.
- Confirm the displayed roster before recording attendance.
If the calendar path or class is hidden, your role, location, or class permissions can be limiting the view. Do not use another location or date as a workaround.
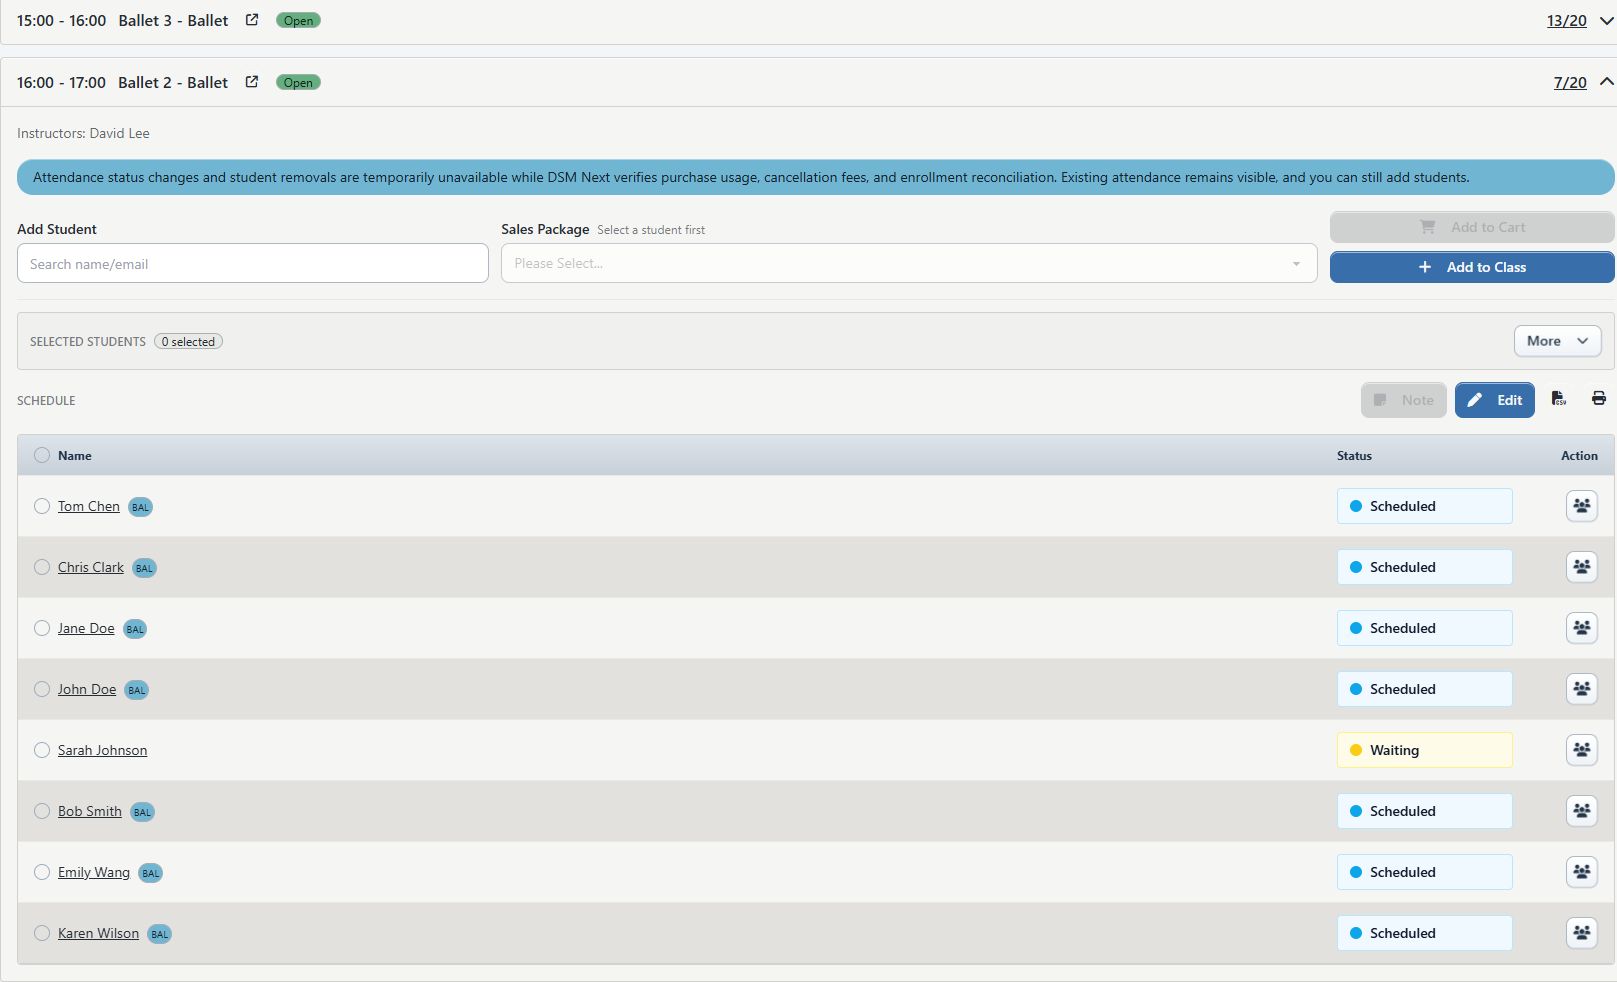
#Understand attendance statuses
Attendance labels depend on your studio's attendance mode. The video below uses Present (here for class), Late (arrived after the start), and Absent (not present). Follow the options shown in your roster. Other modes can use the following labels:
| Status | Operational meaning |
|---|---|
| Scheduled | The student's attendance has not been resolved for this occurrence. Studio settings can count some scheduled records toward package usage. |
| Attended | The student attended. This normally counts toward package usage. |
| Early Cancel | The student canceled under the studio's early-cancellation policy. |
| Late Cancel | The student canceled under the studio's late-cancellation policy. This can count toward package usage and can create a fee. |
| No Show | The student did not attend and did not receive the early/late-cancel state. This can count toward usage and can create a fee, according to settings. |
| Waiting | The student is waiting for this schedule. This is a roster state, not proof of attendance. |
Private-lesson screens can use different labels, including Complete, Did Not Show, or Complimentary. This article documents the common Day View group-class roster and should not be used to infer private-lesson billing policy.
#Record one student's attendance
- Find the student on the correct class roster.
- Review the current status and assigned purchase shown on the row.
- Select the current status control.
- Choose the appropriate available status. In the mode shown in the video, choose Present, Late, or Absent. The change saves immediately; there is no separate Save button.
- Wait for the roster to reload.
- Confirm that the row now shows the intended status.
If the status fails to save, the roster should return an error. Resolve the cause before attempting another status.
#Record attendance for several students
Bulk attendance is available only when your roster provides an attendance status control and Apply button. The Present / Late / Absent roster shown in the video uses individual status controls. Selecting checkboxes or opening More does not mark attendance. If no bulk attendance control appears, update each student individually. When a bulk control is available, review the selection carefully and follow these steps.
- Select the checkbox beside each student who should receive the same status.
- Confirm the Selected students count.
- Select the intended attendance status in the bulk control.
- Recheck the names and status.
- Select Apply once.
- Wait for the confirmation and roster reload.
- Review every changed row, including students below the initial screen area.
Warning: Bulk Apply can create separate downstream package, fee, payment, and notification activity for each selected student. Do not select the entire roster unless the same status is correct for everyone.
Warning: Bulk Apply sends a separate request for each selected student. If one request fails, some earlier requests can still have succeeded. Reload the roster and verify every selected row before retrying; never assume the whole batch rolled back.
#Print or export a roster
Each schedule provides Export CSV and Print Roster actions.
- Export CSV includes student identifiers and contact fields such as email and primary phone, in addition to roster status.
- Print Roster provides a simpler list with student name and status.
Warning: A roster contains personal information. Save, print, share, and dispose of it according to the studio's privacy policy. Check the destination before printing and do not leave a CSV in a shared download folder.
Use the class's Students page instead when you need the enrollment roster across the class rather than attendance for one scheduled date.
#What happens next
For a real status transition, current DSM Next source performs the attendance update and then can:
- run configured schedule-status notifications;
- recalculate the assigned purchase's usage;
- evaluate late-cancel or no-show fee rules and queue a scheduled charge;
- create the ledger charge when that scheduled charge is due; and
- then create a scheduled-payment instruction when that option, a payment system, and an eligible stored payment method are configured.
A scheduled payment is a future payment instruction. It is not proof that funds were collected.
Selecting the status already shown should not send a transition notification, but still confirm the displayed result rather than relying on repeated selections.
#Confirm it worked
- Reopen Day View for the same date.
- Find the same class and confirm each student's status.
- Review assigned purchase remaining quantity or usage when attendance affects a package.
- For Late Cancel or No Show, open the student's Ledger and Scheduled Payments to check whether the studio's rules created financial activity.
- Check message history or delivery logs when a status notification was expected.
- Confirm that no unselected student was changed in a bulk update.
#Correct an attendance mistake
- Record the original and intended statuses.
- Change the roster row to the intended status once.
- Confirm the row after it reloads.
- Review package usage, the ledger, scheduled payments, and message history.
- If a charge, credit, payment, or message needs correction, use the separately authorized finance or communication procedure. Do not keep toggling attendance to try to reverse it.
Important: A corrected attendance label and a corrected account are separate confirmations.
#Troubleshooting
#The student is missing
Confirm the date, class occurrence, and location. Then check the class's Students page and the student's linked schedules. An inactive or incomplete enrollment can appear on the class roster differently from the date roster.
#The status does not save
Wait for the current request to finish and read the error. Confirm attendance permission and that the schedule/student relationship still exists. Do not reload and repeat the change until you know whether the first request succeeded.
#Package usage looks wrong
Review the assigned purchase, attendance mode, and the studio's counted-status settings. The labels and counting rules depend on the selected attendance mode; do not infer package usage from a status label alone. Have an authorized account reviewer correct the purchase assignment or finance record rather than changing attendance to force a total.
#A late-cancel or no-show fee appeared
Compare the status transition with the studio's cancellation-fee settings, member category, allowance, and class exclusions. Changing the status again does not guarantee reversal of an existing charge or scheduled payment.
#A message was sent unexpectedly
Record the student, class, date, old status, new status, and time. Review the configured schedule-status trigger and message history before making another status change.
#Export contains more contact information than expected
Use Print Roster for the simpler name-and-status output. Secure or delete any downloaded CSV according to studio policy.
#Related articles
- Use Day Overview and instructor Teaching views
- Manage class charges and pricing overrides
- Manage class routines
- Manage class notes
- Manage student measurements from a class
- Manage class videos and video meetings
- Manage class prerequisites and student completion
- Choose message recipients and send safely
- Group Classes
- Archive and restore group classes
- Manage student enrollment
- Private lessons and calendar
- Account ledger
- Settings overview