Settings
Prepare the Online Client for launch
#Before you begin
- Decide which tasks a signed-out visitor should be able to complete and which tasks require sign-in.
- Create at least one fictional family or adult account and one intentionally ineligible student for testing.
- Prepare approved studio contact information, branding, registration policies, prices, payment choices, and agreement text.
- Use a payment-processor test environment when one is available. Otherwise, stop before submitting a payment.
- Assign one person to approve client-facing language and another to verify prices, fees, and payment behavior.
- Record the settings you change and the date you intend to launch.
Warning: Online Client changes can expose classes, family and student fields, prices, balances, purchases, payment choices, files, messages, and agreements. They can also allow a client to register, request a service, enter a checkout, or initiate a payment. Do not use a real client or a live payment method for launch testing.
Important: Online Client does not have one master launch switch in the current application. Visibility and actions are assembled from studio-wide settings, individual feature settings, seasons, classes, Sales Items, Pages, payment processors, permissions, dates, and the signed-in client's eligibility.
#Build a launch worksheet
Write down the intended result before changing settings. A simple worksheet prevents a visible menu from being mistaken for a completed workflow.
| Area | Decision to record | Where to configure or verify it |
|---|---|---|
| Studio identity | Name, contact information, logo, colors, and home-page text | Settings > Global Settings, Branding & Logos, and Pages |
| Account access | Whether clients can create accounts, recover passwords, and add related students | Settings > Online Client and the registration field settings shown for the studio |
| Class discovery | Seasons and classes that a visitor or signed-in client can see | Settings > Seasons, Group Classes, and the Online Client calendar/list |
| Registration | Who can register, when enrollment opens, prices, capacity, waitlists, and required information | Season, class, schedule, category, Sales Item, and Online Client settings |
| Commerce | Whether Buy Items, Packages, Cart, and checkout choices appear | Settings > Online Client, Sales Items, and Payment Processors |
| Finance | Whether clients can see a ledger, save card or ACH methods, pay, or review scheduled payments | Online Client and payment-processor settings; test with a fictional account |
| Content | Home text, announcements, videos, messages, files, contact information, and polls | Pages, Announcements, Videos, Messaging, and conditional integrations |
| Agreements | Registration, guardian, student, checkout, class, and Sales Item agreements | Settings > Pages, then the related class or Sales Item when required |
| Specialty scheduling | Private lessons, private events, room booking, or video meetings | The feature's settings, required records, and a complete Online Client test |
#1. Open the studio's Online Client
- In the admin sidebar, select Online Client Login. It opens the current studio's client area in a new tab.
- Save the resulting studio-specific link in the launch worksheet.
- Open the same link in a private browser window to see the signed-out experience.
- Keep a separate normal window signed in as the fictional client.
An administrator can also open a family or student record and use Action > Login As Client when that action is available. The client area shows an impersonation notice during that session.
Important: Impersonation is useful for visibility checks, but it is not a substitute for a normal client login when testing account creation, password recovery, email confirmation, or other authentication behavior.
#2. Review account creation and sign-in
Open Settings > Online Client. This opens the shared searchable settings screen with the Online Client tab selected. The fields and categories come from the studio's settings table, so another studio may show a different inventory.
Use the search box to locate the current on-screen descriptions and IDs for these decisions:
- client account registration, including
OC_MEMBERS_REGISTRATIONwhen present; - password recovery, including
OC_PASSWORD_RECOVERY_BY_EMAILwhen present; - required email confirmation;
- family, adult, or combined account mode;
- guardian, related-student, phone, address, birthday, gender, medical, location, referral, and custom fields; and
- CAPTCHA and social-login options, when the studio intends to use them.
Change only settings that are part of the approved launch plan, then select Save changes.
Important: Enabling a social login, CAPTCHA, email confirmation, or password-recovery option does not create valid external credentials or a working delivery service. Test the complete result. Never place secret keys, tokens, or passwords in a screenshot or launch worksheet.
Confirm account access with these cases:
- a completely new fictional email address;
- an email that already belongs to a fictional account;
- a guardian adding a related fictional student, when enabled;
- a valid sign-in and sign-out; and
- password recovery without changing a real client's credentials.
#3. Choose the client navigation deliberately
The current Online Client menu can include the following conditional areas:
- Announcements;
- Videos;
- Polls;
- Class By Programs;
- Packages;
- Buy Items;
- Cart;
- Messages;
- Room Booking;
- Private Events or Private Lessons;
- Video Meeting;
- Files;
- Contact Us; and
- My Account or finance-related destinations.
The studio can also customize some section titles. Search Settings > Online Client by the visible description or by an ID beginning with OC_.
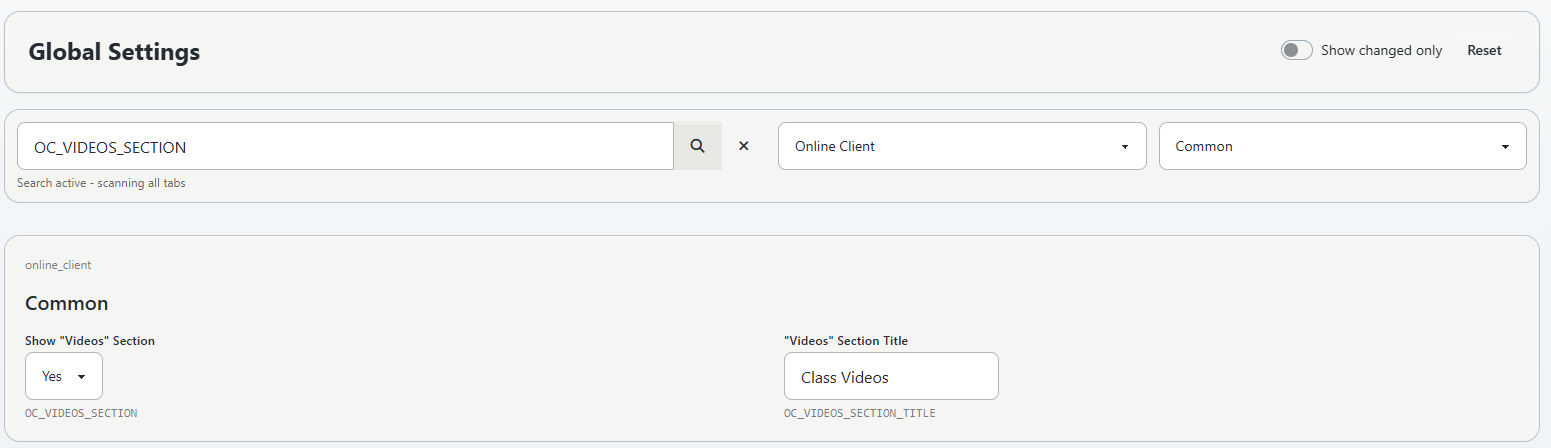
Start with the smallest menu that supports the launch. Enable another section only after its page, data, permissions, empty state, and primary action have been tested.
Important: A menu flag is only one layer. Polls, Files, private scheduling, room booking, payments, and other integrations have additional prerequisites. A menu item that is absent may reflect a disabled setting, missing credentials, missing source data, or another feature rule.
#4. Prepare classes and registration
For each season you intend to publish:
- Review Settings > Seasons for dates, enrollment start, status, Block Registrations, Visible for Client, fees, and waitlist behavior.
- Review each class's identity, schedule, capacity, student eligibility, pricing method, and Online Client Registration value.
- Confirm the class schedule occurs in the intended season and date range.
- Open the class as a signed-out visitor when public discovery is intended.
- Sign in as an eligible fictional client and confirm the expected action and price.
- Repeat the check with an intentionally ineligible fictional student.
Warning: Seeing a class does not prove that registration will succeed, and seeing a registration action does not prove that checkout totals are correct. Review the complete cart before opening enrollment.
#5. Prepare purchases, cart, and payments
Use Settings > Online Client, Settings > Sales Items, and Settings > Payment Processors together.
Confirm the intended behavior for:
- Buy Items, Packages, and Cart visibility;
- anonymous browsing or cart use, if allowed;
- item status, client visibility, active dates, price, tax, inventory, and purchase restrictions;
- class-registration prices and required Sales Items;
- card, ACH, pay-in-studio, PayPal, gift card, credit, coupon, and voucher choices that the studio actually supports;
- convenience fees and processor-specific fees;
- payment plans and scheduled payments; and
- receipts and studio/client notifications.
Warning: Turning on a payment method in Online Client settings does not prove that the processor is configured, that credentials are valid, or that settlement will occur. Use the processor's approved test method and reconcile the resulting order, charge, payment, receipt, and processor record before accepting live payments.
Warning: A scheduled payment is a future instruction. Its presence does not mean money was collected.
#6. Prepare client-facing pages and agreements
- Open Settings > Pages.
- Review active home-page and Buy Items text for outdated dates, links, pricing, and policies.
- Review Account, Guardian, Student, Checkout, class, and Sales Item agreements with the appropriate legal or policy owner.
- Test checkbox-only and signature-required behavior with fictional accounts.
- Confirm where completed waiver files and pending requirements appear.
Warning: Saving a new active agreement can make it available to client workflows immediately. Editing an existing Page does not reliably require clients who signed that Page ID to sign again. Plan agreement version changes carefully.
#7. Review branding, contact, and communication
- Open Settings > Branding & Logos and preview the Online Client colors, logo, link, and height.
- Check the signed-out and signed-in header at desktop and mobile widths.
- Confirm the studio name, address, phone, email, website, time zone, date format, and time format in Global Settings.
- Review Contact Us visibility and its destination before enabling it.
- Review active announcements, videos, messages, and files for real personal data, expired links, or test content.
- Verify all automated email or SMS choices separately. Do not send a launch test to a real client list.
#8. Run the launch test matrix
Test at least these roles and states:
| Test account or state | What to confirm |
|---|---|
| Signed-out visitor | Branding, public navigation, home content, classes or items intended for public viewing, sign-in, and account creation. |
| New fictional client | Registration fields, duplicate-account handling, agreements, email confirmation, first sign-in, and empty states. |
| Existing fictional family | Related students, classes, ledger, purchases, waivers, messages, and conditional scheduling features. |
| Eligible fictional student | Expected class action, price, cart line, fee, agreement, and checkout path. |
| Ineligible fictional student | Clear unavailable or ineligible result without exposing an unintended workaround. |
| Staff impersonation | What support staff will see while assisting a client, including the impersonation notice. |
| Mobile viewport | Navigation, forms, dialogs, cart summary, agreements, and buttons at approximately 390 by 844 pixels. |
For a commerce launch, add one approved processor test that reaches the expected confirmation without using real funds.
#9. Open access in a controlled sequence
- Save screenshots or notes of the approved settings and test results.
- Open one season, class group, Sales Item category, or client feature first.
- Recheck the signed-out and signed-in experiences after saving.
- Monitor registrations, carts, payments, waiver requirements, messages, and support questions.
- Expand access only after the first controlled group produces the expected records.
Avoid changing registration, pricing, payment, agreement, and messaging behavior at the same moment. A staged launch makes an unexpected result easier to trace.
#What happens next
Saved Global and Online Client settings can refresh cached branding, client-home, and feature-flag data. The client menu and home tiles are then rebuilt from the saved studio settings and the current account state.
Season, class, Sales Item, Page, room, and integration records continue to apply their own rules. Saving the Online Client settings page does not create those records, open a season, make a class eligible, configure a payment processor, or validate an external service.
#Confirm the launch is ready
Do not mark the launch ready until all of the following are true:
- the studio-specific Online Client URL works in a signed-out private window;
- only approved public content and navigation are visible;
- a fictional client can create or access the intended account type;
- an eligible and an ineligible registration case both behave as planned;
- every visible price and fee matches the approved worksheet;
- checkout offers only working, approved payment choices;
- required agreements appear for the correct person and context;
- completed actions create the expected admin-side records;
- no real personal information, test clutter, credentials, or unfinished feature is exposed; and
- desktop and mobile checks pass.
#Troubleshooting
#A menu item does not appear
Search Settings > Online Client for the related feature setting, then check its additional prerequisites. For example, Polls requires both Online Client poll visibility and member-poll support; Files requires its integration settings; private scheduling and room booking require their own records and feature settings.
#A class appears but cannot be registered
Review season visibility and enrollment dates, registration blocking, class Online Client Registration, schedule dates, capacity, waitlist settings, student eligibility, pricing, and cart availability.
#Account creation is missing
Review the current studio's account-registration setting and the signed-out page. If registration is intentionally closed, existing accounts can still have a sign-in path. If registration should be open, also test required fields, duplicate handling, CAPTCHA, and confirmation delivery.
#A payment choice appears but cannot complete
Stop testing with live funds. Check the Online Client payment flag, Payment Processors, credentials, allowed method, required billing fields, processor safety mode, and the exact response. A visible button is not proof of a working processor.
#Clients see old content or navigation
Reload the Online Client in a new private window and confirm the setting saved for the correct studio. Then check dates, status, account state, and any secondary feature flag. Record the exact URL, role, and field ID if the result remains inconsistent.
#Related articles
- Configure, collect, and reconcile Referral Sources
- Create, use, and retire studio locations safely
- Settings overview
- Find and change Global Settings safely
- Create and publish a season
- Create pages, agreements, waivers, and contracts
- Create a group class
- Sales, purchases, and inventory
- Online Client navigation and account menu
- Create an Online Client account
- Confirm email and Create Password access
- Manage class videos and video meetings
- Find and register for classes
- Online Client checkout