Settings
Create and control Scheduled Triggers
Warning: The current Add trigger form opens with Status set to Enabled. An enabled trigger can send messages when its event or schedule is due and the studio's scheduler, queue, delivery service, and safety controls allow execution. Switch Status to Disabled before saving unless the automation has completed approval and is intended to go live.
Warning: Enabling an existing row with the Enabled toggle is a live operational change. It does not open a confirmation dialog. Review the trigger first, then enable it only during an approved monitoring window.
This 50-second overview introduces the setup screen. Follow the testing and enablement steps below before running an automation.
#Scheduled Triggers and Scheduled Messages are different
| Destination | Current purpose |
|---|---|
| Settings > Scheduled Triggers | Event- or date-driven automation that references reusable Email or SMS templates. It can be enabled and processed by scheduler or event paths. |
| Messaging > Scheduled Messages | A reserved remote-API screen. The current page does not create or manage a schedule. |
| Messaging > Message Templates | Where reusable Email and SMS content is created and maintained before it is selected by a trigger. |
Do not send a user to Messaging > Scheduled Messages to create a Scheduled Trigger. Do not substitute a Scheduled Trigger when the intended feature is a one-time scheduled campaign.
#Before you begin
- Name one specific event and one communication outcome.
- Create a fictional recipient who can safely meet the trigger condition.
- Prepare an approved internal email address or SMS test destination.
- Decide whether the audience is All Members or a narrower member filter, member category, or class group.
- Confirm whether the trigger runs before or after its event and how Delay should be interpreted.
- Decide whether Activation Date and Expiration Date are required.
- Review the template's subject, body, merge fields, links, and channel.
- Identify who will monitor history, delivery status, bounces, replies, and opt-out obligations.
- Confirm an authorized technical or support owner has approved scheduler, queue, studio safety, and provider readiness.
Important: A trigger label in the dropdown proves that the option can be configured. It does not prove that every studio schema, event source, filter, merge field, or delivery channel has completed runtime verification. Validate each trigger type separately.
Warning: CC can copy private client information to every entered address. Use only approved internal recipients, remove the CC after testing when policy requires it, and never use a broad distribution list as an informal audit log.
#Create the template first
- Select Messaging > Message Templates.
- Create or edit an Email or SMS template.
- Use a clear internal category and client-facing subject when the channel supports a subject.
- In Template Settings, turn on Template so the record appears in template lists.
- Select Save Template.
- Test the rendered content with fictional data through the approved messaging test path.
- Confirm the template is active and appears in the template list.
Only active reusable templates are loaded into the current Scheduled Triggers form. An ordinary saved message that is not marked as a template can be absent.
Important: The trigger references the saved template. Editing that template can change the content of future trigger messages. Re-review every linked trigger after a template change.
#Create a disabled trigger
- Select Settings > Scheduled Triggers.
- Select Add New.
- Immediately change Status from Enabled to Disabled.
- Under Trigger, select the approved event.
- For email, optionally filter by All Categories, then choose the Email template.
- For SMS, choose the SMS template.
- If both templates are intentionally selected, plan to test the Email and SMS channels separately.
- Under Member filter, leave All Members only when that broad audience is approved; otherwise select the intended filter.
- Use Member Categories and Classes to narrow the audience when the trigger type supports those facets.
- Enter Delay and choose minutes, hours, or days.
- Enter an internal Description that states the purpose and owner.
- Enter approved comma-separated addresses under CC only when required for the controlled test.
- Set Activation Date and Expiration Date when the automation should be limited to a date window.
- Complete any trigger-specific fields that appear.
- Confirm Status still says Disabled.
- Select Save.
- Confirm the row appears with Enabled set to No.
At least one Email template or SMS template is required. The current form also supports selecting both on one row and displays the channel as EMAIL/SMS.
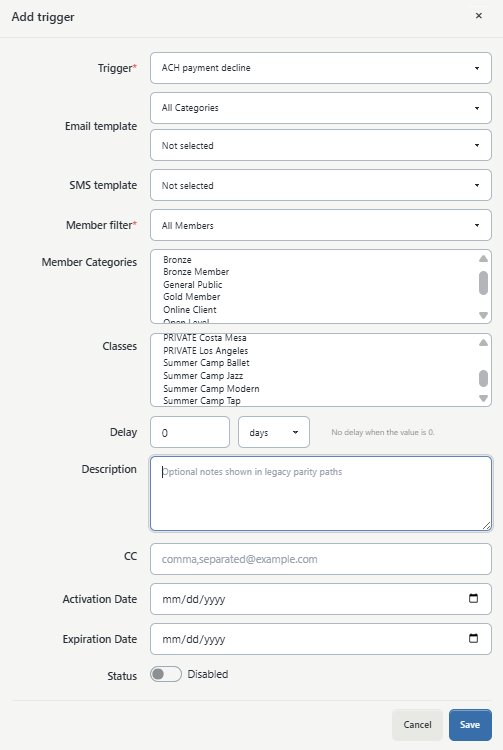
#Understand the controls
| Control | How to review it |
|---|---|
| Trigger | The event or scheduled condition. Available choices can come from the studio's trigger data and application configuration. |
| Email template | An active reusable email template. All Categories filters this list; it is not an audience filter. |
| SMS template | An active reusable SMS template. SMS requires a separately configured provider and compliant recipient data. |
| Member filter | The broad audience definition. A blank selection displays as All Members. |
| Member Categories | Optional member-category facets. Verify the chosen trigger path actually applies them as intended. |
| Classes | Optional class facets. Verify whether the trigger uses class type, registration, attendance, or another class relationship. |
| Delay | A non-negative value in minutes, hours, or days. The screen says No delay when the value is 0. The trigger determines whether the delay is before or after its event. |
| Description | Internal notes used to identify the automation. Do not put secrets or unnecessary client data here. |
| CC | Optional comma-separated email recipients. It applies only to email delivery. |
| Activation Date | The first date on which the trigger can be eligible in supported paths. |
| Expiration Date | The last configured date boundary. It must not be earlier than Activation Date. |
| Trigger-specific fields | Additional settings loaded for the selected trigger and studio schema. Their meaning must be verified for that trigger. |
| Status | Enabled makes the saved row eligible for processing; Disabled keeps it out of normal enabled-trigger selection. |
Audience controls can combine. Do not assume that selecting a member category broadens the Member filter; use a fictional recipient who should pass every selected condition and another who should fail one of them.
#Review the saved row
The list shows Trigger, Filters, Templates, Channel, CC, Delay, and Enabled.
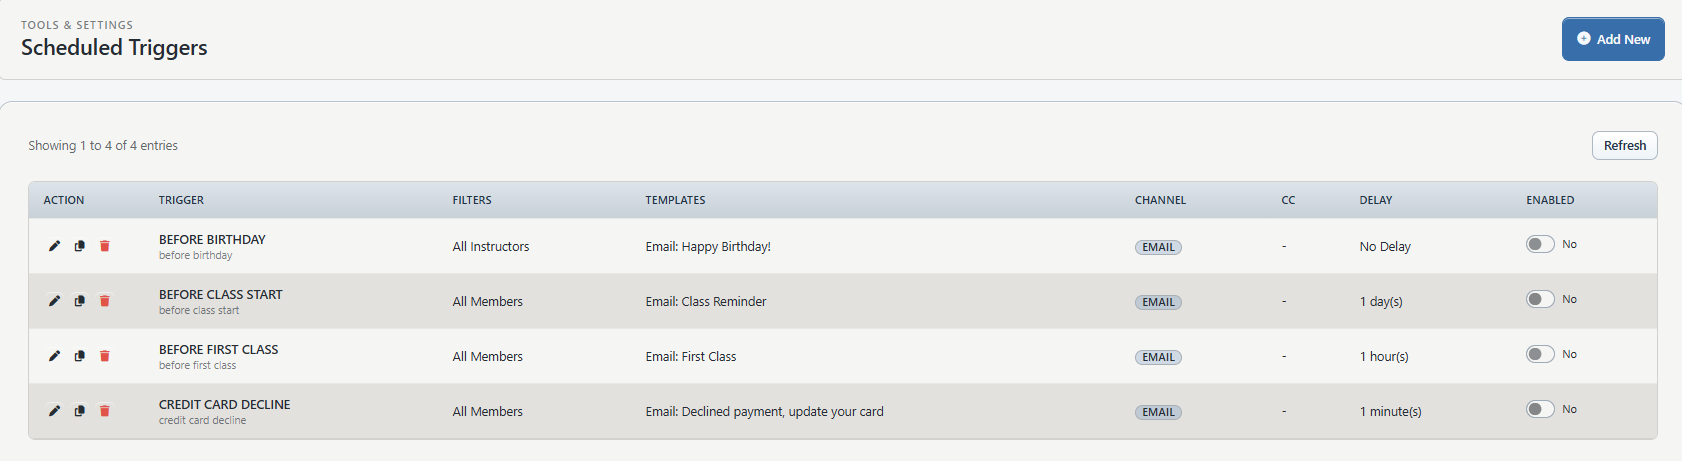
Before enabling, select the edit action and confirm:
- the exact trigger code and label;
- the Email and SMS template selections;
- the complete audience filter, member categories, and classes;
- delay value and unit;
- activation and expiration dates;
- trigger-specific settings;
- CC recipients; and
- Status is Disabled during testing.
Then open each linked template in Messaging > Message Templates and review the current content. The list's template name is not a content preview.
#Test before enabling
The Scheduled Triggers settings page does not provide a complete audience preview or send-test button for the configured trigger.
Use this controlled process:
- Keep the trigger disabled.
- Test the message template separately with fictional merge data.
- Configure the narrowest fictional audience and date window that can exercise the condition.
- Have an authorized technical or support owner confirm the studio's scheduler, queue, safety controls, provider mode, and dry-run or controlled execution plan.
- Document the expected recipient, channel, trigger time, template, and merge-field values.
- Enable only during the approved monitoring window.
- Create or reach the fictional event once.
- Monitor message history and the approved test destination.
- Disable the trigger immediately after the controlled observation when it is not yet approved for ongoing use.
- Compare the actual recipient, content, channel, and timing with the worksheet.
Warning: Disabling a trigger cannot recall a message that was already queued, submitted, or delivered. If an unexpected send occurs, follow the studio's communication-incident process in addition to disabling the trigger.
#Enable an approved trigger
- Confirm the template and audience have current human approval.
- Confirm the date window and delay against the current date and studio time zone.
- Confirm scheduler, queue, provider, and studio safety readiness with the technical owner.
- Open Settings > Scheduled Triggers.
- Select the edit action and complete one final review.
- Set Status to Enabled and select Save, or use the row's Enabled toggle after the same review.
- Confirm the list shows Yes.
- Monitor the first expected event or scheduled run.
- Review local message history and provider evidence for the selected channel.
An Enabled: Yes state confirms only the saved flag. Delivery can still be blocked by an ineligible event, filter, missing recipient data, unusable SMTP or SMS configuration, a stopped scheduler or queue, a studio safety lock, provider rejection, or unsupported trigger behavior.
#Duplicate or delete a trigger
Use the copy action when you need a similar starting point. The current Duplicate trigger action copies the trigger and its compatible trigger-specific settings, gives it a copy name, and saves the duplicate disabled.
- Select Duplicate trigger.
- Wait for the list to refresh.
- Open the copied row.
- Review every field and linked template.
- Keep it disabled until it completes its own test and approval.
Warning: Delete trigger permanently removes the trigger row and its compatible trigger-specific settings. This page does not provide an archive or restore list. Record the configuration before deletion and confirm the correct row in the browser prompt.
Deleting the trigger does not delete the linked message template or recall messages already sent.
#What happens next
An enabled trigger can be evaluated in one of two broad ways:
- scheduled runners evaluate time- or date-based conditions; and
- event-driven services evaluate conditions when an applicable status or payment event occurs.
When a supported condition and audience match, the software can prepare Email, SMS, or both using the linked template. Delivery still depends on the selected provider, valid recipient data, queue processing, and studio safety controls.
Email delivery attempts can be recorded in message history. Provider acceptance does not prove inbox placement or that the client read the message. SMS has its own provider status and consent obligations.
#Confirm it worked
For a controlled trigger test, confirm:
- the row was enabled only for the intended window;
- exactly the expected fictional recipient qualified;
- the event and delay produced the expected time;
- the correct Email or SMS template rendered;
- merge fields, links, and contact details are correct;
- CC went only to approved recipients;
- local message history contains the expected status when available;
- provider evidence agrees with the local result; and
- the ineligible fictional recipient did not receive the message.
For ongoing automation, review the first several expected runs and establish a recurring audit for audience, template, bounce/failure, and opt-out changes.
#Troubleshooting
#No message templates are found
Create an active reusable Email or SMS template under Messaging > Message Templates. Confirm its type, reusable-template state, and active status, then reload Scheduled Triggers.
#No trigger choices are found
The studio's trigger definitions and configured fallback list may be unavailable. Record the message shown on the page and ask an administrator or support contact to verify the studio's trigger data. Do not invent a trigger code.
#Save asks for an Email or SMS Template
Select at least one active template. Choosing All Categories filters email choices; it does not select a template.
#The expiration date is rejected
Set Expiration Date on or after Activation Date. Then confirm the intended time-zone boundary with the communications owner.
#The trigger is enabled but no message was sent
Check the event, audience filters, class/category relationships, delay, date window, recipient address or phone, template status, scheduler, queue, studio safety controls, and provider readiness. An enabled row is not delivery proof.
#The wrong person received the message
Disable the trigger, preserve the evidence, and review Member filter, Member Categories, Classes, event data, and the recipient's current profile. Do not delete history before the incident is understood.
#A message was sent twice
Disable the trigger if another send could occur. Check for duplicate enabled rows, dual Email/SMS selection, repeated source events, delay windows, queue retries, and message-history suppression behavior. Record both provider IDs without exposing recipient details.
#A template change did not look right in the next message
Open the exact linked template from the trigger, confirm its type and active reusable-template state, and test its current merge data. A similarly named template can be selected by mistake.
#The Enabled toggle reports an error
Reload the list and confirm the stored state before toggling again. Do not assume the optimistic on-screen change was saved when the error appears.
#A deleted trigger is needed again
Recreate it from the recorded configuration and repeat testing and approval. There is no restore action on this page.